Adriano Vieira Petrich, Hervé Poulain, Tristan Cavelier, Pavel Baranchuk, Jacques Honoré, Jingjing XU, Danièle Willaert, Rafael Monnerat, Vincent Desmares, Xavier Hardy, Sébastien Robin, Minashe Selvam, Nicolas Dumazet, Titouan Soulard |
Create Workflow
How To Create A New Workflow
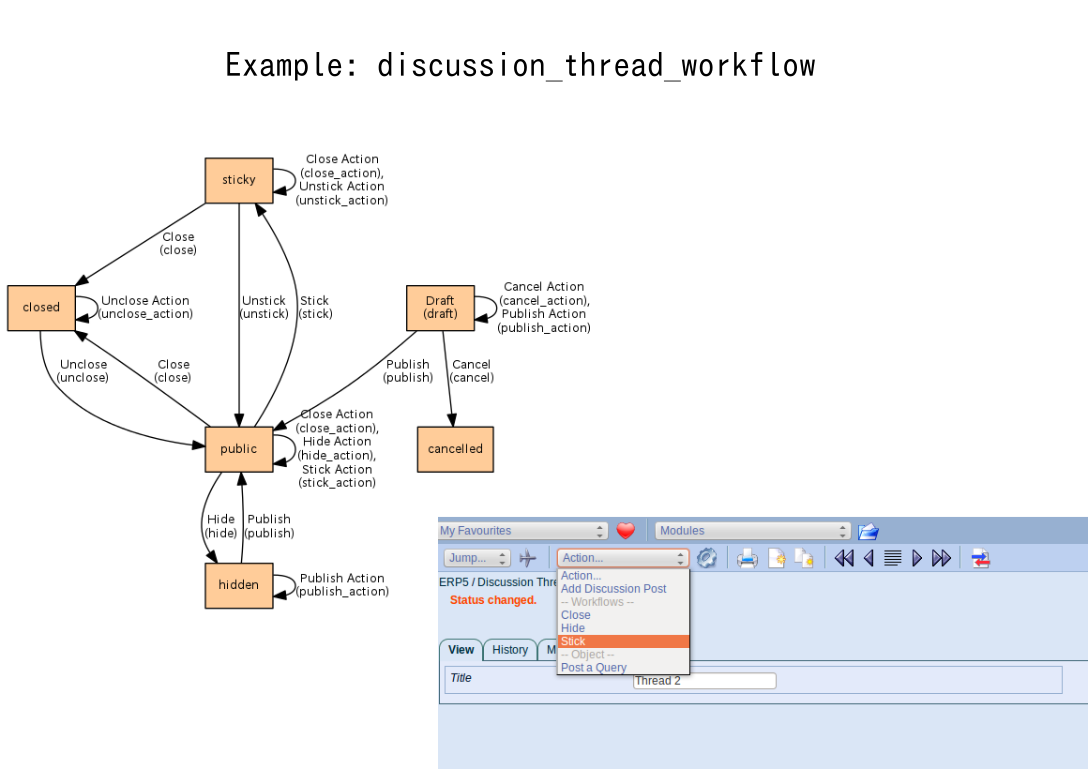
This tutorial explains how to design and implement workflows into ERP5. We will design the workflow to associate with a Discussion Thread and a Discussion Post in our Discussion Threads module.
Agenda
- How to design a workflow
- How to implement workflows on ERP5 documents
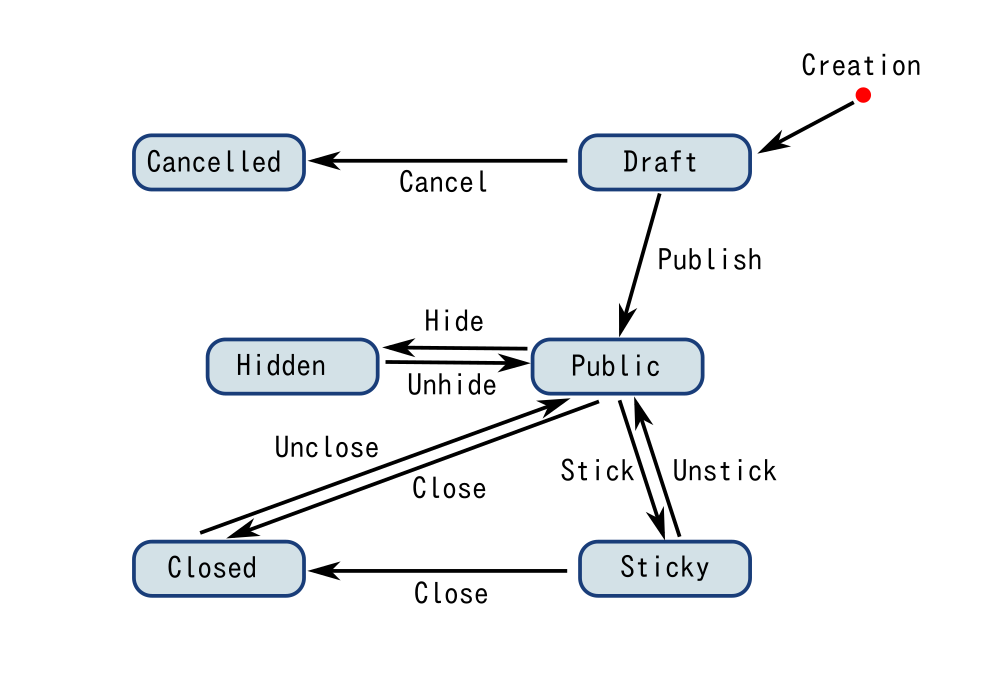
A basic forum workflow diagram
Workflows are used to implement user interaction - validating objects, ordering, planning and confirming orders, etc. If you want to learn more:
HowToUseAndDefineInteractionWorkflows
The first thing to do when you want to implement a workflow on any ERP5 document is to design it. By designing it, you are making the goal of your development very clear, for yourself and for the community, to which you will be able to show how your module works.
A workflow is made of states and transitions. States are the status of your documents. Transitions are the possible actions you can take to change the state of your documents. As you can see on the diagram, transitions are unilateral.
This diagram explains how our Threads in the Discussion Threads Forum will work. When a user create a Thread, it will be put in Draft state. When he finishes editing it, he will be able to Published it. It will then be viewable by all the community. If the Thread is very interesting and pertinent it can be put on Sticky by an administrator. If one user creates a Thread but hide it, the user can still see his Thread and can reply but another user cannot see it. If it is useless or outdated an administrator will be able to Close it. We leave the possibility to re-open a Thread if an administrator makes a mistake. He will then use the Unclose action.
Create a workflow
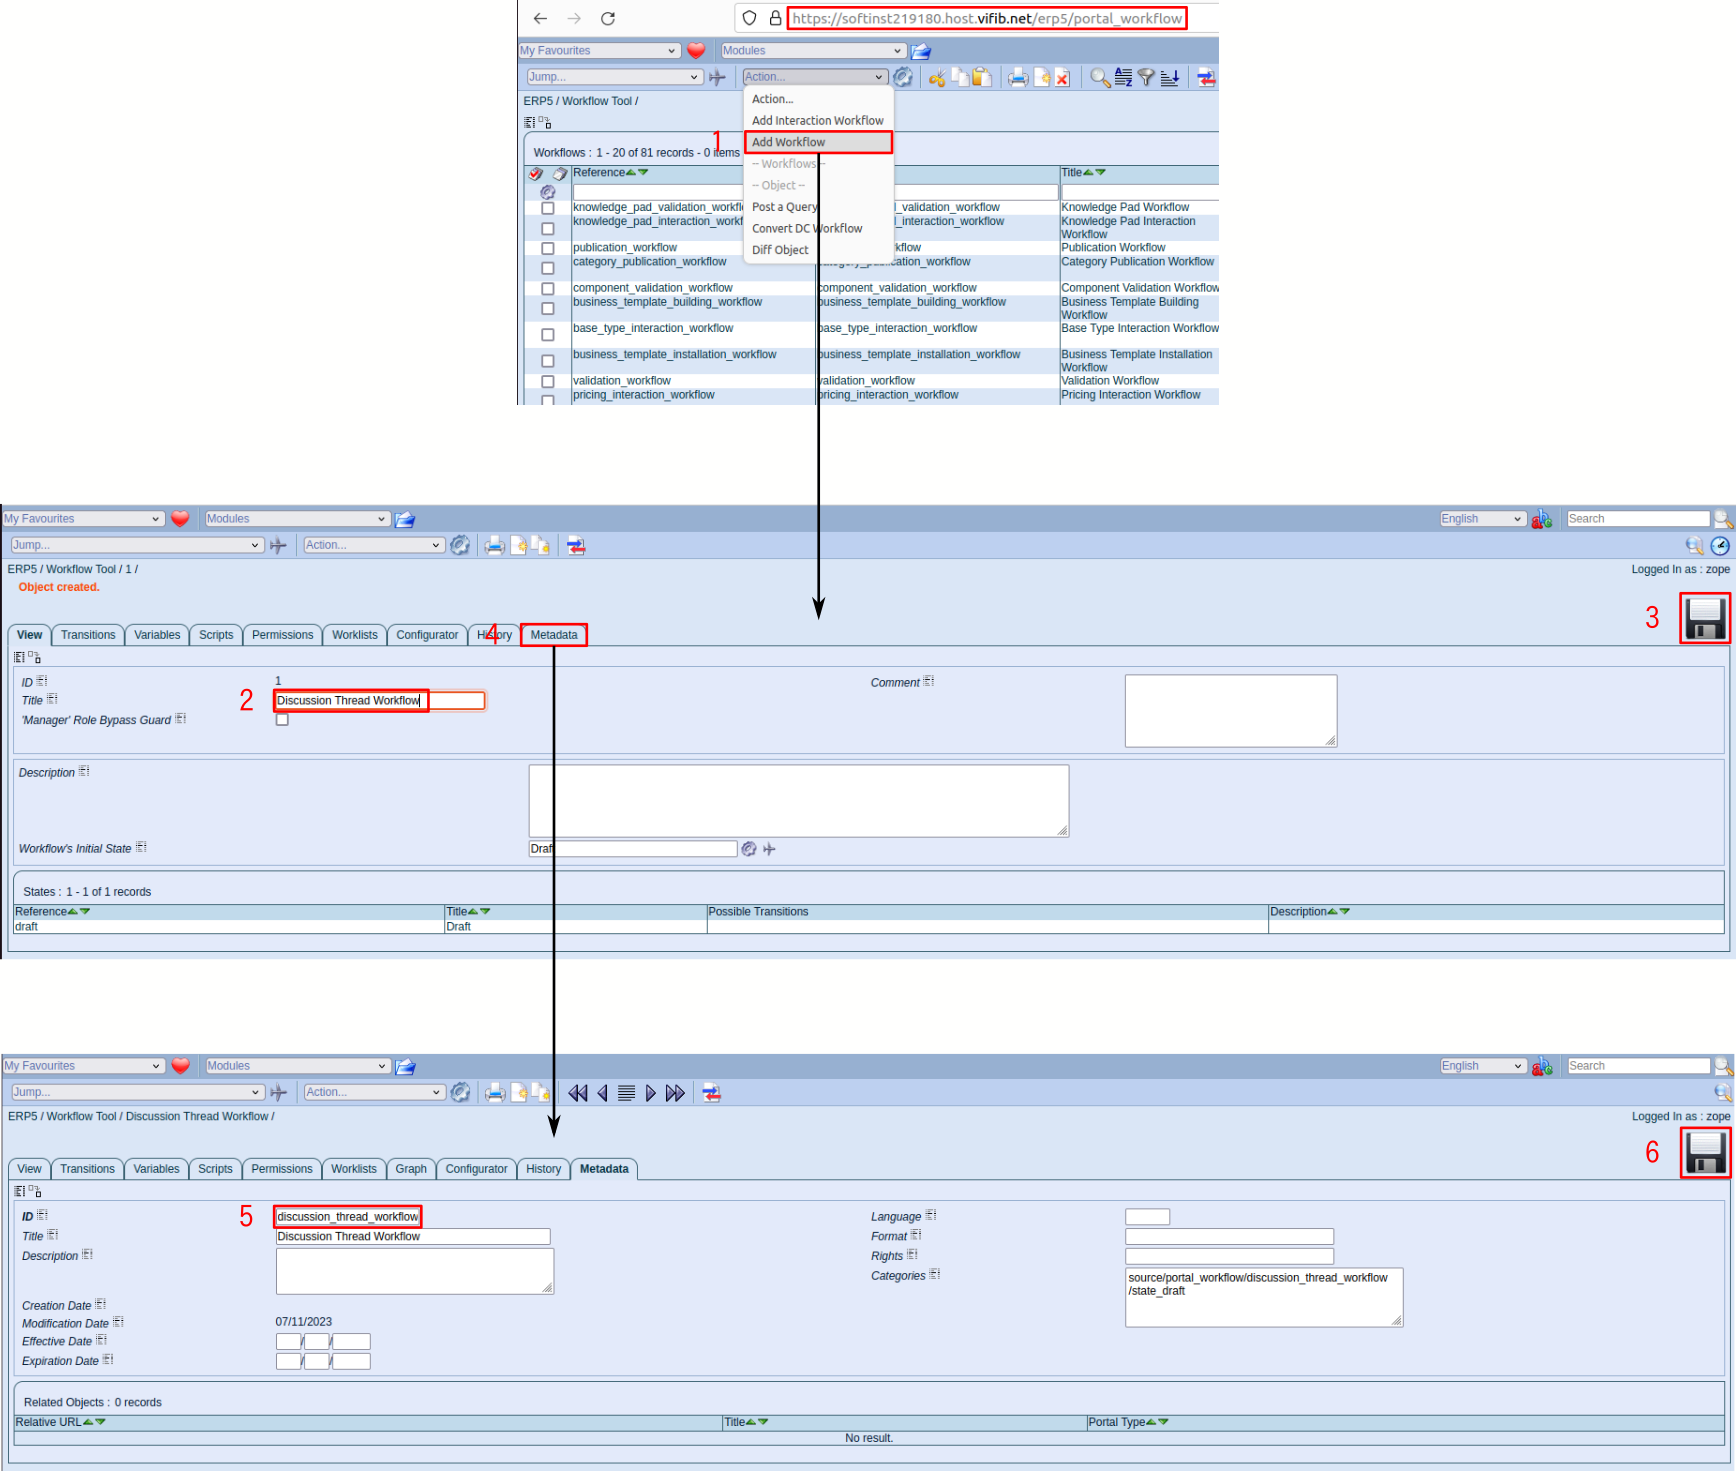
All workflows can be managed using the Workflow Portal. Therefore for this part we will mainly work in INSTANCE_ID/erp5/portal_workflow page.
This tool will help you to create, customize and use your workflows in ERP5. When you access it, you see the list of all workflows being used in your instance.
In order to create a new workflow, click on “Add Workflow” in the Action menu of the portal. This will lead you to a page where you can edit the workflow; edit the title for “Discussion Thread Workflow” and save.
We then want to change the identifier of the workflow, which will by default be a number. This cannot be done on the default view because of the potential side-effects of this change.
Open the “Metadata” tab, where you will be able to change the workflow identifier to “discussion_thread_workflow”. When naming your workflow, you should be careful and follow the convention “name_of_the_type_workflow”.
Create a state
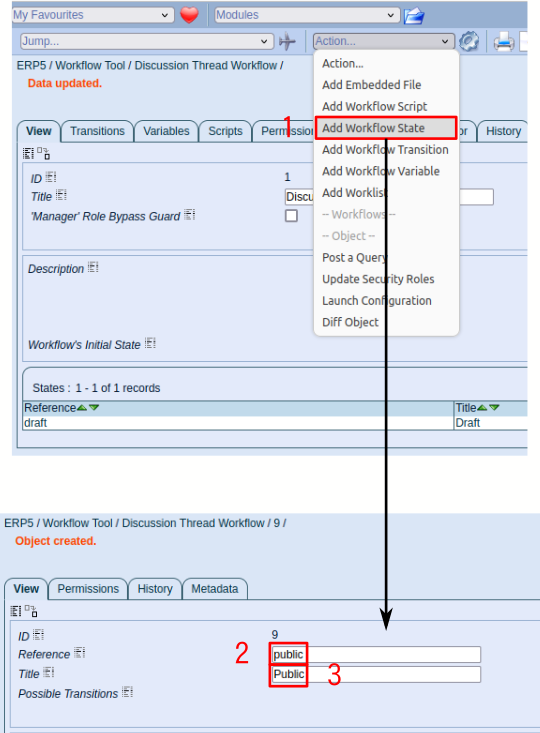
We will now create the states in our workflow. Go into your workflow by clicking on “discussion_thread_workflow” in the workflow portal.
If you look at the list of states on the bottom of the page, you can see that a Draft state has already been created. This is the default state used when a document is created in ERP5. You can now add the five other states: public, sticky, closed, hidden and cancelled.
To create a new state, choose “Add Workflow State” in the action menu. Then fill in the required information: reference and title of the state, and click on the save icon. Note that the identifier is automatically updated.
Once the five states are available, we can start creating transitions in our workflow.
Create a transition
For each transition in our workflow, we will create two transitions in the system. Following the naming conventions, all transition names have to be in lower case.
The first transition is a logic transaction, for instance the “publish” transition. This action will contain all the internal ERP5 logic used when calling this transition. It can be directly called by some scripts in the system.
The second transition is a user transition, for example “publish_action”, which corresponds to the action which will be displayed in the user interface and which will be called only when the user clicks on it. It will then call the first transition.
Security restriction can be set up on the user action, whereas the other action can only be called by a script.
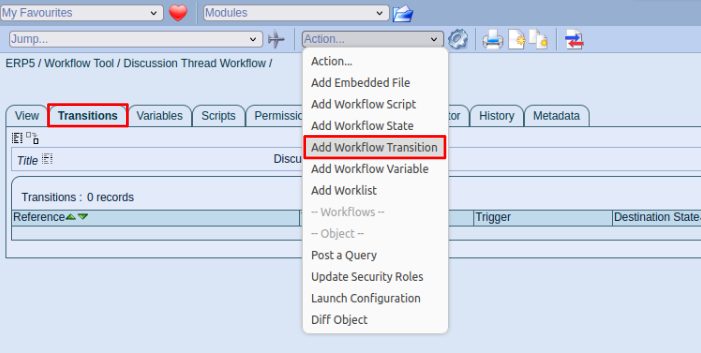
Creating transitions is easy. Go on the Transitions tab of the discussion_thread_workflow, where all the transitions are listed, and call the “Add Workflow Transition” action.
Logic transition
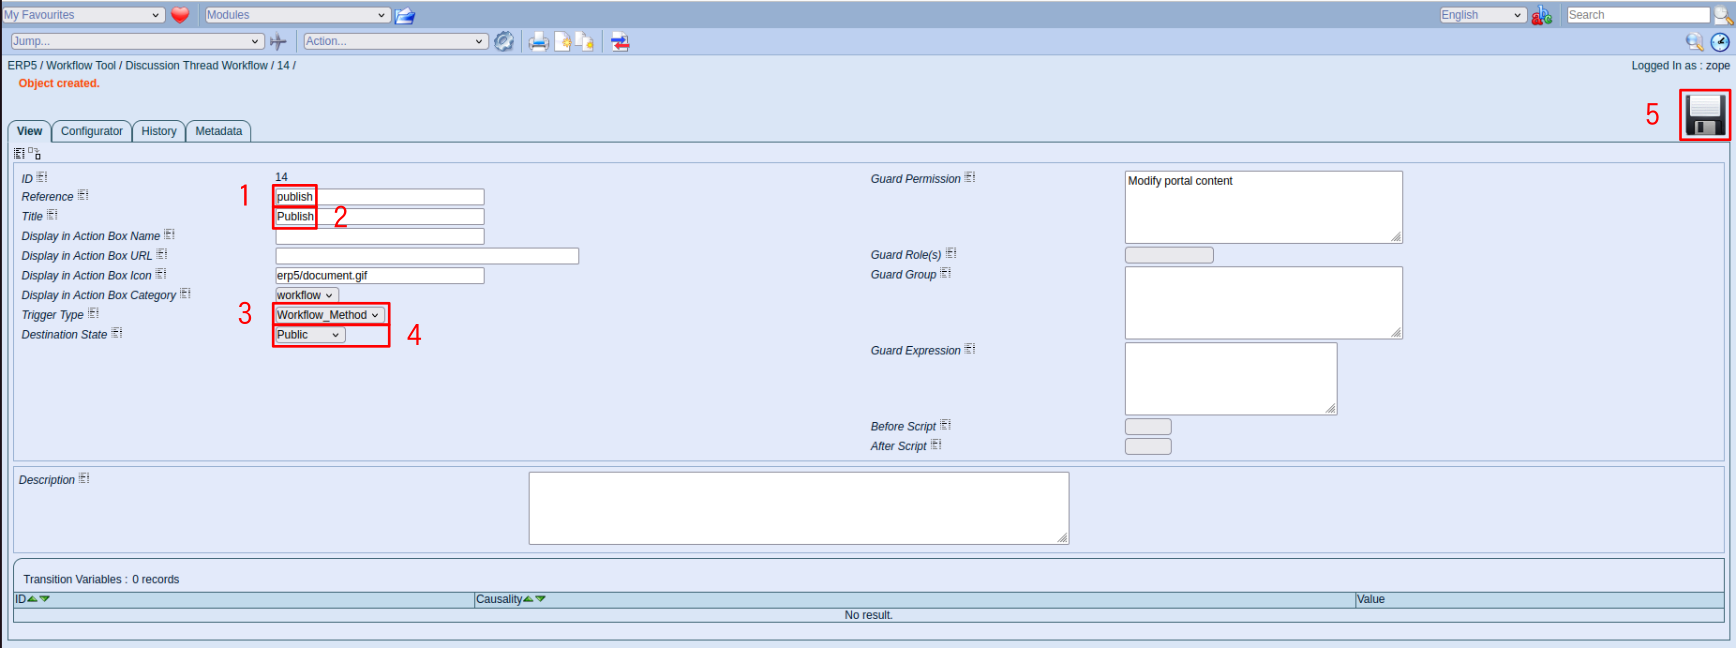
We will start by configuring the logical transition “publish”. On the newly opened page, add a reference and title for the transition and select the trigger type and destination state as explained below.
A workflow can be triggered by three types of events. The “Automatic” type is when the workflow will have its launch condition set in TALES (scenario correspond too, tales is the word use in ERP5). The “User_Action” type is for transitions meant to be called from the action menu (yes, that one, the one we use every time!) and the “Workflow_Method” means that only workflow methods will call this transition. In our case it can only be called from another method so you must select the “Workflow_Method” trigger type.
In the Destination State field, you should put the state in which the object is expected to be after the transition being triggered. Here, the publish workflow should change the workflow state to public, so you must select public in the Destination State drop down menu.
Don't forget to save your changes by using the icon on the top right corner before navigating to a new page.
User transition
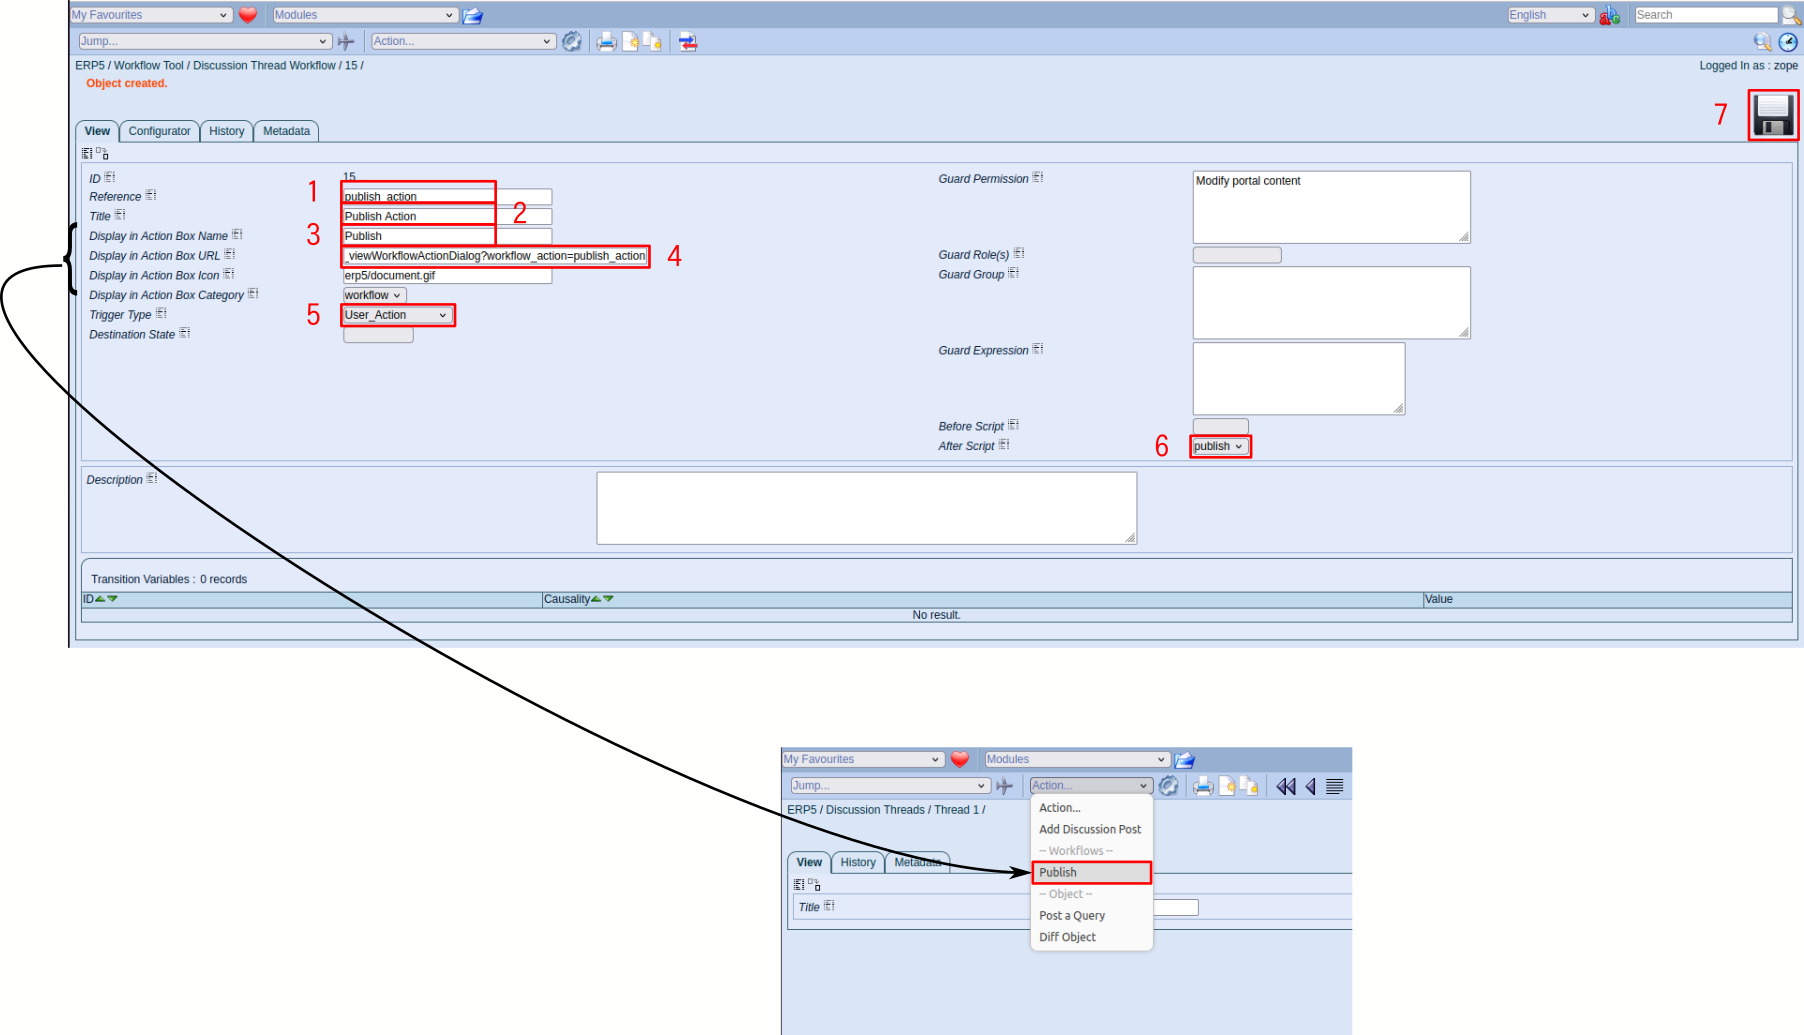
Next we should configure the user transition “publish_action”. First, don't forget to fill the Title.
Then, we will choose here the second trigger type “Initiated by user action”, so that user can invoke this transition from the interface.
In “After Script” property, you must select a logic transition to invoke, here “publish”, so that the workflow will allow user to publish a document. Usually, an “User_Action” transition invokes a “Workflow_Method” transition in "Script (after)" in order to change the workflow state.
The “Workflow_Method" transition is always the one responsible for changing the workflow state, never the “User_Action” transition. As the invoked logic transition “publish” will automatically change the workflow state, you don't need to select anything in the Destination State drop down menu.
In order to show the publish action in the action menu of the user interface, and in addition to choosing the trigger type, you need to fill the “Display in actions box” values as listed below:
Name for the publish action: it will be displayed in the menu.
URL: it is used by the action, and must be set to:
%(content_url)s/Base_viewWorkflowActionDialog?workflow_action=publish_action
It calls the default workflow view dialogue on the page.
Category: it is used to put the action in a specific section of the action menu (section titles are displayed in grey).
We can define here when the action will be viewable. But we will wait until we associate it with a state to do it.
Associate transitions with a state

Now that we have created transitions, we will associate them with a state.
In our example, according to the global workflow, the Publish transition must be available when the document is in Draft state. So you must go back in the page for your workflow and click on the Draft state. You should now see all transitions available as shown above. It allows you to choose what kind of transitions are accessible for this state. Please select the check boxes of the "publish" and "publish_action" transitions.
After you associate the transition to a state, if the transition can be initiated by user action, it will appear in the "Action..." menu of every object which has this state.
Current states with transitions of your workflow
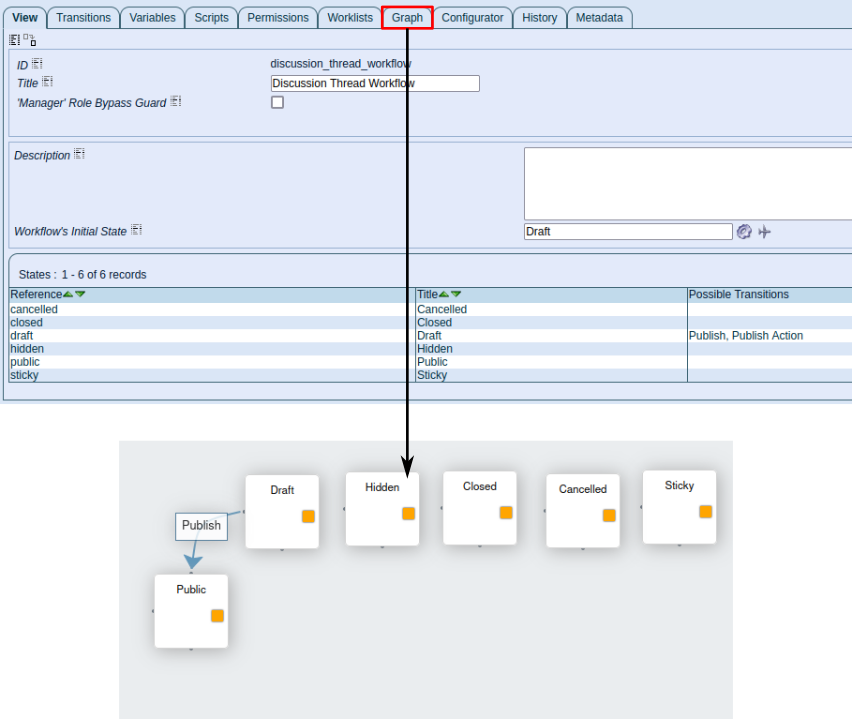
After all those manipulations, we can go back in “discussion_thread_workflow” in order to discover a very useful tab which is the “Graph” tab. If you click on it, you will see a graphic representation of the workflow you just configured.
In our example, you should have all the states defined and only one transition. Note that transitions without a destination state (and consequently our user transition) are not represented on the graph.
At this step, if you haven't got any error you can redo all the operation we made to create the remaining transitions such as cancel, stick, unstick, hide, close and unclose.
What you should have after
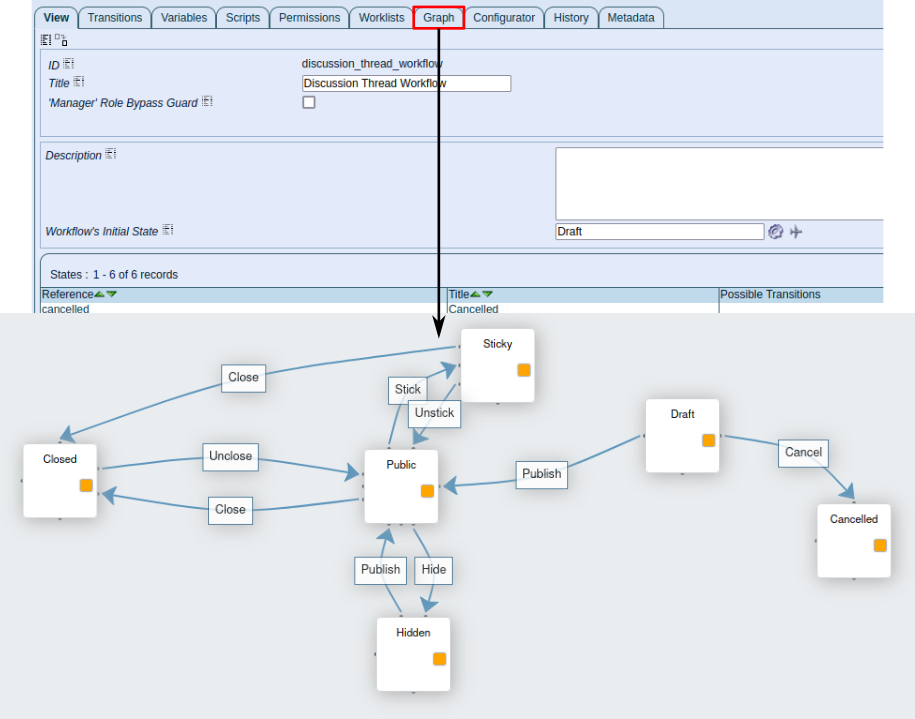
The above illustration is the result of the configuration of each state and its related transition(s).
Don't forget to fill in the fields Title, Description and most importantly the field Name and URL in the section named “Display in action box”. Be careful to the associations between the states and the transitions.
Remember that Unstick and Unclose are just transitions, not states.
Assign the workflow
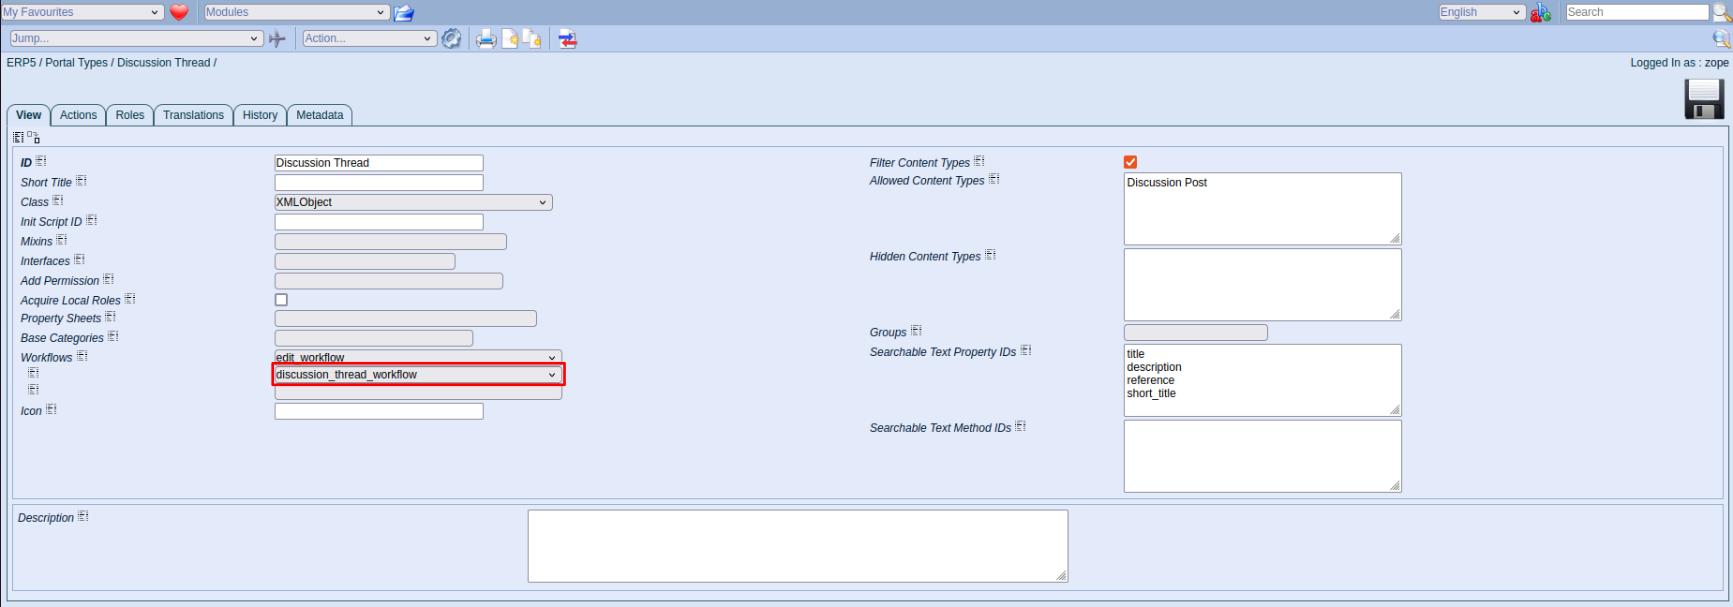
We have now fully created our workflow. The final step is to associate it with the proper document. In order to do that, go to /portal_types/Discussion Thread. This page is the ERP5 view for the Discussion Thread type we created earlier.
On this page, you should have a Workflows field, which already contains the edit_workflow. In the select field under, choose your newly created discussion_thread_workflow, to associate it with the type.
You can add many workflows as you like to a single type of object, but be careful because the security and the workflow graph can become really complicated if you have states with the same names (and it increases security risks).
Thank You
- Nexedi SA
- 147 Rue du Ballon
- 59110 La Madeleine
- France
- +33629024425
For more information, please contact Jean-Paul, CEO of Nexedi (+33 629 02 44 25).