Rafael Monnerat, Jingjing XU, Sven Franck, Mayoro Diagne, Ni Yan, Tristan Cavelier, Boxiang Sun |
Prepare Outgoing Events
How to Prepare Outgoing Events
This visual guide is part of a collection of documents created by the One Student One ERP (OSOE) project in collaboration with Institut Mines Telecom, Telecom Bretagne, Dresden University of Technology and the South Westfalia University of Applied Sciences. It can be used to teach modern ERP theory and practice to undergraduate students or professionals.
Copyright: You are free to copy, distribute, display, and perform the work under the following conditions: you must attribute the work in the manner specified by the author or licensor; you may not use this work for any commercial purposes including training, consulting, advertising, self-advertising, publishing, etc.; you may not alter, transform, or build upon this work. For any reuse or distribution, you must make clear to others the license terms of this work. Any of these conditions can be waived if you get permission from the copyright holder through a commercial license or an educational license. For more information, contact info@nexedi.com
Agenda
- Starting point: the Ticket - Campaign
- Create a new Event
- Edit the Event document
- Go back to the Ticket page and check the Events list
From the previous tutorial "How to create Campaigns", you have learned how to create a campaign with ERP5 CRM Ticket module. Then in this tutorial, you will see how to create new events from this campaign.
As introduced in the previous tutorial "Events", an event can be a phone call, an email, a fax message, etc. It can be either an incoming or outgoing event. The idea here is to learn how to prepare a campaign, which means create its detail events that will be sent later, as you will learn in the next tutorial.
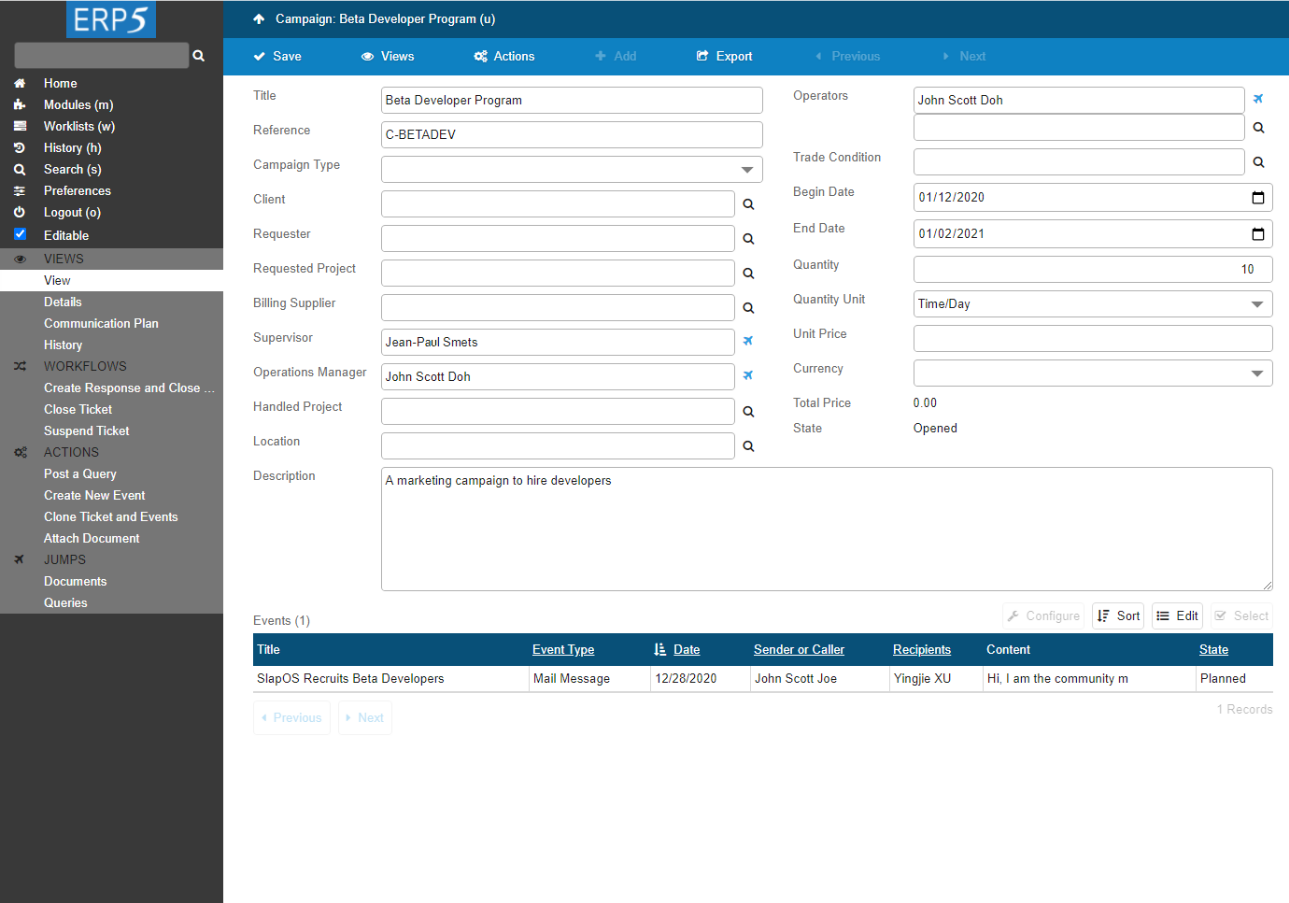
Example: Create the Event Mail message (SlapOS Recruits Beta Developers) from the Ticket (Beta Developer Program)
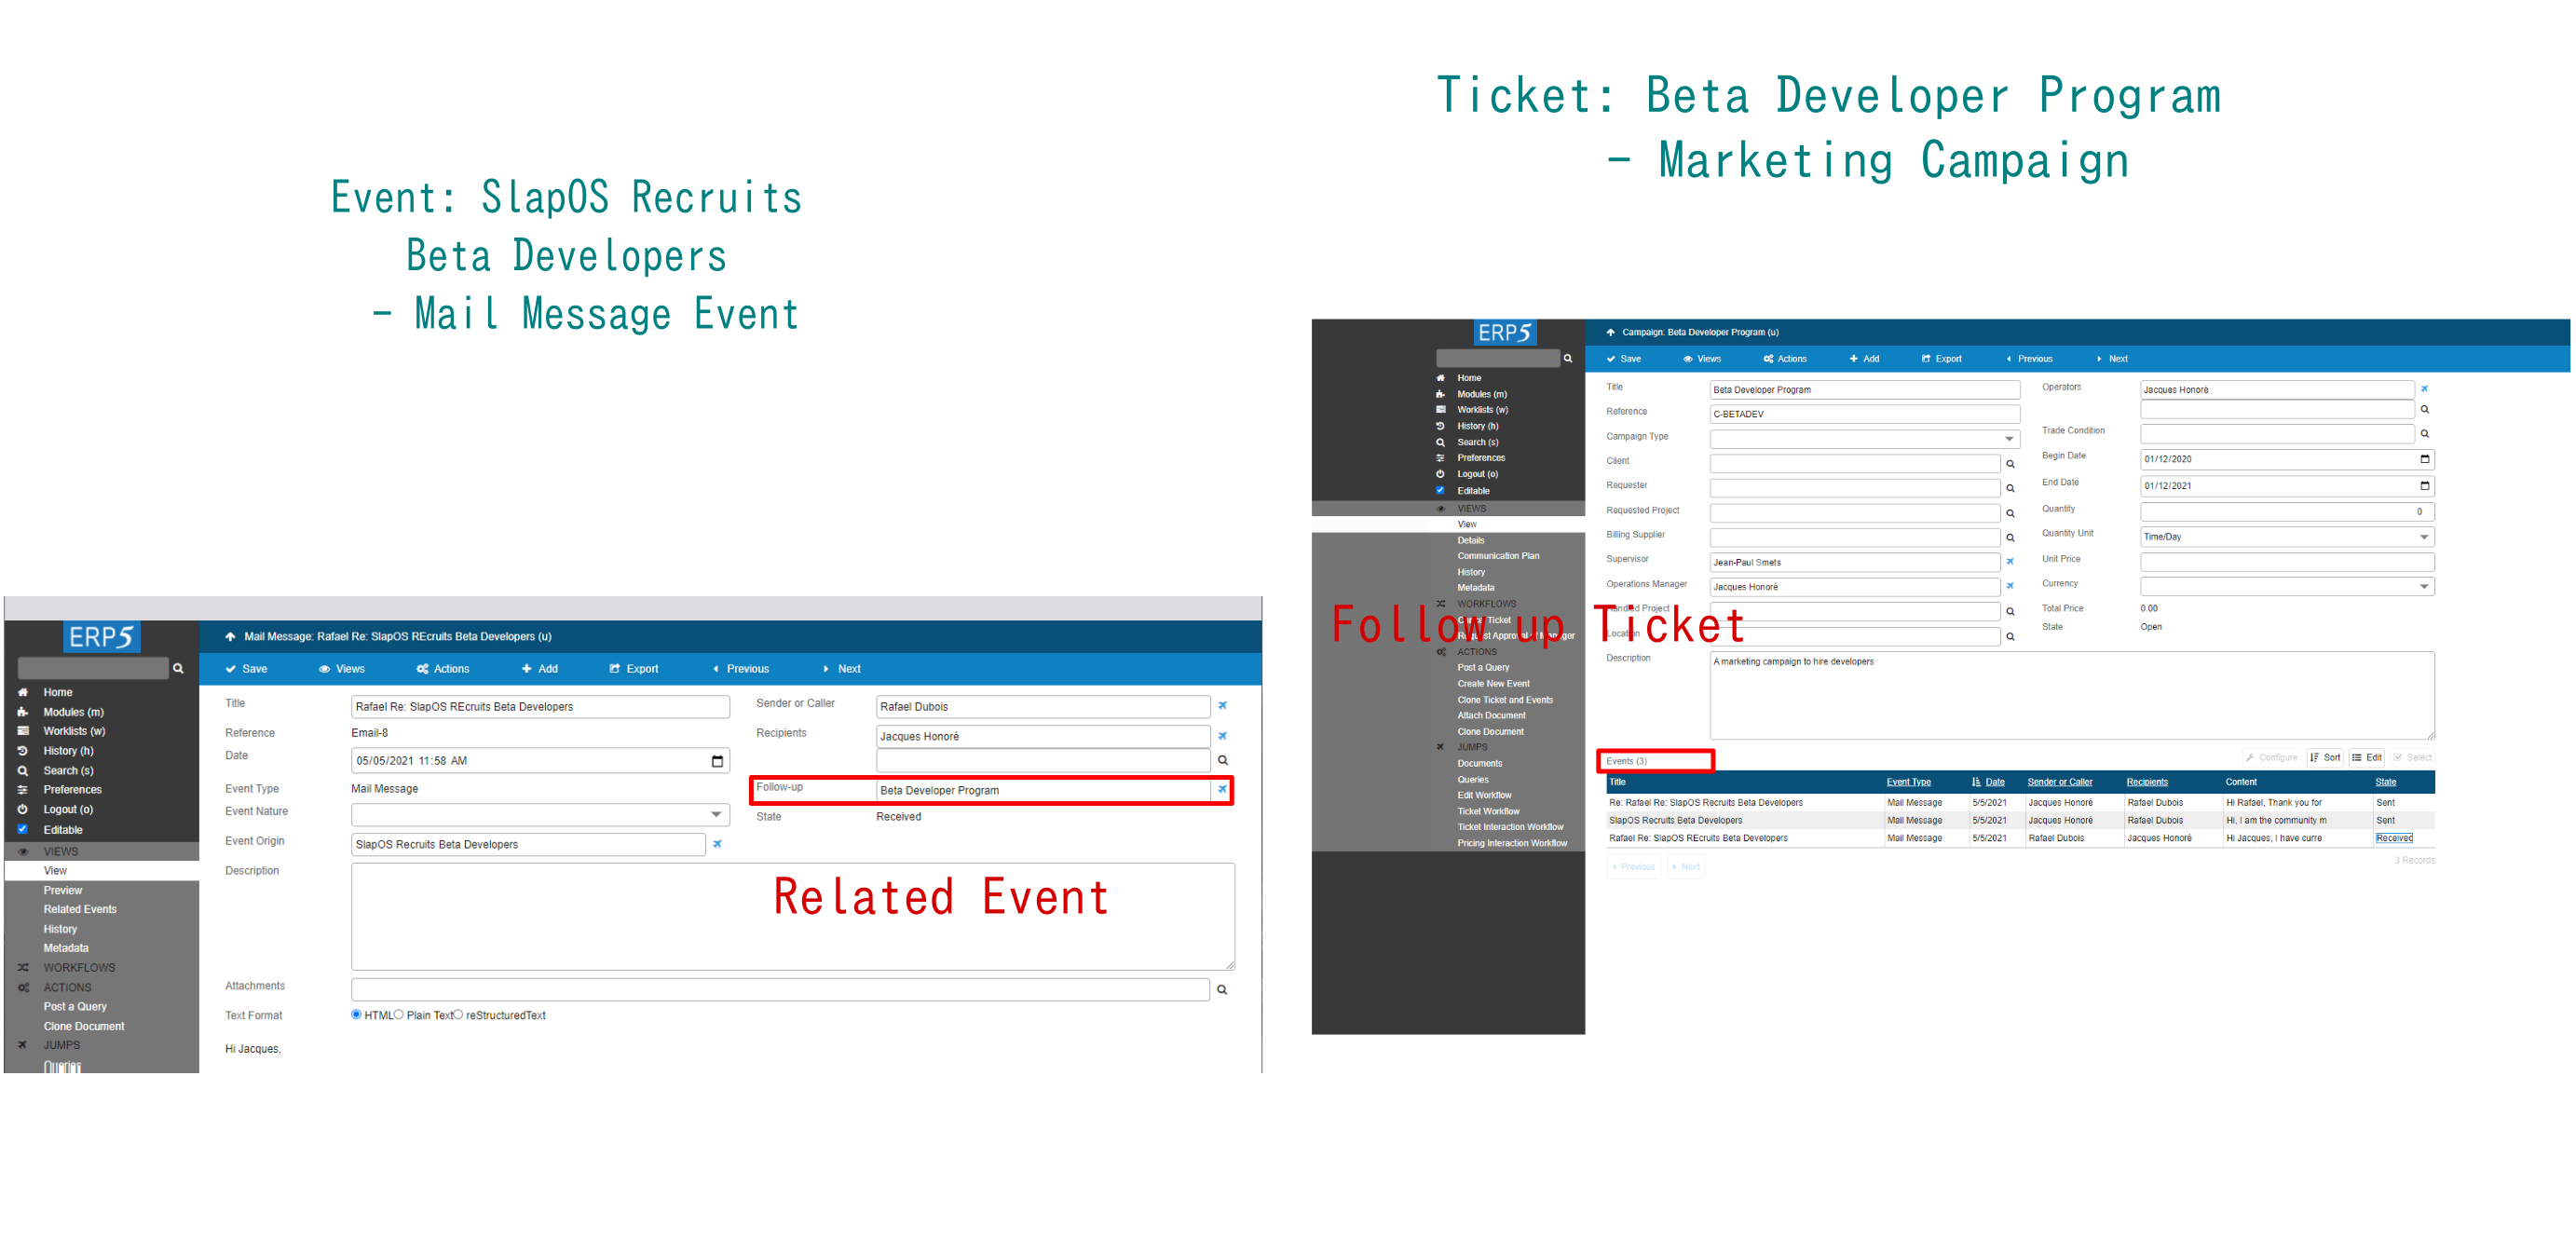
In last tutorial, we have created a Ticket - the marketing campaign Beta Developer Program (the right side screenshot), which aims to increasing the awareness of SlapOS (The new open source Cloud developed by VIFIB) by announcing the campaign and hiring software developers.
Now that the campaign Ticket has been opened, we are going to create Events for it, send these Outgoing Events to the customers of the marketing campaign, and then handle those Incoming Events from our clients. In our VIFIB example, after the marketing campaign has been opened, as described in the introductory of Events, Cédric de Saint Martin, the community manager of VIFIB will create a mail message - an Event, and then send to his contacts who might be interested in the program and become developers of SlapOS in the future. After these contacts have received the email, they will reply to the VIFIB manager by mail message, which will be well stored in the CRM system for future reference.
In this tutorial, we will describe in detail how to create the mail message Event from the marketing campaign Ticket
Description: the Event Title is "SlapOS Recruits Beta Developers", the Event Type is Mail Message, the Event Nature is Announcement, the Sender is Cédric de Saint Martin (SlapOS Community Manager from VIFIB), the Recipients is Jingjie Xu, the Event Content is about announcing the developer hiring campaign and describing the progression of SlapOS Project.
| <span metal:use-macro="container/Zuite_viewTestMacroLibrary/macros/init_test_environment">init</span> | ||
| openAndWait | ${base_url}/Zuite_setUpCreateEventTest | |
| verifyTextPresent | Init Ok | |
| <span metal:use-macro="container/Zuite_viewTestMacroLibrary/macros/wait_for_activities"> Wait for activities </span> | ||
| <span metal:use-macro="container/Zuite_viewTestMacroLibrary/macros/login_as_functional_test_user">Login As Functional Test User</span> | ||
Starting point: the Ticket - Campaign
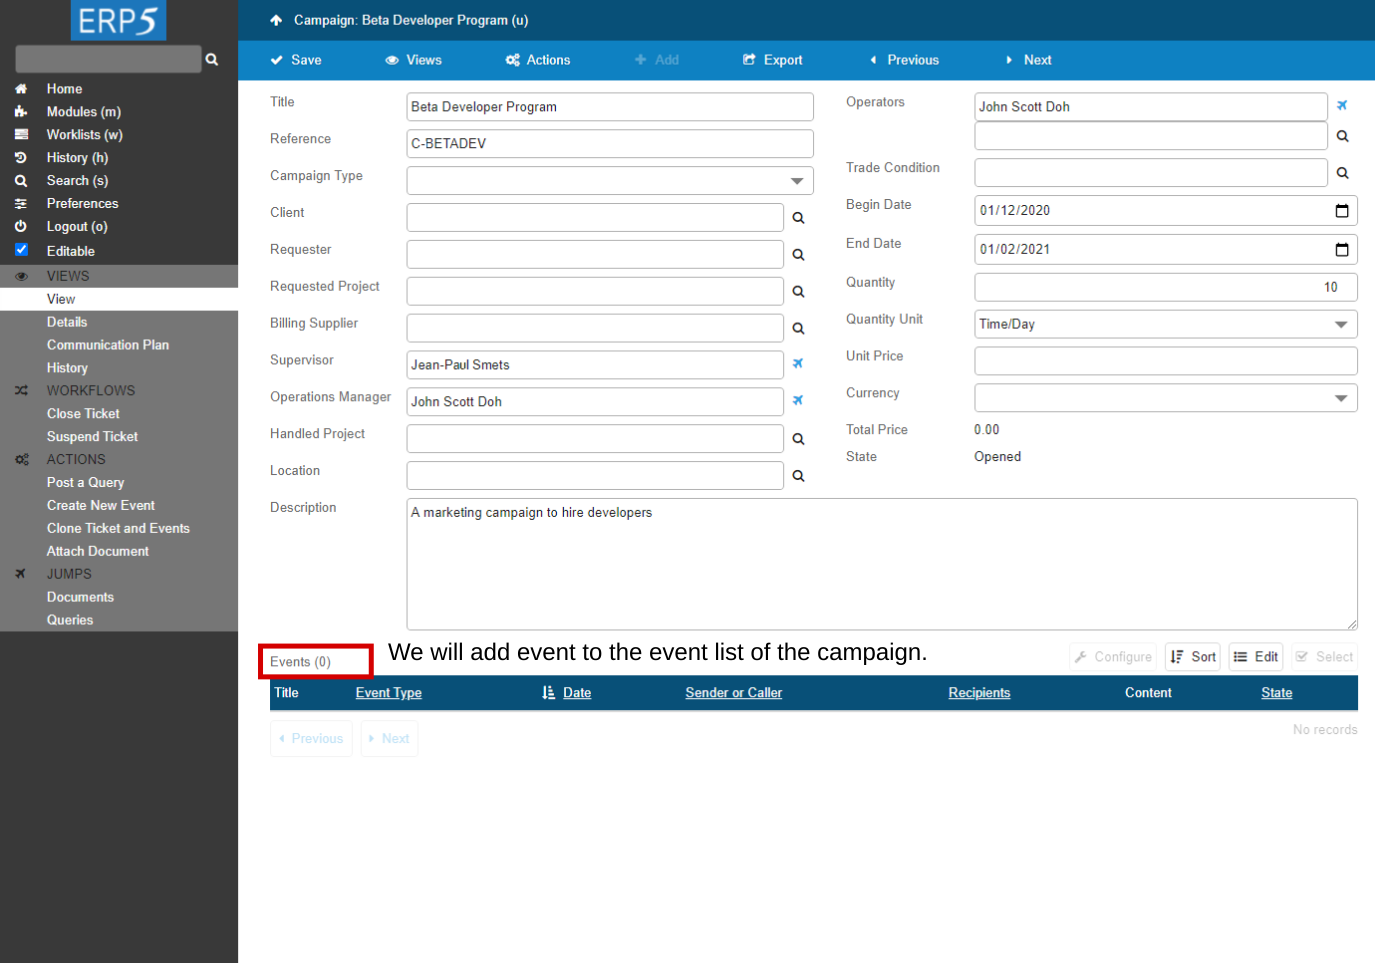
At the bottom of a campaign Ticket there is a list of all the events of the campaign. As you can see in the screenshot, this list is empty now, and we will create new events from this campaign Ticket , in order to fill this Events list.
| <tal:block tal:define="click_configuration python: {'text': 'Modules'}"> <tal:block metal:use-macro="here/Zuite_CommonTemplateForRenderjsUi/macros/click_on_panel_link" /> </tal:block> | ||
| <tal:block metal:use-macro="here/Zuite_CommonTemplateForRenderjsUi/macros/wait_for_content_loaded"> </tal:block> | ||
| <tal:block tal:define="click_configuration python: {'text': 'Campaigns'}"> <tal:block metal:use-macro="here/Zuite_CommonTemplateForRenderjsUi/macros/click_on_page_link"> </tal:block> </tal:block> | ||
| <tal:block metal:use-macro="here/Zuite_CommonTemplateForRenderjsUi/macros/wait_for_content_loaded"></tal:block> | ||
| <tal:block metal:use-macro="here/Zuite_CommonTemplateForRenderjsUi/macros/wait_for_listbox_loaded" /> | ||
| waitForElementPresent | //a[contains(text(), "ZUITE-TEST-CREATE-EVENT-CAMPAIGN-001")] | |
| click | //a[contains(text(), "ZUITE-TEST-CREATE-EVENT-CAMPAIGN-001")] | |
| <tal:block metal:use-macro="here/Zuite_CommonTemplateForRenderjsUi/macros/wait_for_content_loaded"> </tal:block> | ||
Create a new Event
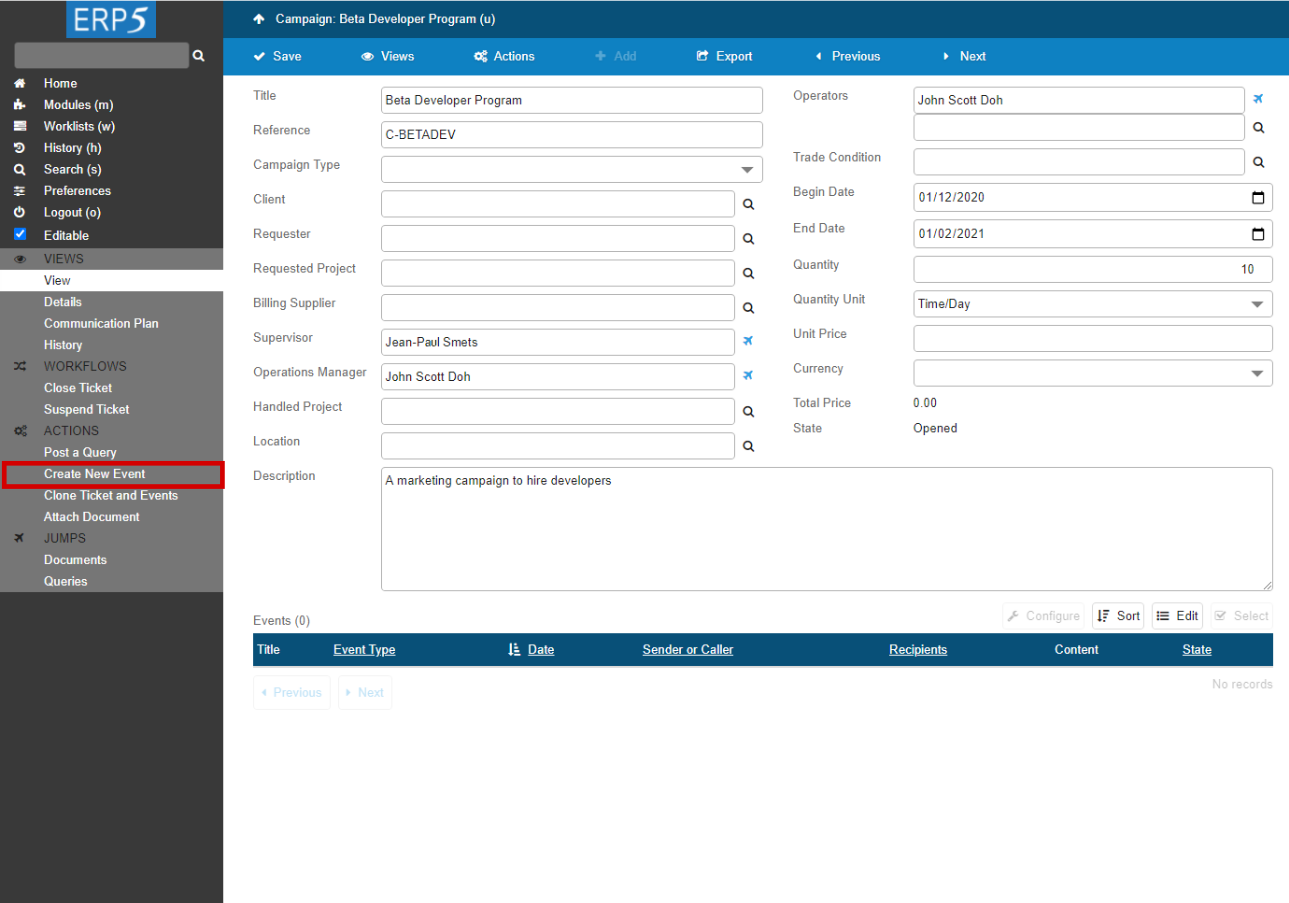
In order to add an Event to a campaign Ticket, Click on“Create New Event”on the sidebar on this page.
| click | //input[@name="editable"] | |
| <tal:block metal:use-macro="here/Zuite_CommonTemplateForRenderjsUi/macros/wait_for_content_loaded"> </tal:block> | ||
| waitForElementPresent | //input[@name="field_my_title"] | |
| <tal:block tal:define="click_configuration python: {'text': 'Create New Event'}"> <tal:block metal:use-macro="here/Zuite_CommonTemplateForRenderjsUi/macros/click_on_panel_link"> </tal:block> </tal:block> | ||
| <tal:block metal:use-macro="here/Zuite_CommonTemplateForRenderjsUi/macros/wait_for_content_loaded"> </tal:block> | ||
Set the Event title, type, direction and edit the message
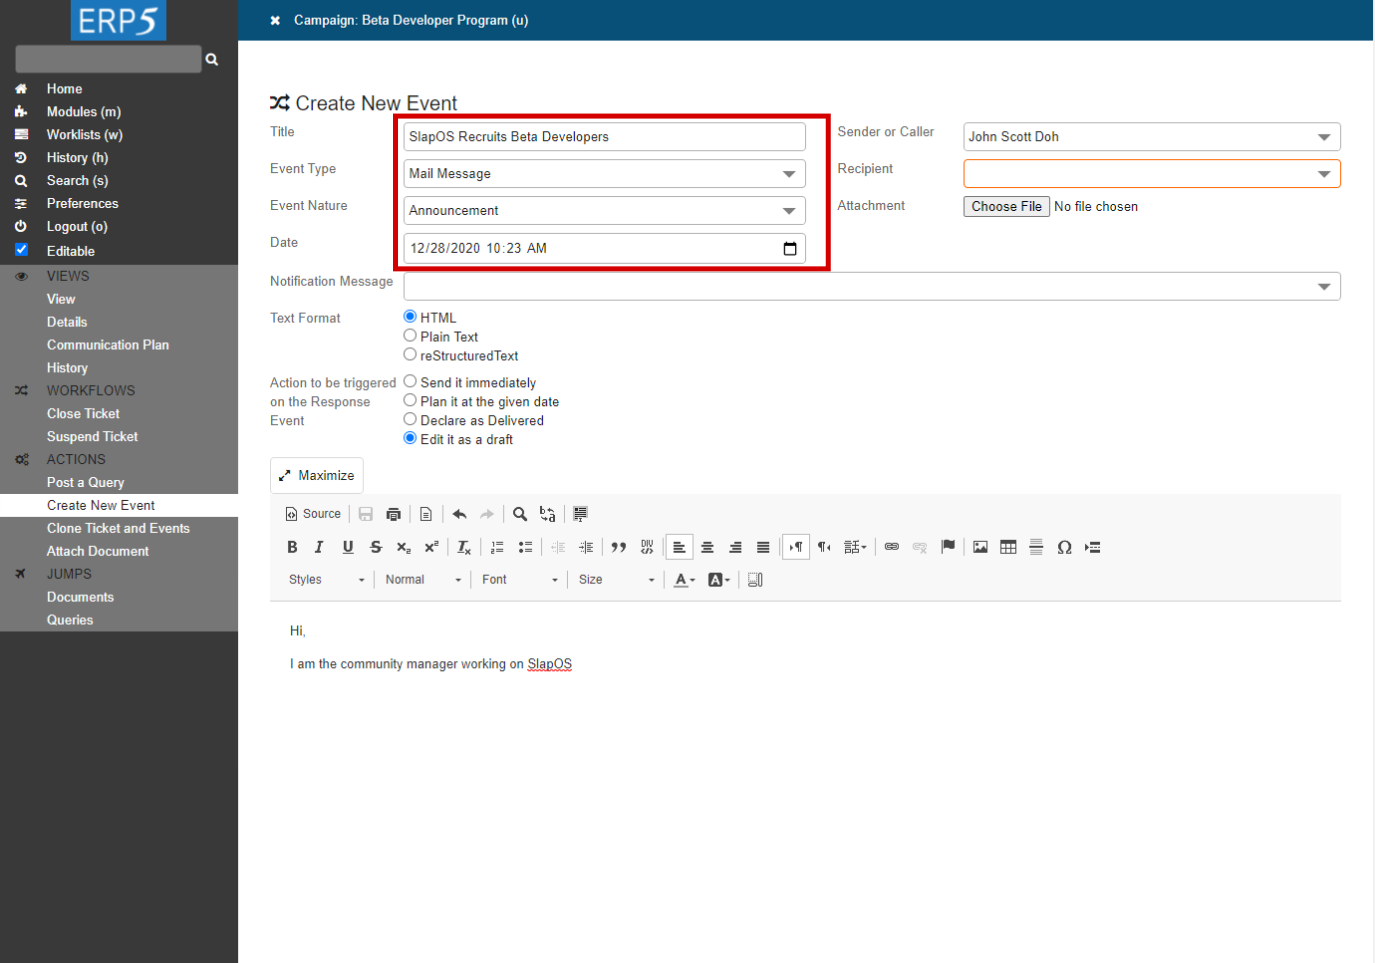
Now you will arrive at the Event creation page where you can add a Title to this event; if you have chosen to create a web message (email), the title of the event will be the title of the email received by the Recipient when you will post the event, as described in the next tutorial. Then, choose the Event type and Event Nature of the event (in our example, this Event is an Announcement). Then in the "Message" area, you can edit the content of the email you want to send.
When you are done, you can choose to Keep the Event in "Draft" state , so that you can delete the Event from the Events list in the Ticket document. If not, the Event will be created under "Planned" state, which means it is ready to be sent, and you cannot delete it from the Ticket document anymore, because it will be recorded as a history of your Campaign. Then you can click the “New Event” button. This will create the new Event and open it in order for you to edit it further.
| select | //select[@name="field_your_portal_type"] | Mail Message |
| type | //input[@name="field_your_title"] | ZUITE-TEST-CREATE-EVENT-EVENT-001 |
| select | //select[@name="field_your_destination"] | functional_test_username |
| waitForElementPresent | //div[@data-gadget-scope="field_your_text_content"]//textarea | |
| type | //div[@data-gadget-scope="field_your_text_content"]//textarea | Annoucing the developer hiring campaign and describing the progression of SlapOS Project. |
| click | //input[@name="field_your_event_workflow_action" and @value="plan"] | |
| <tal:block metal:use-macro="here/Zuite_CommonTemplateForRenderjsUi/macros/submit_dialog"> </tal:block> | ||
| <tal:block metal:use-macro="here/Zuite_CommonTemplateForRenderjsUi/macros/wait_for_content_loaded"> </tal:block> | ||
Event “Follow Up” a Ticket
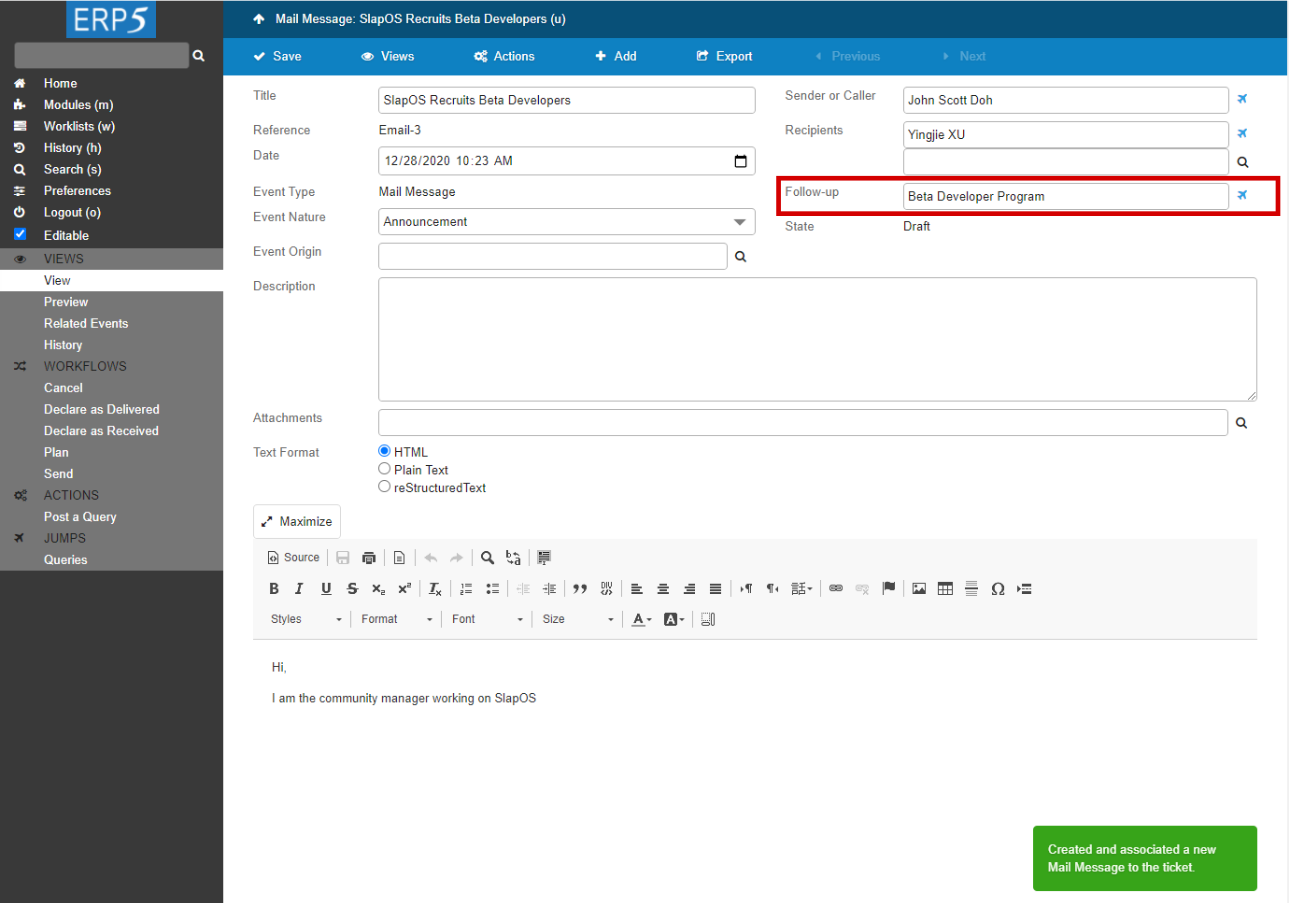
Now that the Event has been created, you can see on the screenshot that some fields of this event have already been filled.
For example, we will now explain the “Follow Up” field. You remember that in order to keep tracks of interactions, the ERP5 CRM uses "Event Origin" and "Follow Up". The field “Follow Up” creates a link between an Event and a Ticket ( A Ticket is either a Campaign, a Support Request, a Meeting, a Sale Opportunity, etc...), from where the Event is created. The field "Event Origin" creates a link between related Events ( eg, an original mail message and the replies from its recipients).
In our example, as we have created the Event (the Mail message "SlapOS Recruits Beta Developers") from a Campaign Ticket (the Beta Developer Program), so the "Follow Up" field has been automatically set as being this very Campaign. As a result, this Event will be displayed in the Events list of the Follow Up Ticket, in our example, in the page of Beta Developer Program from where we have created this Event. If you click on the "plane" next to the Follow-up field, it leads you to the "Beta Developer Program" Campaign.
| waitForElementPresent | //input[@value="ZUITE-TEST-CREATE-EVENT-CAMPAIGN-001"] | |
| verifyValue | //input[@name="field_my_default_follow_up_title"] | ZUITE-TEST-CREATE-EVENT-CAMPAIGN-001 |
| verifyValue | //input[@name="field_my_title"] | ZUITE-TEST-CREATE-EVENT-EVENT-001 |
| verifyText | //p[@id="field_my_translated_simulation_state_title"] | Planned |
Edit the Event document
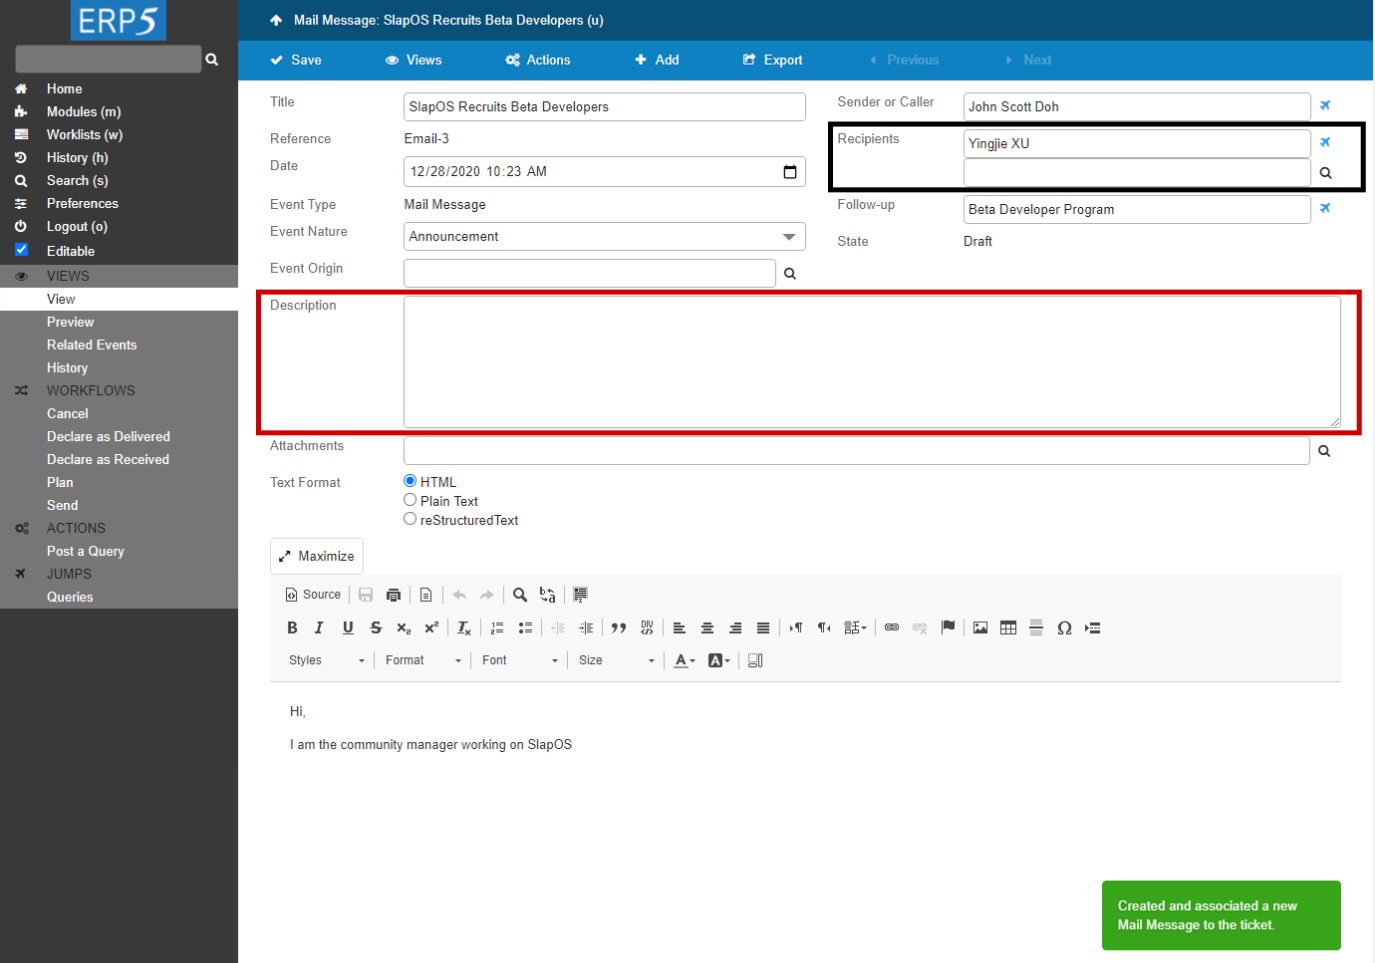
Because in the previous step "Set Event title, Event Nature and edit the message", we have write the content of the email, so now you only have to fill up the "Description" field (if you need to note something to your team member to see), and you will have to fill up the Sender/Caller which means the person that will be in charge of sending the Event, and the Recipients field which must contain a person or an organisation from the Person or Organisation Modules of your ERP5 instance. If you are not sure of a name, you can click on the little magnify glass next to those fields and set the relation between a person/organisation and this Event, following the procedure you have learned in the previous tutorials. When you are done editing the Event document, Save your work by clicking the“Save" button.
| waitForElementPresent | //div[@data-gadget-scope="field_my_text_content"] | |
| waitForElementPresent | //div[@data-gadget-scope="field_my_text_content"]//textarea | |
| type | //div[@data-gadget-scope="field_my_text_content"]//textarea | Annoucing the developer hiring campaign and describing the progression of SlapOS Project. |
| <tal:block metal:use-macro="here/Zuite_CommonTemplateForRenderjsUi/macros/save"> <tal:block metal:use-macro="here/Zuite_CommonTemplateForRenderjsUi/macros/wait_for_content_loaded"> </tal:block> </tal:block> | ||
Preview the Event
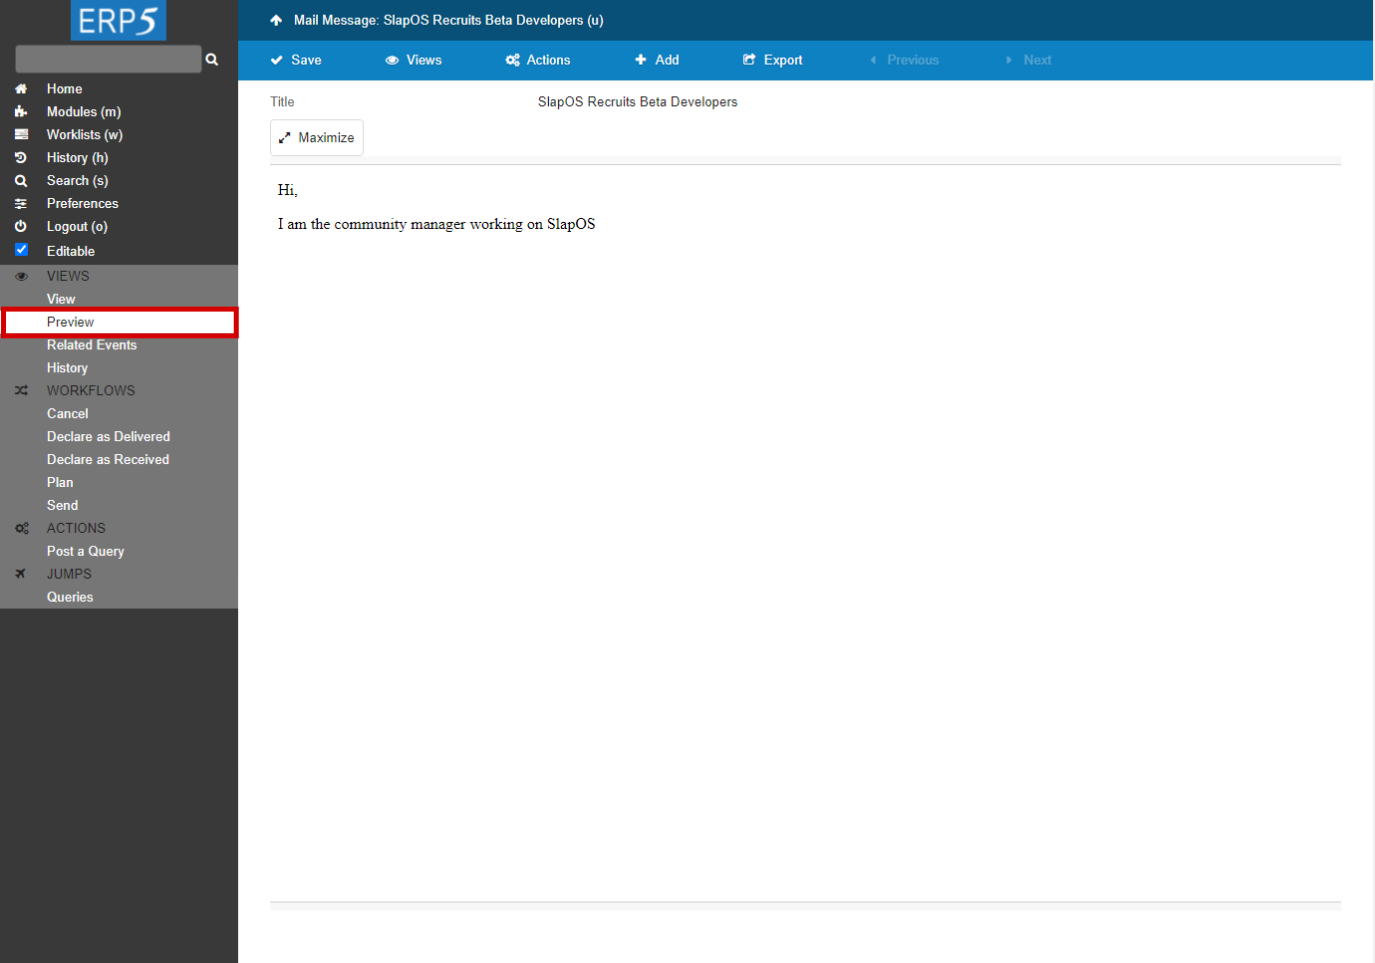
If you want to see what your email looks like, you can click on the “Preview” tab , as highlighted in red on the screenshot.
| storeLocation | event_creation | |
| <span metal:use-macro="container/Zuite_viewTestMacroLibrary/macros/wait_for_activities"> Wait for activities </span> | ||
| open | ${event_creation} | |
| <tal:block metal:use-macro="here/Zuite_CommonTemplateForRenderjsUi/macros/wait_for_app_loaded"> </tal:block> | ||
| <tal:block tal:define="click_configuration python: {'text': 'Preview'}"> <tal:block metal:use-macro="here/Zuite_CommonTemplateForRenderjsUi/macros/click_on_panel_link"> </tal:block> </tal:block> | ||
| <tal:block metal:use-macro="here/Zuite_CommonTemplateForRenderjsUi/macros/wait_for_content_loaded"> </tal:block> | ||
| waitForTextPresent | Annoucing the developer hiring campaign and describing the progression of SlapOS Project. | |
| <tal:block tal:define="click_configuration python: {'text': 'View'}"> <tal:block metal:use-macro="here/Zuite_CommonTemplateForRenderjsUi/macros/click_on_panel_link"> </tal:block> </tal:block> | ||
| <tal:block metal:use-macro="here/Zuite_CommonTemplateForRenderjsUi/macros/wait_for_content_loaded"> </tal:block> | ||
Go back to the Ticket from Event
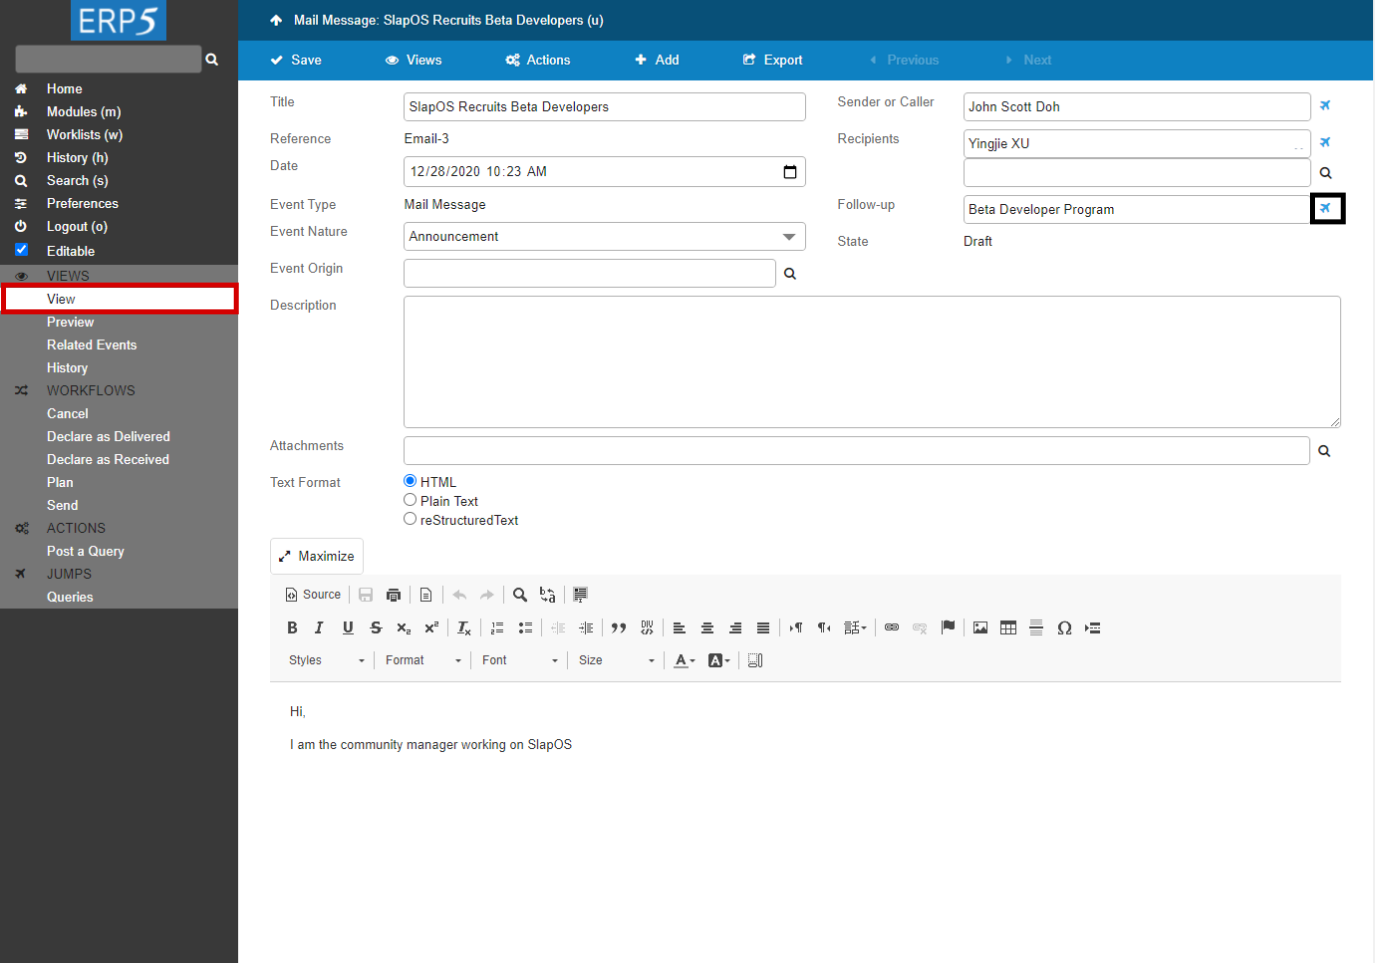
We will now go back to the campaign in order to check that this event has been added to the Campaign Ticket.
In order to reach the associated Campaign Ticket, you can go back to the view of your event by clicking on the “View” tab, highlighted in red on the picture. Then click on the plane icon next to the “Follow Up” field, which will lead you to the Ticket that has been linked to your Event.
| click | //input[@name="field_my_default_follow_up_title"]/../../a | |
| <tal:block metal:use-macro="here/Zuite_CommonTemplateForRenderjsUi/macros/wait_for_content_loaded"> </tal:block> | ||
| verifyText | //p[@id="field_my_translated_simulation_state_title"] | Opened |
Check the Events list in the Ticket
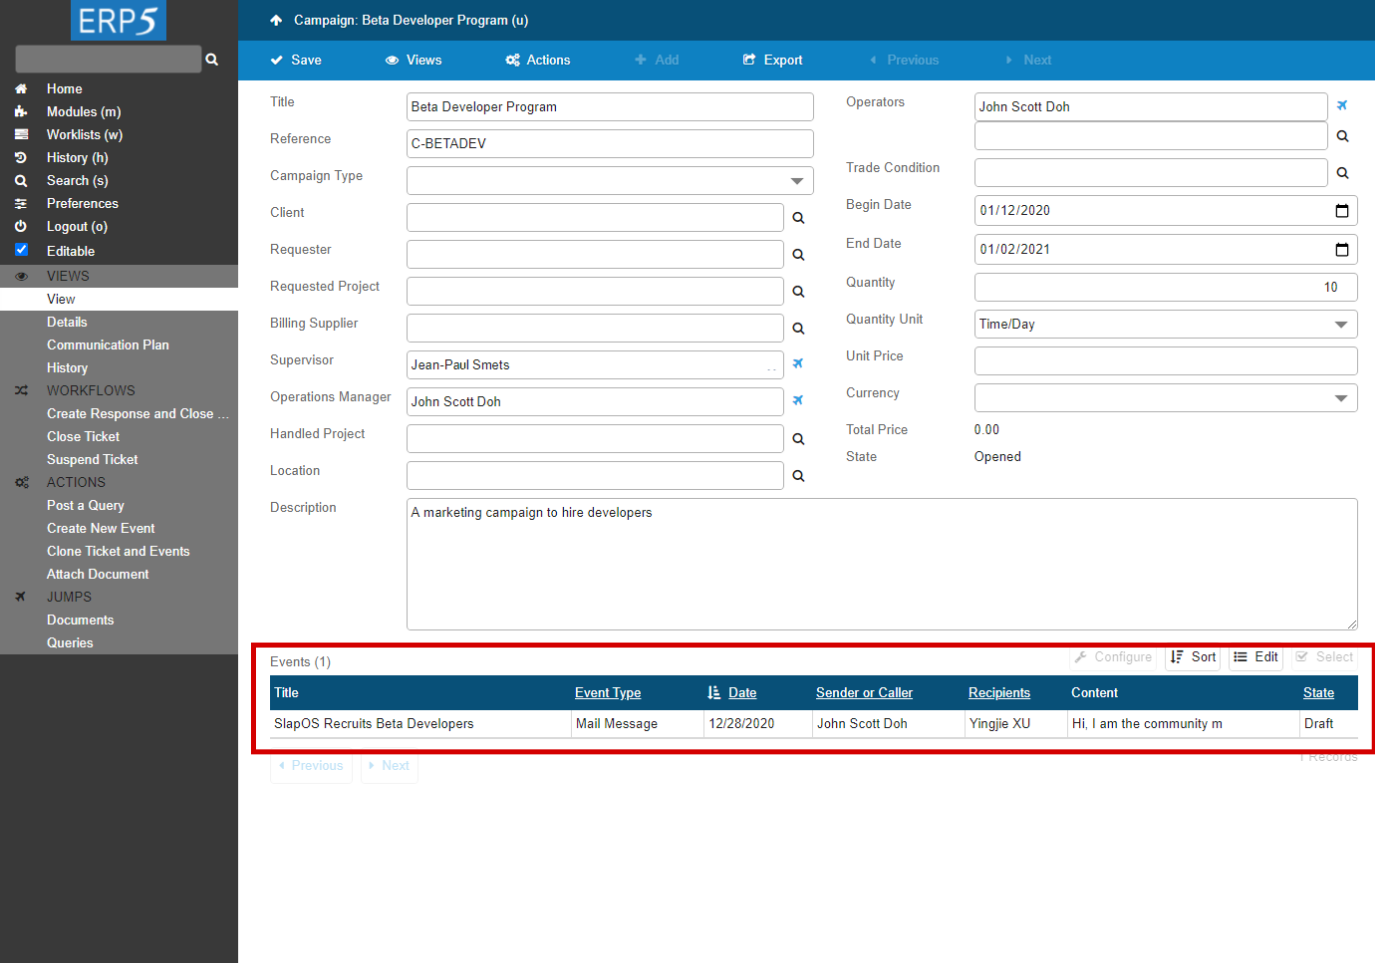
Now you will be redirected to the Follow Up Ticket of the Event, which is the Campaign from where we created the event. In the red area on the bottom of this campaign Ticket, you can now see that the Event you just created and edited is displayed as a Draft message , which means it is successfully created and waiting to be confirmed.
The next step will be to understand how to process this outgoing Event. We will learn how to do this in the next tutorial “How to Send Outgoing Events”.
| <tal:block metal:use-macro="here/Zuite_CommonTemplateForRenderjsUi/macros/wait_for_listbox_loaded" /> | ||
| waitForElementPresent | //a[text()="ZUITE-TEST-CREATE-EVENT-EVENT-001"] | |
| click | //a[text()="ZUITE-TEST-CREATE-EVENT-EVENT-001"] | |
| <tal:block metal:use-macro="here/Zuite_CommonTemplateForRenderjsUi/macros/wait_for_content_loaded"> </tal:block> | ||
| verifyText | //p[@id="field_my_translated_simulation_state_title"] | Planned |
| <tal:block tal:define="click_configuration python: {'text': 'Confirm'}"> <tal:block metal:use-macro="here/Zuite_CommonTemplateForRenderjsUi/macros/click_on_panel_link"> </tal:block> </tal:block> | ||
| <tal:block metal:use-macro="here/Zuite_CommonTemplateForRenderjsUi/macros/wait_for_content_loaded"> </tal:block> | ||
| <tal:block metal:use-macro="here/Zuite_CommonTemplateForRenderjsUi/macros/submit_dialog"> </tal:block> | ||
| <tal:block metal:use-macro="here/Zuite_CommonTemplateForRenderjsUi/macros/wait_for_content_loaded"> </tal:block> | ||
| waitForElementPresent | //p[text()="Confirmed"] | |
| <span metal:use-macro="container/Zuite_viewTestMacroLibrary/macros/wait_for_activities"> Wait for activities </span> | ||
| openAndWait | ${base_url}/Base_clearCache | |
| assertTextPresent | Cleared. | |
| openAndWait | ${base_url} | |
| <tal:block metal:use-macro="here/Zuite_CommonTemplateForRenderjsUi/macros/wait_for_app_loaded"></tal:block> | ||
| <tal:block tal:define="click_configuration python: {'text': 'Modules'}"> <tal:block metal:use-macro="here/Zuite_CommonTemplateForRenderjsUi/macros/click_on_panel_link" /> </tal:block> | ||
| <tal:block metal:use-macro="here/Zuite_CommonTemplateForRenderjsUi/macros/wait_for_content_loaded"> </tal:block> | ||
| <tal:block tal:define="click_configuration python: {'text': 'Events'}"> <tal:block metal:use-macro="here/Zuite_CommonTemplateForRenderjsUi/macros/click_on_page_link"> </tal:block> </tal:block> | ||
| <tal:block metal:use-macro="here/Zuite_CommonTemplateForRenderjsUi/macros/wait_for_content_loaded"></tal:block> | ||
| <tal:block metal:use-macro="here/Zuite_CommonTemplateForRenderjsUi/macros/wait_for_listbox_loaded" /> | ||
| waitForElementPresent | //a[contains(text(), "ZUITE-TEST-CREATE-EVENT-EVENT-001")] | |
| click | //a[contains(text(), "ZUITE-TEST-CREATE-EVENT-EVENT-001")] | |
| <tal:block metal:use-macro="here/Zuite_CommonTemplateForRenderjsUi/macros/wait_for_content_loaded"> </tal:block> | ||
| click | //input[@name="editable"] | |
| <tal:block metal:use-macro="here/Zuite_CommonTemplateForRenderjsUi/macros/wait_for_content_loaded"> </tal:block> | ||
| waitForElementPresent | //input[@name="field_my_source_title"] | |
| type | //input[@name="field_my_source_title"] | ZUITE-TEST-CREATE-EVENT-PERSON-OPERATION-MANAGER |
| type | //input[@name="field_my_destination_title_list"] | ZUITE-TEST-CREATE-EVENT-PERSON-OPERATION-MANAGER |
| <tal:block metal:use-macro="here/Zuite_CommonTemplateForRenderjsUi/macros/save"> <tal:block metal:use-macro="here/Zuite_CommonTemplateForRenderjsUi/macros/wait_for_content_loaded"> </tal:block> </tal:block> | ||
| <tal:block tal:define="click_configuration python: {'text': 'Send'}"> <tal:block metal:use-macro="here/Zuite_CommonTemplateForRenderjsUi/macros/click_on_panel_link"> </tal:block> </tal:block> | ||
| <tal:block metal:use-macro="here/Zuite_CommonTemplateForRenderjsUi/macros/wait_for_content_loaded"> </tal:block> | ||
| <tal:block metal:use-macro="here/Zuite_CommonTemplateForRenderjsUi/macros/submit_dialog"> </tal:block> | ||
| <tal:block metal:use-macro="here/Zuite_CommonTemplateForRenderjsUi/macros/wait_for_content_loaded"> </tal:block> | ||
| waitForElementPresent | //p[text()="Sent"] | Sent |
| <span metal:use-macro="container/Zuite_viewTestMacroLibrary/macros/wait_for_activities"> Wait for activities </span> | ||
| openAndWait | ${base_url}/Base_clearCache | |
| assertTextPresent | Cleared. | |
| openAndWait | ${base_url} | |
| <tal:block metal:use-macro="here/Zuite_CommonTemplateForRenderjsUi/macros/wait_for_app_loaded"> </tal:block> | ||
| <tal:block tal:define="click_configuration python: {'text': 'Modules'}"> <tal:block metal:use-macro="here/Zuite_CommonTemplateForRenderjsUi/macros/click_on_panel_link" /> </tal:block> | ||
| <tal:block metal:use-macro="here/Zuite_CommonTemplateForRenderjsUi/macros/wait_for_content_loaded"> </tal:block> | ||
| <tal:block tal:define="click_configuration python: {'text': 'Events'}"> <tal:block metal:use-macro="here/Zuite_CommonTemplateForRenderjsUi/macros/click_on_page_link"> </tal:block> </tal:block> | ||
| <tal:block metal:use-macro="here/Zuite_CommonTemplateForRenderjsUi/macros/wait_for_content_loaded"></tal:block> | ||
| <tal:block metal:use-macro="here/Zuite_CommonTemplateForRenderjsUi/macros/wait_for_listbox_loaded" /> | ||
| <span metal:use-macro="container/Zuite_viewTestMacroLibrary/macros/login_as_manager">Login As Manager</span> | ||
| openAndWait | ${base_url}/Zuite_tearDownCreateEventTest | |
| verifyTextPresent | Clean Ok | |
| <span metal:use-macro="container/Zuite_viewTestMacroLibrary/macros/wait_for_activities"> Wait for activities </span> | ||
Thank You
- Nexedi SA
- 147 Rue du Ballon
- 59110 La Madeleine
- France
- +33629024425
For more information, please contact Jean-Paul, CEO of Nexedi (+33 629 02 44 25).