Rafael Monnerat, Klaus Wölfel, Jingjing XU, Sven Franck, Mayoro Diagne, Ni Yan, Boxiang Sun, Thomas Gambier |
How to Add People
How to Add People

This visual guide is part of a collection of documents created by the One Student One ERP (OSOE) project in collaboration with Institut Mines Telecom, Telecom Bretagne, Dresden University of Technology and the South Westfalia University of Applied Sciences. It can be used to teach modern ERP theory and practice to undergraduate students or professionals.
Copyright: You are free to copy, distribute, display, and perform the work under the following conditions: you must attribute the work in the manner specified by the author or licensor; you may not use this work for any commercial purposes including training, consulting, advertising, self-advertising, publishing, etc.; you may not alter, transform, or build upon this work. For any reuse or distribution, you must make clear to others the license terms of this work. Any of these conditions can be waived if you get permission from the copyright holder through a commercial license or an educational license. For more information, contact info@nexedi.com
| <tal:block metal:use-macro="here/Zuite_viewTestMacroLibrary/macros/init_test_environment" /> | ||
| openAndWait | ${base_url}/Zuite_setUpPersonTest | |
| verifyTextPresent | Init Ok | |
| <tal:block metal:use-macro="here/Zuite_viewTestMacroLibrary/macros/wait_for_activities" /> | ||
| <tal:block metal:use-macro="here/Zuite_viewTestMacroLibrary/macros/login_as_functional_test_user" /> | ||
| <tal:block tal:define="click_configuration python: {'text': 'New'}"> <tal:block metal:use-macro="here/Zuite_CommonTemplateForRenderjsUi/macros/click_on_panel_link" /> </tal:block> | ||
Agenda
- How to create a person
- How to validate the person
- How to check the creation
Now you have access to your ERP5, we are going to show you how to create persons in ERP5, thanks to the « base » area of the application. These persons can be either you, your co-workers, your clients, your suppliers, etc. Every person you interact with can be stored in ERP5. Here we will use an example of adding people into ERP5.
Example
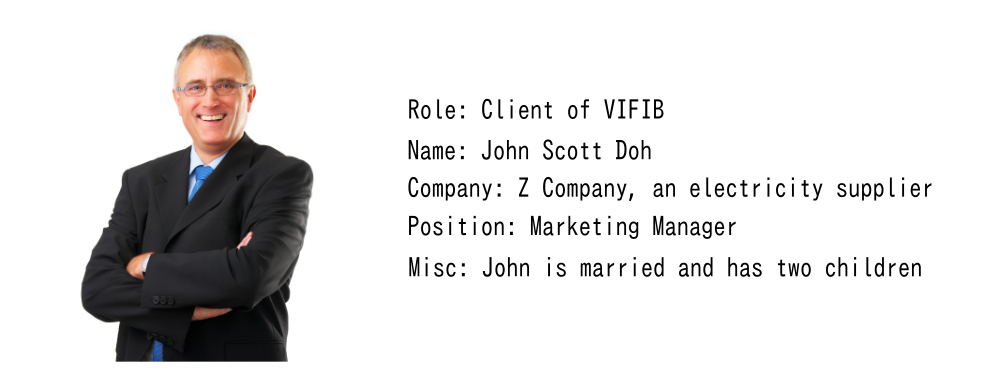
As you can see on the picture, we are going to create a person named John Doe, with the information above.
From the "Modules" tab to create Person
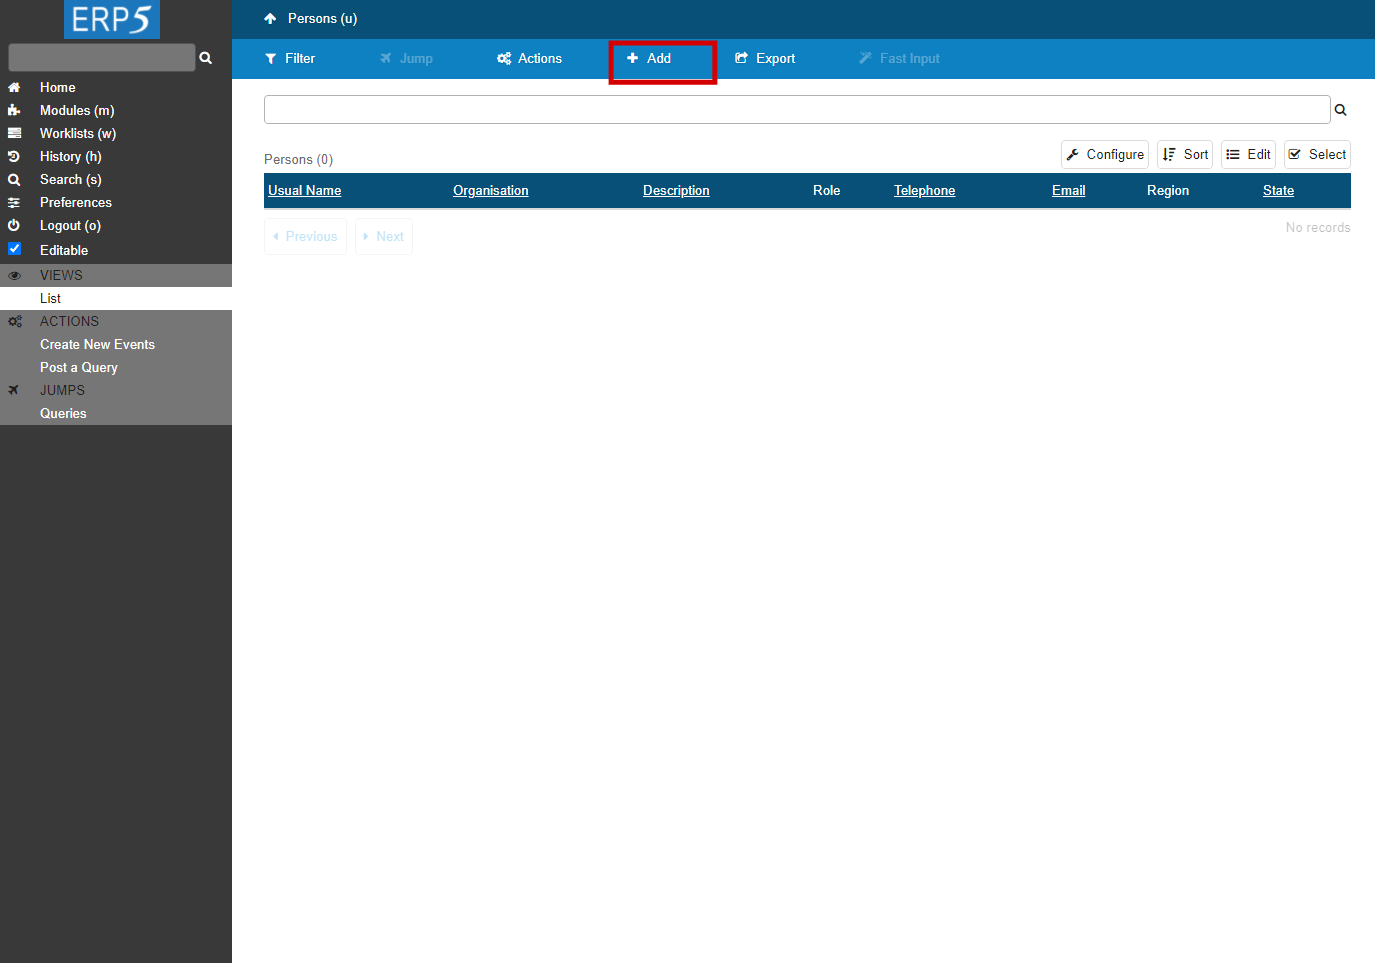
Click on “person” in the "Modules" Tab to create Persons. First click on "Modules" on the sidebar, then click on "Person" module, once you are reach the page in the screenshot, click on "+Add" to create a new person"s document where you will have to fill with the required information.
| waitForElementPresent | //button[text()="Person"] | |
| click | //input[@name="editable"] | |
| <tal:block metal:use-macro="here/Zuite_CommonTemplateForRenderjsUi/macros/wait_for_content_loaded"> </tal:block> | ||
| click | //button[text()="Person"] | |
Reach the person creation page
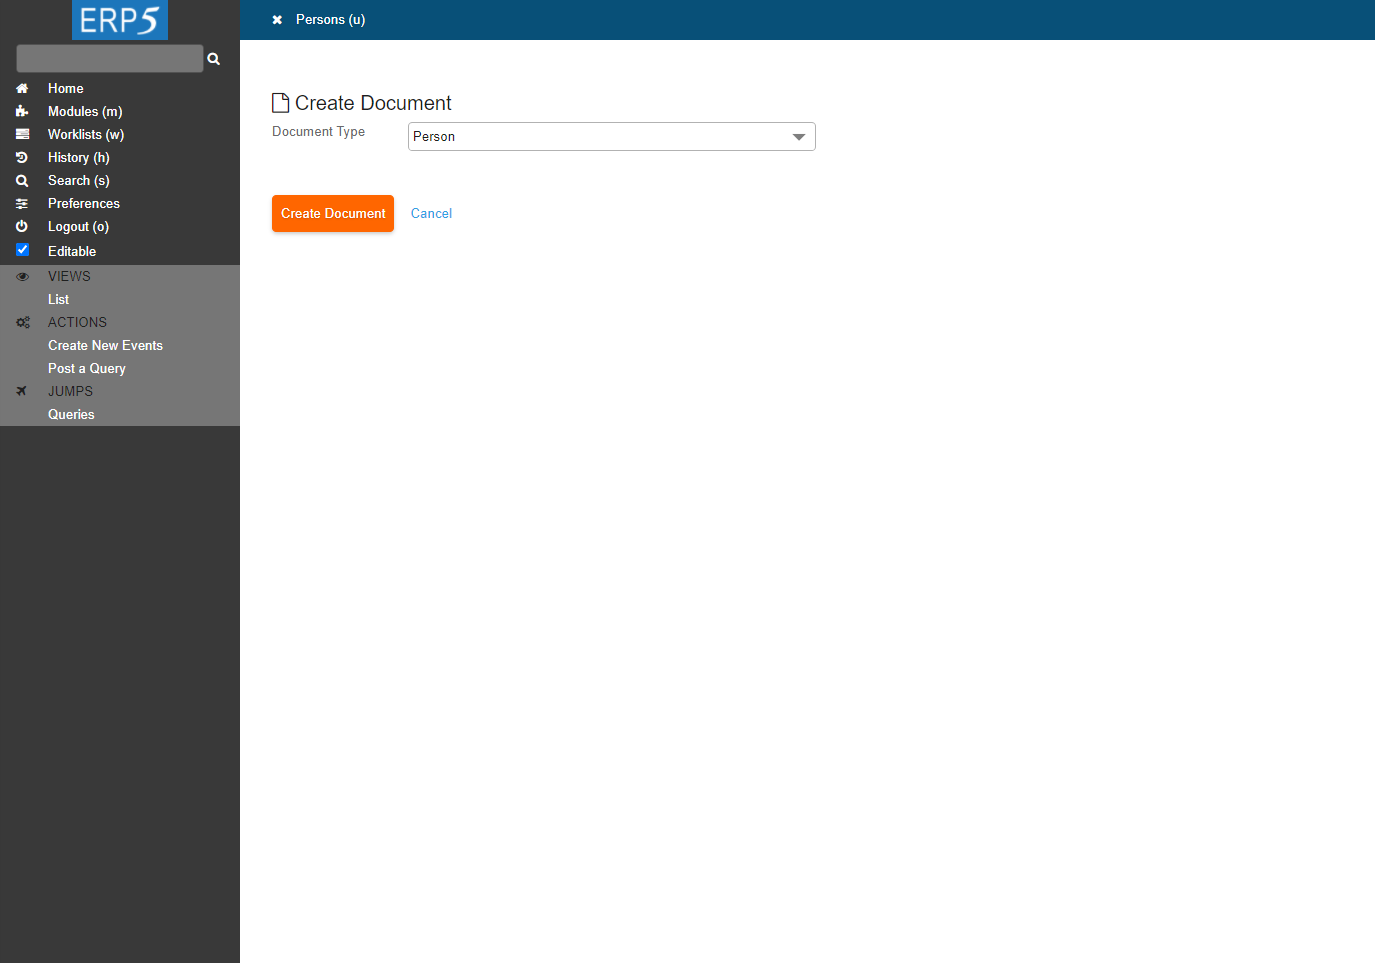
The person creation page helps you store any specific information about a person, whether it is personal or financial, or even his/her picture. Note: If you are using the ERP5 Virtual Machine, you can find a picture of John Doe in your home folder. As you can see, there are different tabs on the person creation page. All those tabs gather the required information about the person, and it is possible to add some more details with the "Action" menu on top of the page, as we will see later in this tutorial.
Fill the “View” page and save
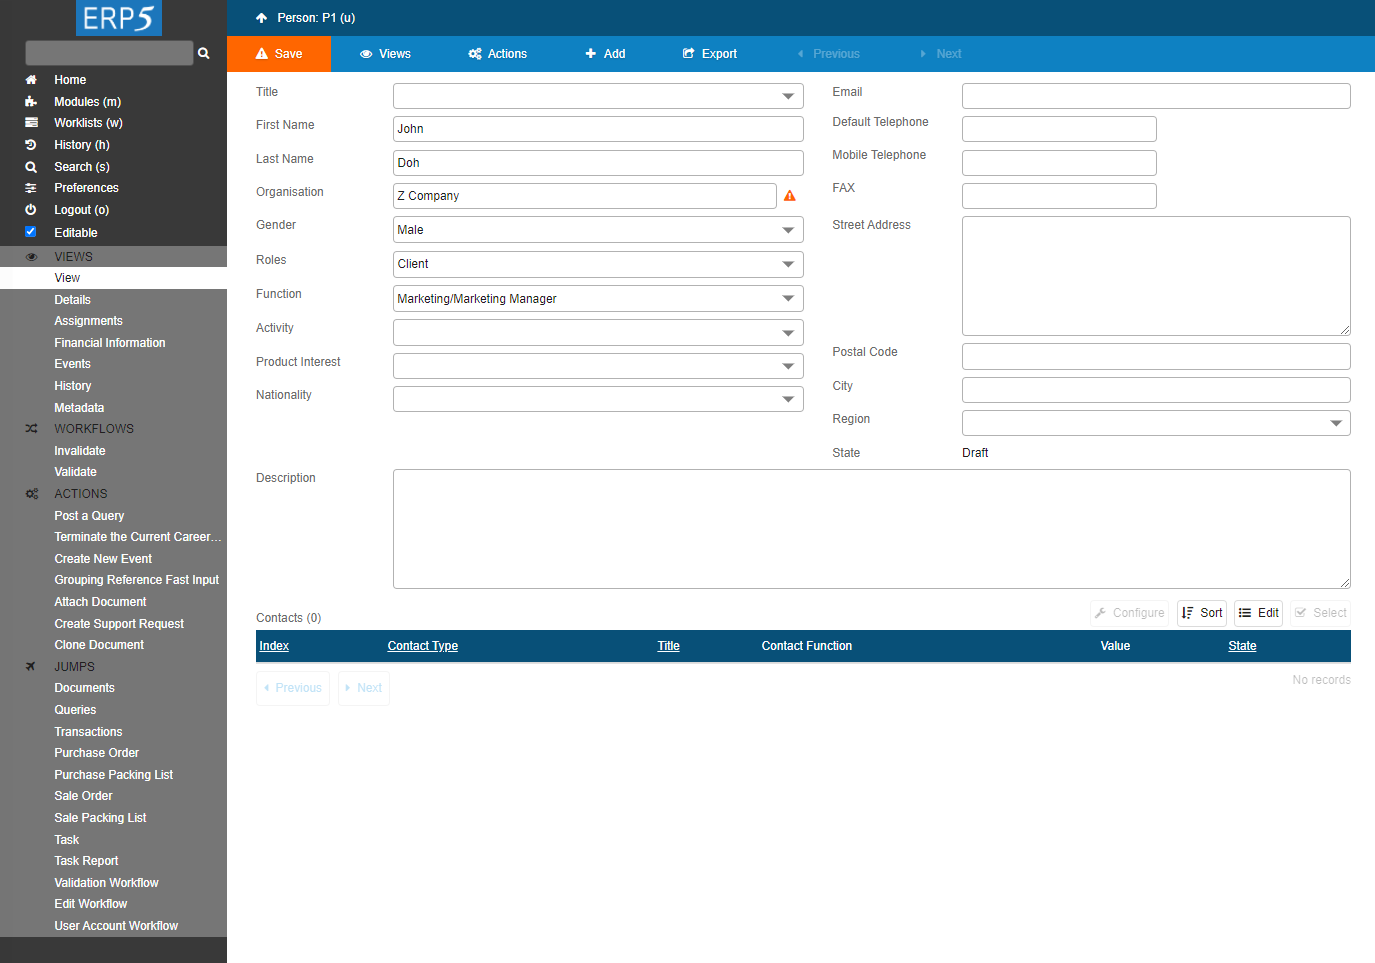
Now let's refer back to our example: one of your company's contact is John Doh, the marketing manager of Z Company, a client of your company. Fill out the “view” page with those basic information of Mr Doh, then you can store his information in ERP5, by clicking on the Save button.
Note that after entering all information in the current form, you should always save them before switching to another tab or document.
| waitForElementPresent | //input[@name="field_my_first_name"] | |
| type | //input[@name="field_my_first_name"] | John |
| type | //input[@name="field_my_last_name"] | Doh |
| type | //input[@name="field_my_career_subordination_title"] | Z Company |
| fireEvent | //input[@name="field_my_career_subordination_title"] | input |
| waitForElementPresent | //ul[@class="search_ul"]//li | |
| click | //ul[@class="search_ul"]/li[@name="Organisation"] | |
| select | //select[@name="field_my_gender"] | Male |
| select | //select[@name="subfield_field_my_career_role_list_default:list"] | Client |
| select | //select[@name="field_my_career_function"] | Marketing/Marketing Manager |
| select | //select[@name="field_my_career_activity"] | Education |
| select | //select[@name="field_my_nationality"] | French |
| type | //input[@name="field_my_default_email_coordinate_text"] | jdoh@zcompany.com |
| type | //input[@name="field_default_telephone_my_default_telephone_coordinate_text"] | +33(0)6-218765/00 |
| <tal:block metal:use-macro="here/Zuite_CommonTemplateForRenderjsUi/macros/save"> </tal:block> | ||
Create the related organisation
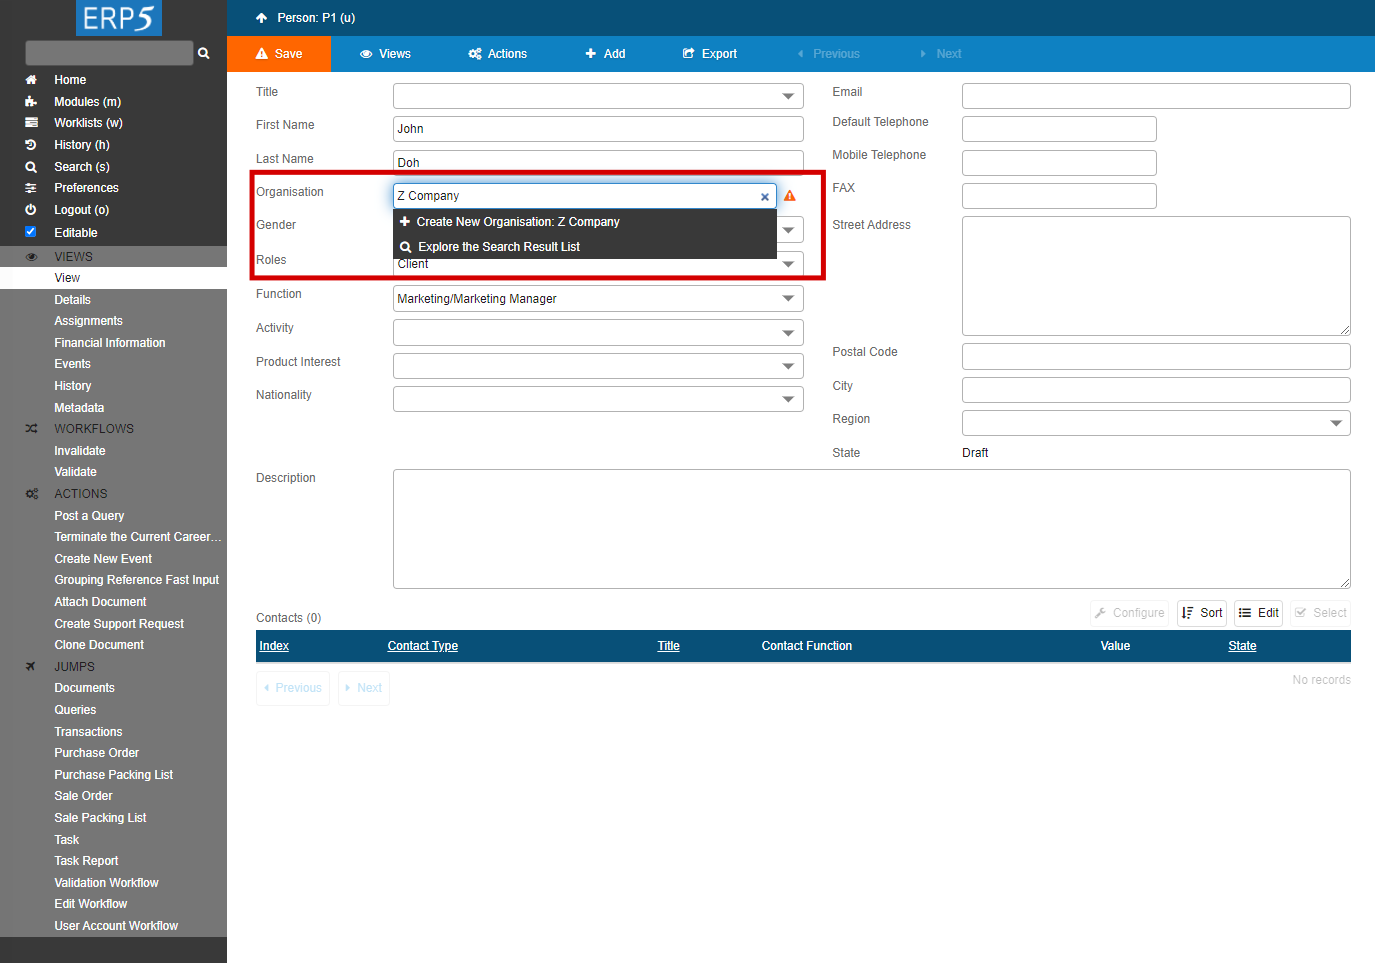
Now that you have saved the information about John Doh, we see that there seems to be a problem with the organisation Z Company. Indeed, as John Doh is the first person of Z Company to be stored in ERP5, the organisation does not exist yet, unless you have created it before thanks to the organisation creation function, which obviously is not the case here.
We will now solve this problem by creating the organisation - Z Company. To do that, just choose “Create New Organisation: Z Company”in the drop list.
Note that you cannot see it but your organisation has been created in the “organisation” section.
Fill the “Details” page
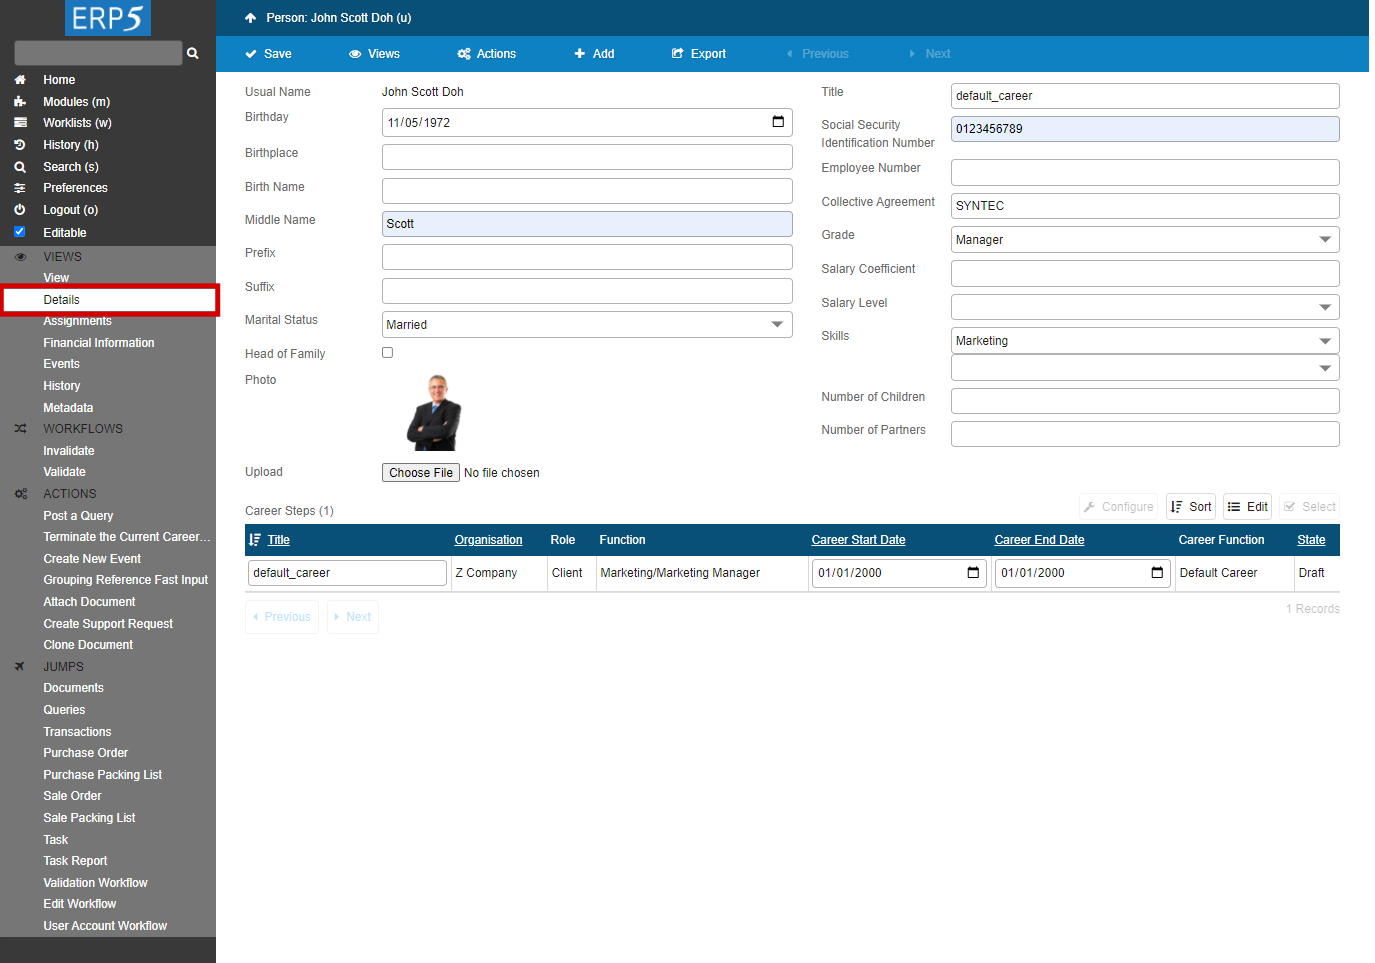
When you are done with the “view” tab, fill the other tabs. For example, you can fill out the “details” tab with the information: The middle name of John Doh is Scott; John is married and has two children. You can also add a profile photo to it.
| <tal:block tal:define="click_configuration python: {'text': 'Details'}"> <tal:block metal:use-macro="here/Zuite_CommonTemplateForRenderjsUi/macros/click_on_panel_link"> </tal:block> </tal:block> | ||
| <tal:block metal:use-macro="here/Zuite_CommonTemplateForRenderjsUi/macros/wait_for_content_loaded"> </tal:block> | ||
| type | //input[@name="field_my_child_count"] | 2 |
| select | //select[@name="field_my_marital_status"] | Married |
| <span metal:use-macro="here/Zuite_CommonTemplateForRenderjsUi/macros/save">init</span> | ||
About the other tabs
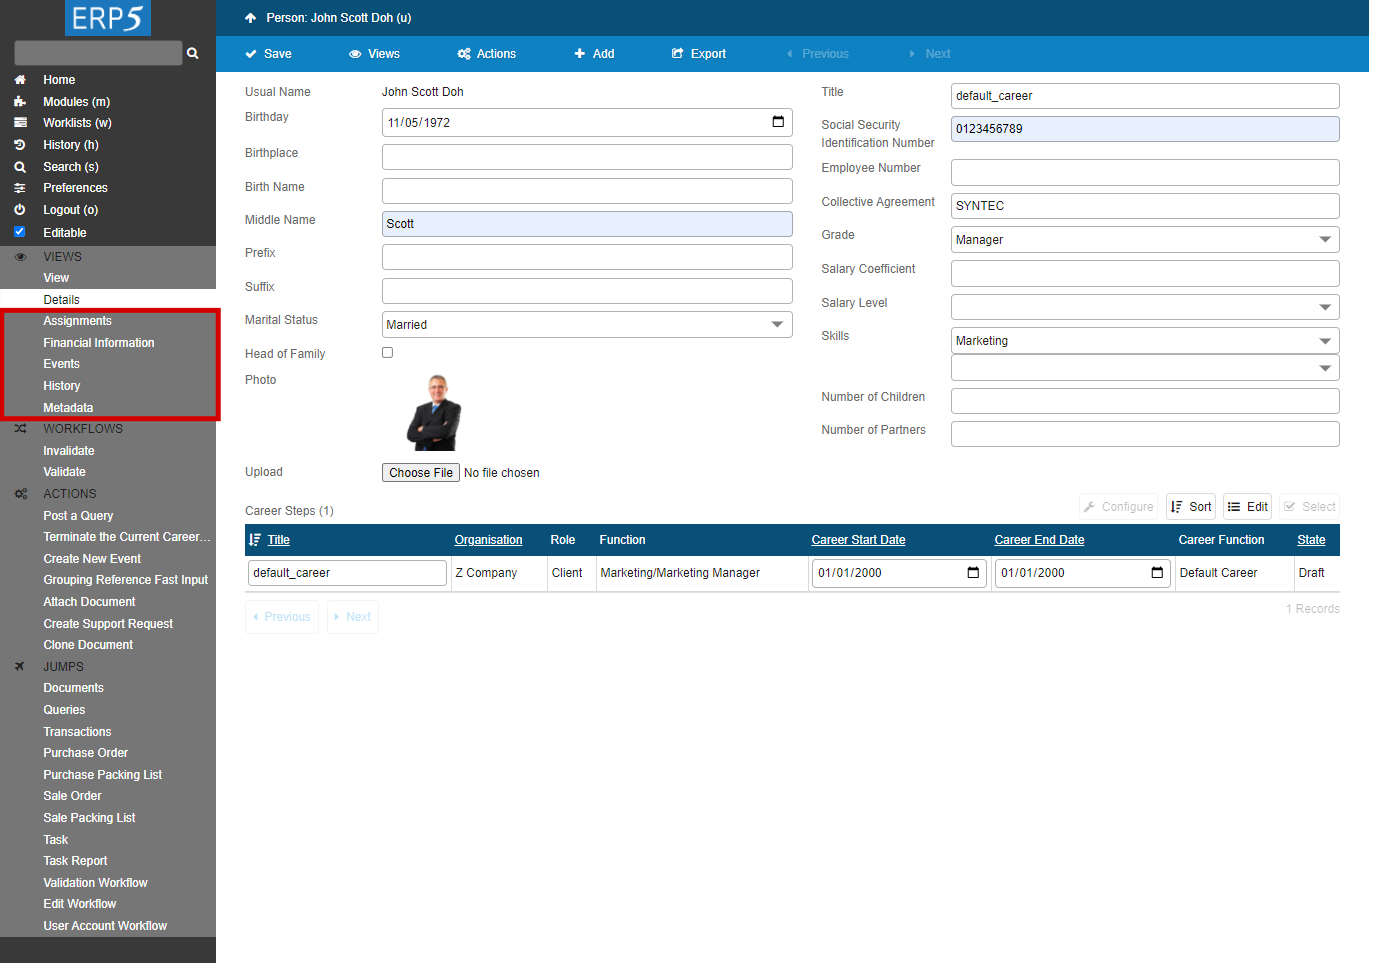
As you can see, some tabs like “assignment” for instance, do not allow to enter data. Indeed, the only way to specify this information to ERP5, is to use the “+Add”and choose “Add assignment”. But it is important to notice that the tabs circled in red on the picture, are tabs that will automatically be updated by the application whenever necessary. This subject will be treated in a specific tutorial.
Remember that these tabs provide the general information about the person you are creating, but you can add different properties using the "+Add" on top of the page. For example, the « view» tab allows you to set the person's email address. But sometimes, a person can have several email addresses. The "+Add" makes it possible for example to add an other email address; simply choose “add email”.
How to Validate a Person (1)
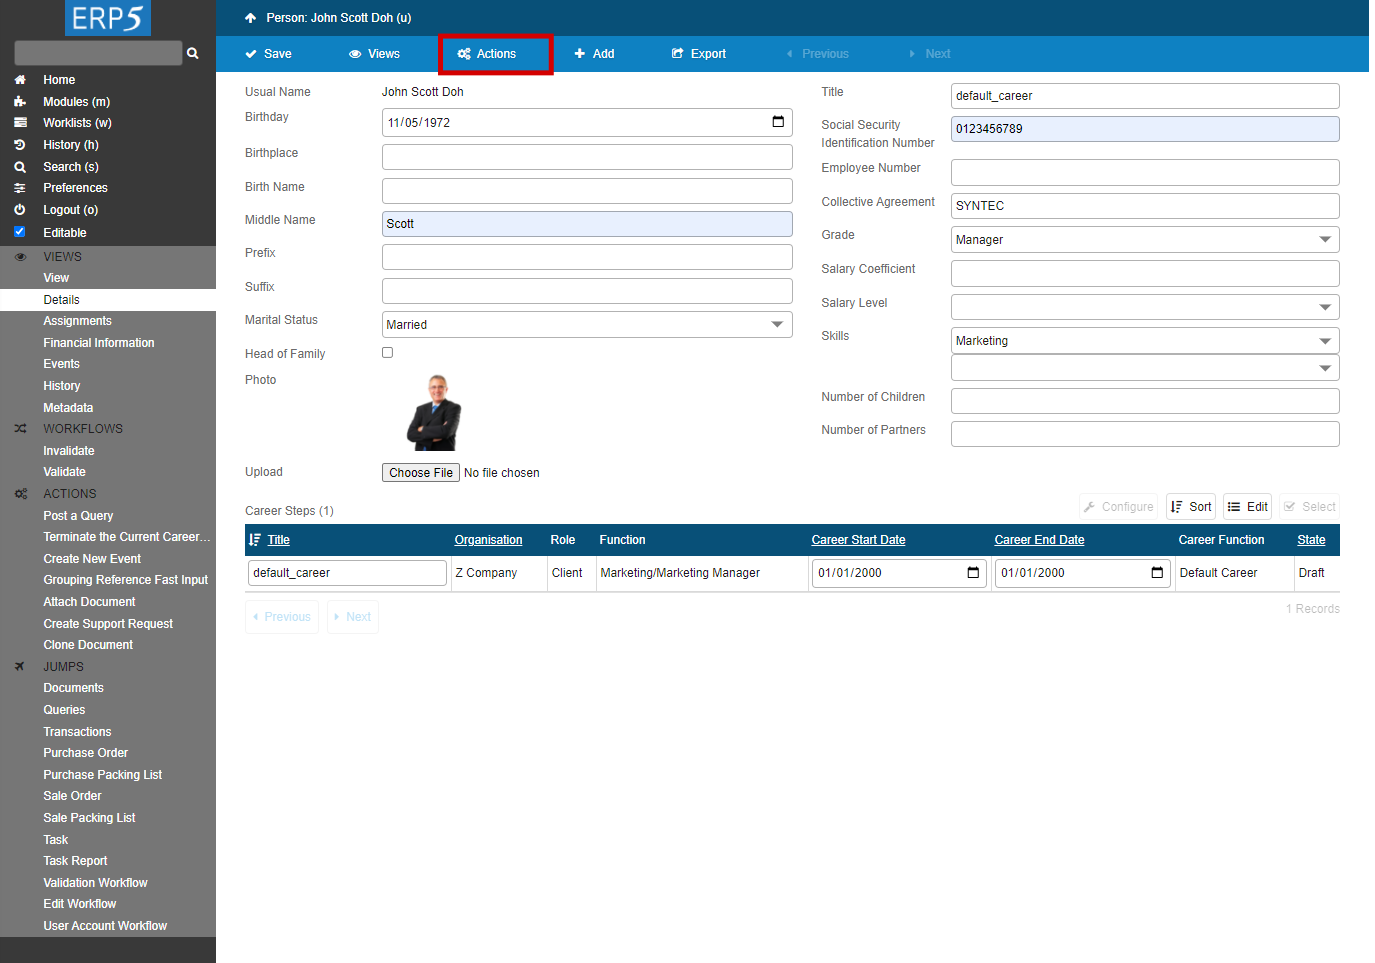
Open the "Action" menu.
ERP5 is an application based on workflows, which means that the data you enter in the system needs to be validated. In the case of a person, this step is really important, for instance, there is no need to validate somebody if you are not sure of his/her name: if the state is “draft”, which is the state by default, you warn everybody that the related information is incomplete. But when it is validated, the data is sure.
| <tal:block tal:define="click_configuration python: {'text': 'Validate'}"> <tal:block metal:use-macro="here/Zuite_CommonTemplateForRenderjsUi/macros/click_on_panel_link"> </tal:block> </tal:block> | ||
| <tal:block metal:use-macro="here/Zuite_CommonTemplateForRenderjsUi/macros/wait_for_content_loaded"> </tal:block> | ||
| <tal:block metal:use-macro="here/Zuite_CommonTemplateForRenderjsUi/macros/submit_dialog"> </tal:block> | ||
| <tal:block metal:use-macro="here/Zuite_CommonTemplateForRenderjsUi/macros/wait_for_content_loaded"> </tal:block> |
How to Validate a Person (2)
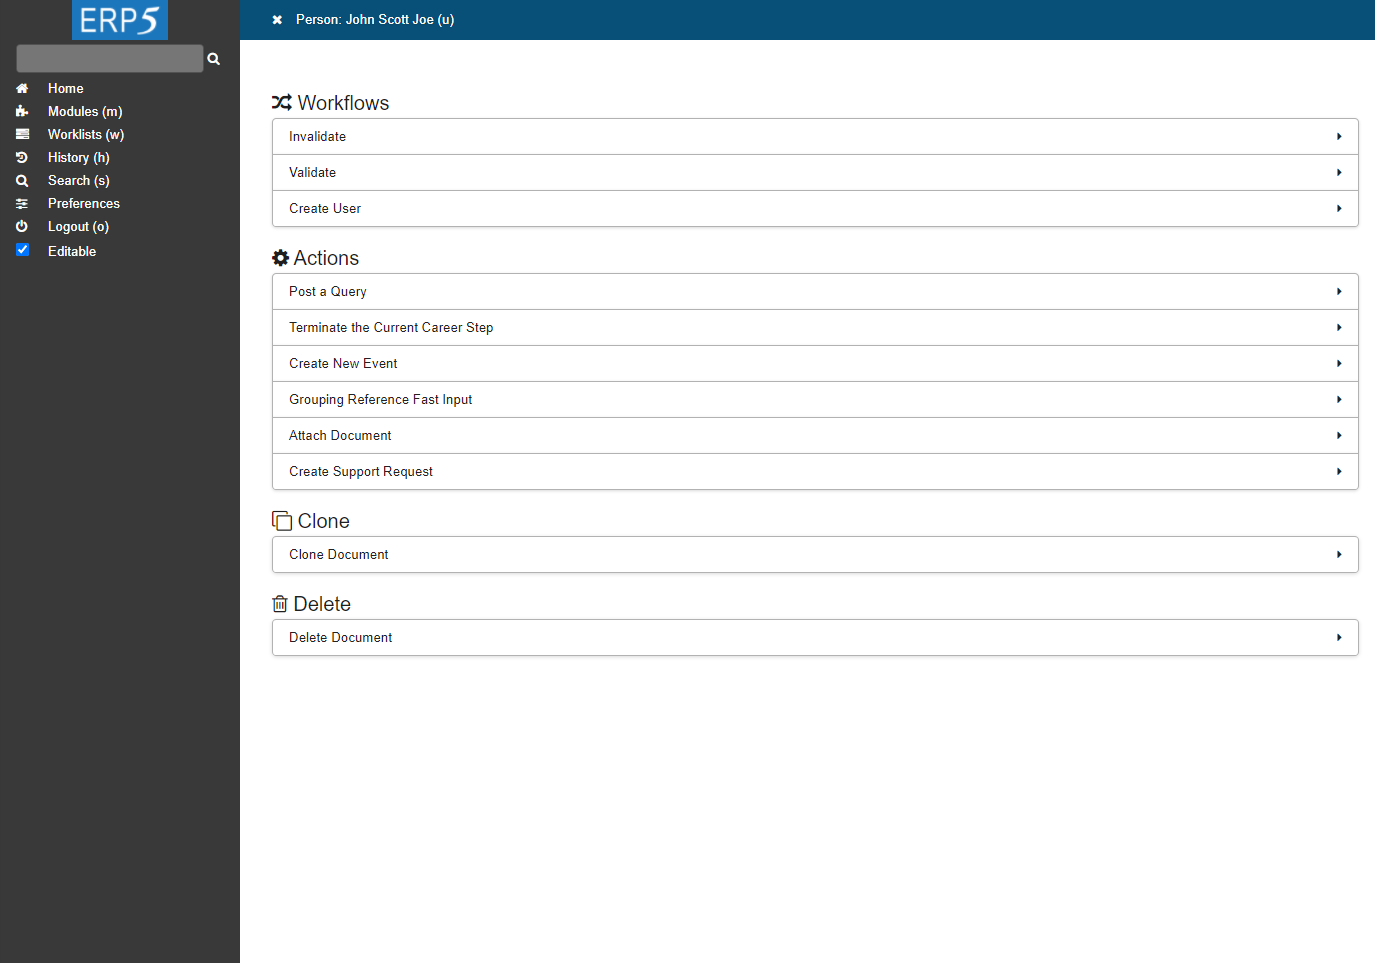
Click on “Validate”.
How to Validate a Person (3)
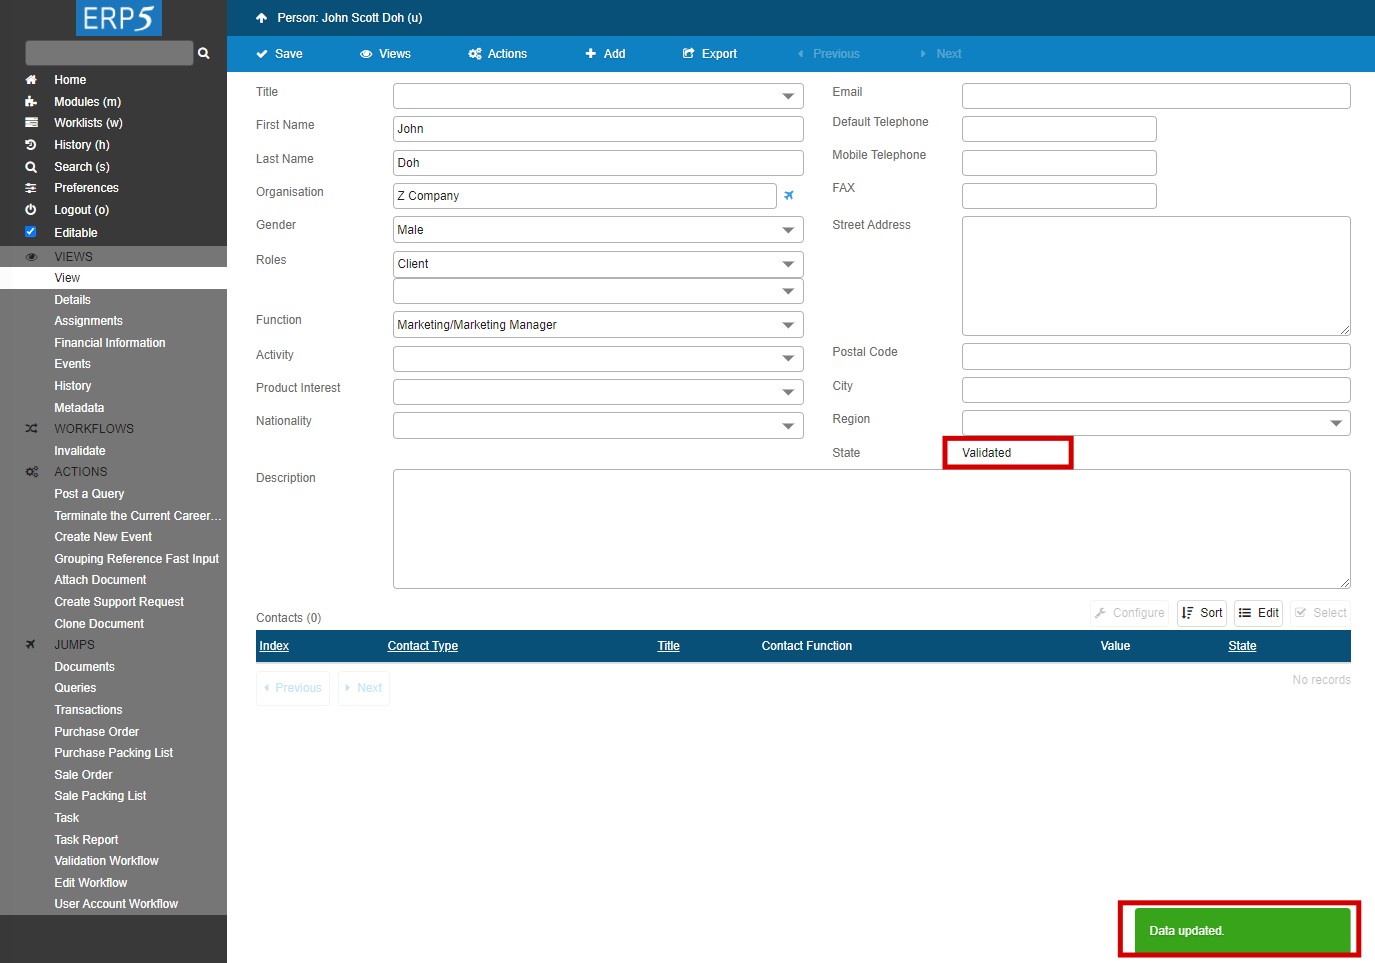
Check the update status which has been changed from "Draft" to "Validated".
Thanks to this function, your data will be validated, which means that your co-workers can be confident in accuracy of the information.
| <tal:block tal:define="click_configuration python: {'text': 'View'}"> <tal:block metal:use-macro="here/Zuite_CommonTemplateForRenderjsUi/macros/click_on_panel_link"> </tal:block> </tal:block> | ||
| <tal:block metal:use-macro="here/Zuite_CommonTemplateForRenderjsUi/macros/wait_for_content_loaded"> </tal:block> | ||
| verifyText | //p[@id="field_my_translated_validation_state_title"] | Validated |
How to Check the Creation (1)
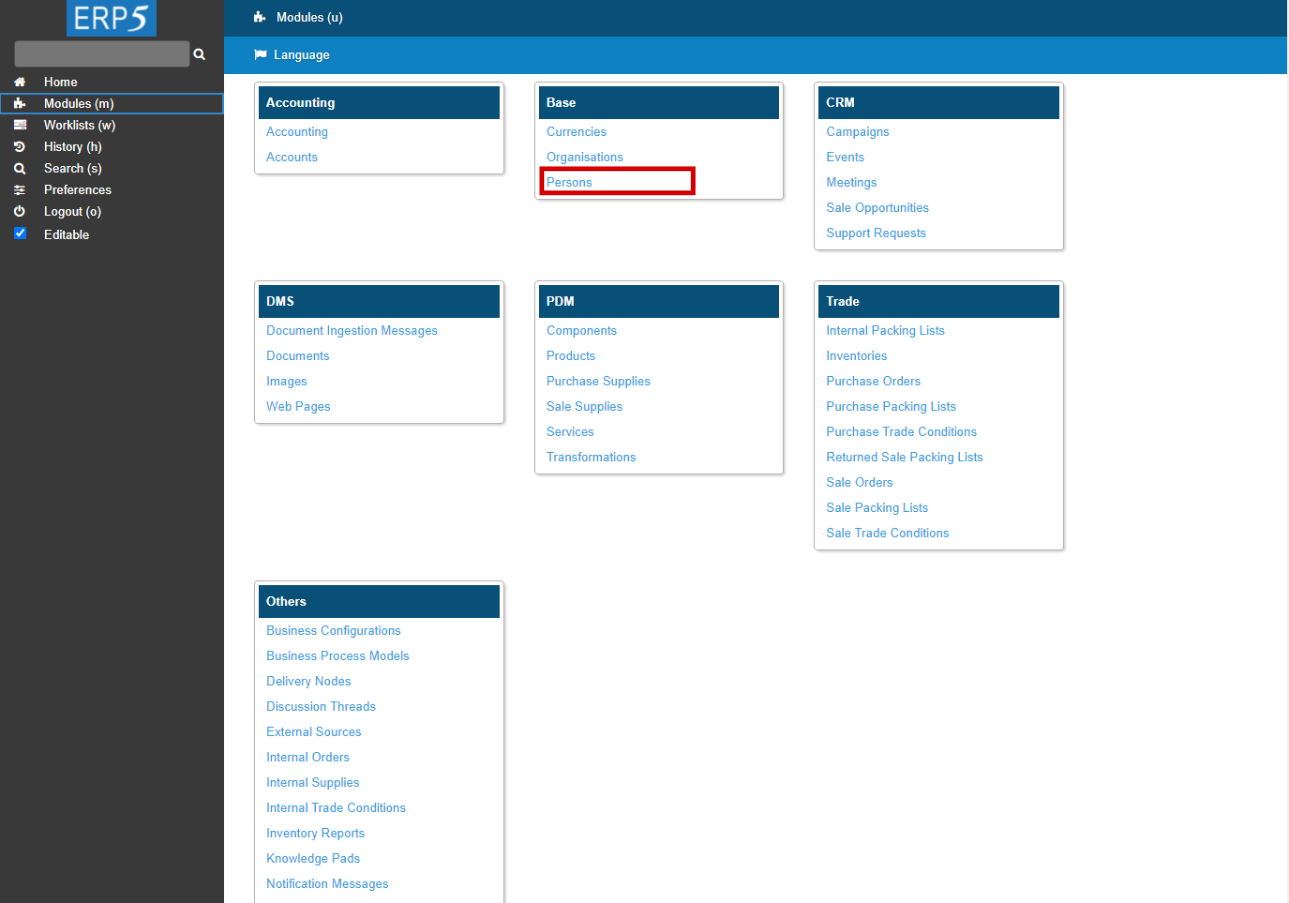
Now that the person has been created, defined and validated, we are going to check that everything worked fine.
This is a 3 step procedure: As a first step, browse the “Modules”on the sidebar, and choose “Persons”. The aim of this action is to lead you to the person module which displays each person who has been created in ERP5.
| <tal:block tal:define="click_configuration python: {'text': 'Modules'}"> <tal:block metal:use-macro="here/Zuite_CommonTemplateForRenderjsUi/macros/click_on_panel_link"> </tal:block> </tal:block> | ||
| <tal:block metal:use-macro="here/Zuite_CommonTemplateForRenderjsUi/macros/wait_for_content_loaded"> </tal:block> |
How to Check the Creation (2)
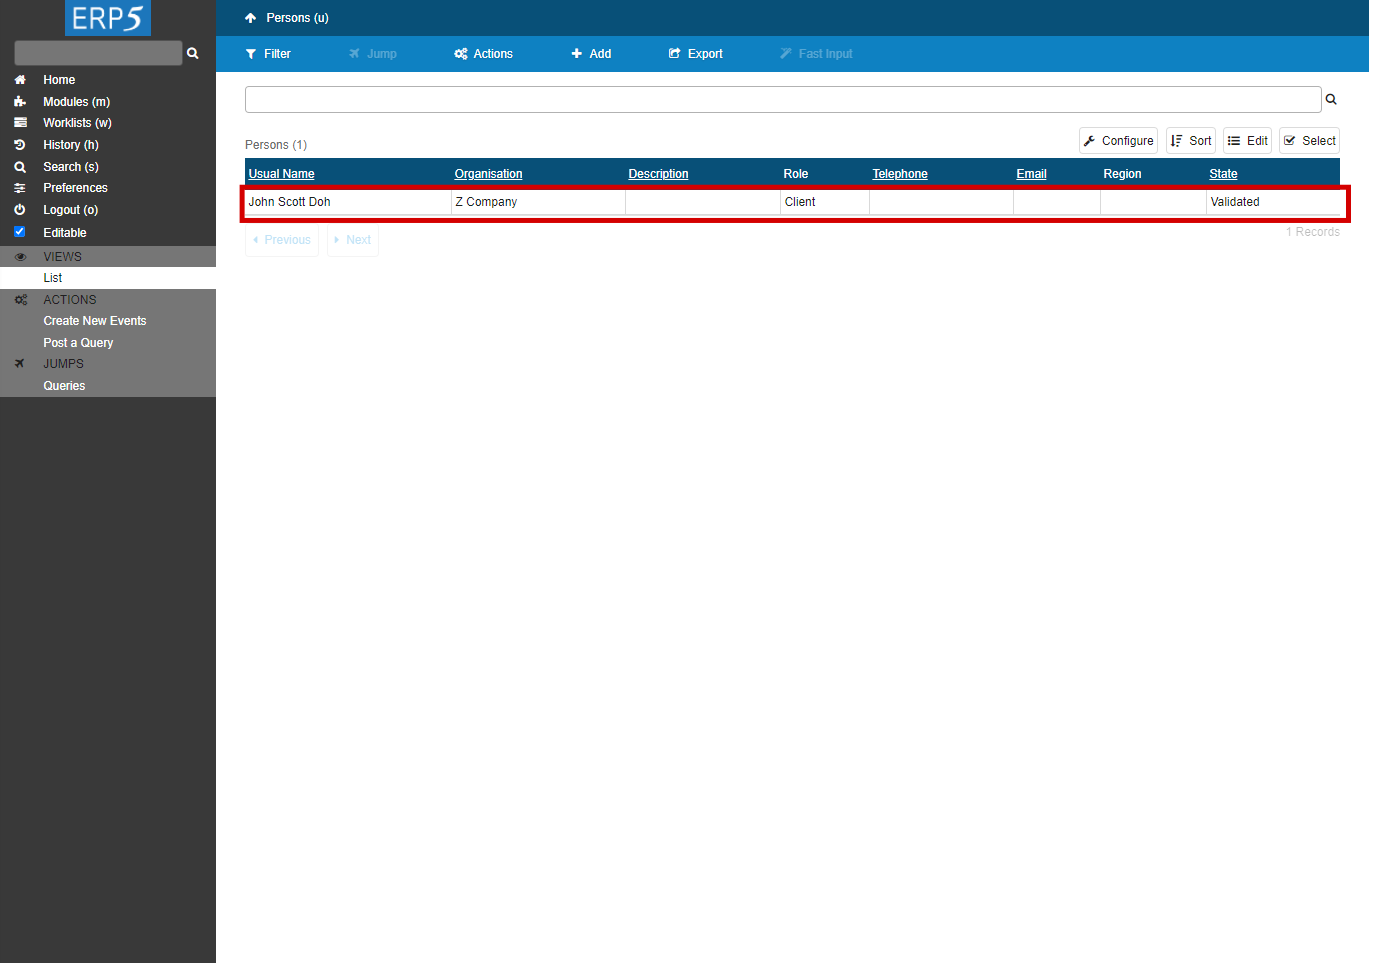
The second step is only to check that you are located in the person general menu and that the new person you created is on the Persons List.
| <tal:block tal:define="click_configuration python: {'text': 'Persons'}"> <tal:block metal:use-macro="here/Zuite_CommonTemplateForRenderjsUi/macros/click_on_page_link"> </tal:block> </tal:block> | ||
| <tal:block metal:use-macro="here/Zuite_CommonTemplateForRenderjsUi/macros/wait_for_content_loaded"> </tal:block> |
Use "Modules" tab
You can also use the "Modules" tab on the sidebar of the page to check the persons stored in your ERP5 database. Just click on “Persons” in the “Base”module, which is the module that gathers “Currencies”, “Organisations” and “Persons”.
| <span metal:use-macro="container/Zuite_viewTestMacroLibrary/macros/login_as_manager">Login As Manager</span> | ||
| openAndWait | ${base_url}/Zuite_tearDownPersonTest | |
| verifyTextPresent | Clean Ok | |
| <span metal:use-macro="container/Zuite_viewTestMacroLibrary/macros/wait_for_activities">Wait for activities </span> | ||
Thank You

- Nexedi SA
- 147 Rue du Ballon
- 59110 La Madeleine
- France
- +33629024425
For more information, please contact Jean-Paul, CEO of Nexedi (+33 629 02 44 25).