Rafael Monnerat, Jingjing XU, Mohamadou Mbengue, Sven Franck, Ni Yan, Boxiang Sun |
Send Outgoing Events
How to Send Outgoing Events
This visual guide is part of a collection of documents created by the One Student One ERP (OSOE) project in collaboration with Institut Mines Telecom, Telecom Bretagne, Dresden University of Technology and the South Westfalia University of Applied Sciences. It can be used to teach modern ERP theory and practice to undergraduate students or professionals.
Copyright: You are free to copy, distribute, display, and perform the work under the following conditions: you must attribute the work in the manner specified by the author or licensor; you may not use this work for any commercial purposes including training, consulting, advertising, self-advertising, publishing, etc.; you may not alter, transform, or build upon this work. For any reuse or distribution, you must make clear to others the license terms of this work. Any of these conditions can be waived if you get permission from the copyright holder through a commercial license or an educational license. For more information, contact info@nexedi.com
| <span metal:use-macro="container/Zuite_viewTestMacroLibrary/macros/init_test_environment">init</span> | ||
| openAndWait | ${base_url}/Zuite_setUpPostEventTest | |
| verifyTextPresent | Init Ok | |
| <span metal:use-macro="container/Zuite_viewTestMacroLibrary/macros/wait_for_activities"> Wait for activities </span> | ||
| <span metal:use-macro="container/Zuite_viewTestMacroLibrary/macros/login_as_functional_test_user">Login As Functional Test User</span> | ||
Agenda
- Confirm the Event
- Send the Event
- Check the Event status
Now we know how to create outgoing Events and associate them to a Ticket such as a campaign. In this tutorial, you will learn how to send an outgoing Event created for the campaign Ticket.
The planned Event sheet
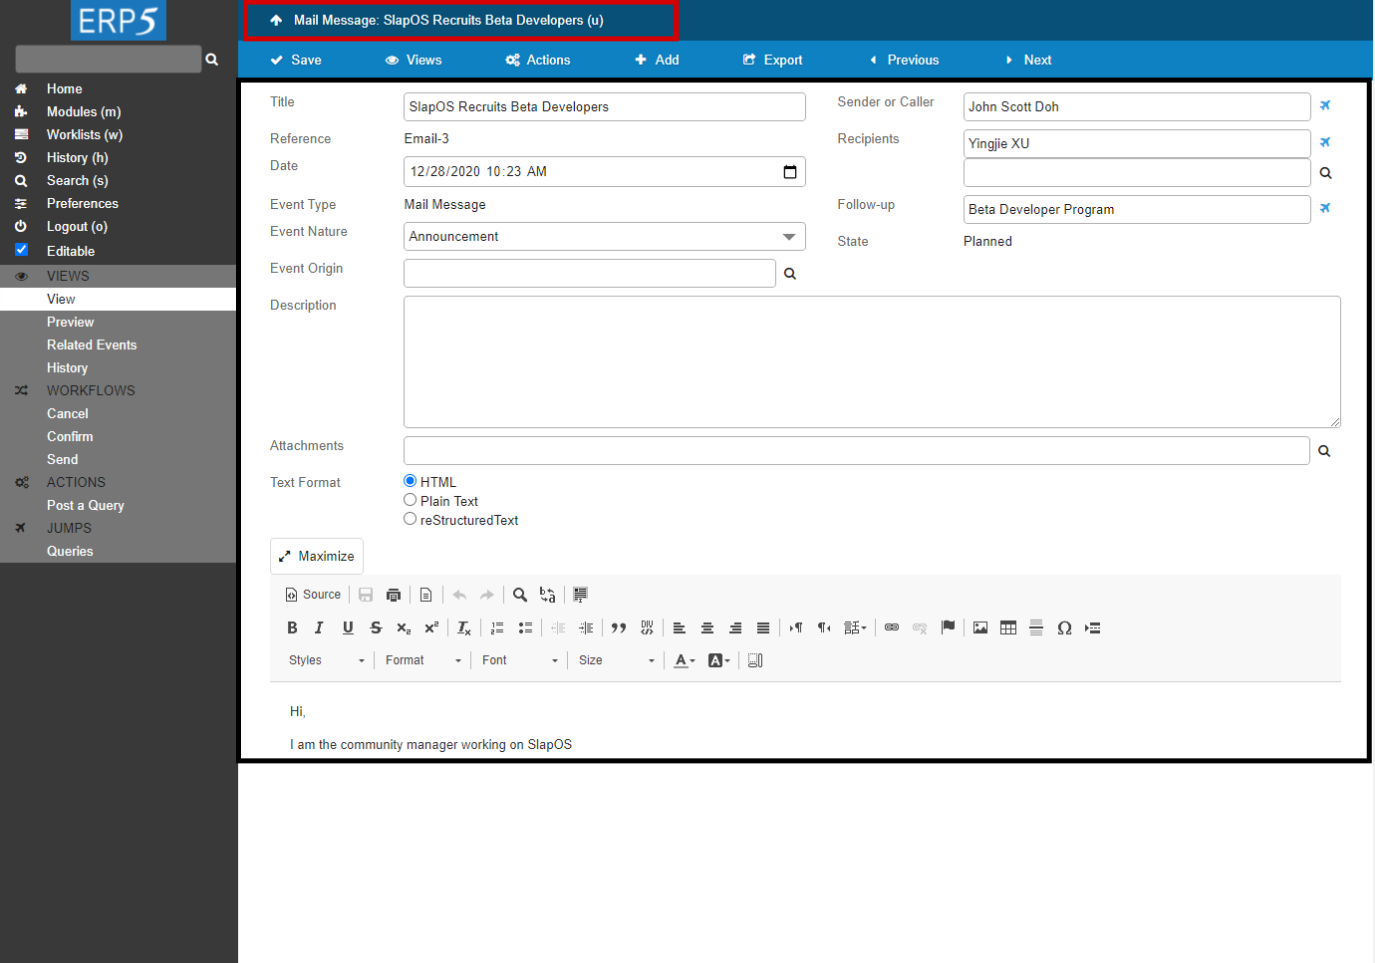
The Red Zone of the screenshot shows you your location in your ERP5 instance: the planned Event waiting to be sent.
The Black Zone displays the content of the Event. As we have edited this Event previously, it is now ready to be sent . We will then explain how to send this event from this event sheet.
| <tal:block tal:define="click_configuration python: {'text': 'Modules'}"> <tal:block metal:use-macro="here/Zuite_CommonTemplateForRenderjsUi/macros/click_on_panel_link" /> </tal:block> | ||
| <tal:block metal:use-macro="here/Zuite_CommonTemplateForRenderjsUi/macros/wait_for_content_loaded"> </tal:block> | ||
| <tal:block tal:define="click_configuration python: {'text': 'Events'}"> <tal:block metal:use-macro="here/Zuite_CommonTemplateForRenderjsUi/macros/click_on_page_link"> </tal:block> </tal:block> | ||
| <tal:block metal:use-macro="here/Zuite_CommonTemplateForRenderjsUi/macros/wait_for_content_loaded"></tal:block> | ||
| <tal:block metal:use-macro="here/Zuite_CommonTemplateForRenderjsUi/macros/wait_for_listbox_loaded" /> | ||
| waitForElementPresent | //a[contains(text(), "ZUITE-TEST-POST-EVENT-EVENT-001")] | |
| click | //a[contains(text(), "ZUITE-TEST-POST-EVENT-EVENT-001")] | |
| <tal:block metal:use-macro="here/Zuite_CommonTemplateForRenderjsUi/macros/wait_for_content_loaded"> </tal:block> | ||
| click | //input[@name="editable"] | |
| <tal:block metal:use-macro="here/Zuite_CommonTemplateForRenderjsUi/macros/wait_for_content_loaded"> </tal:block> | ||
| waitForElementPresent | //input[@name="field_my_title"] | |
| verifyText | //p[@id="field_my_translated_simulation_state_title"] | Planned |
Confirm the Event (1): Click on 'Confirm' in 'Action' list
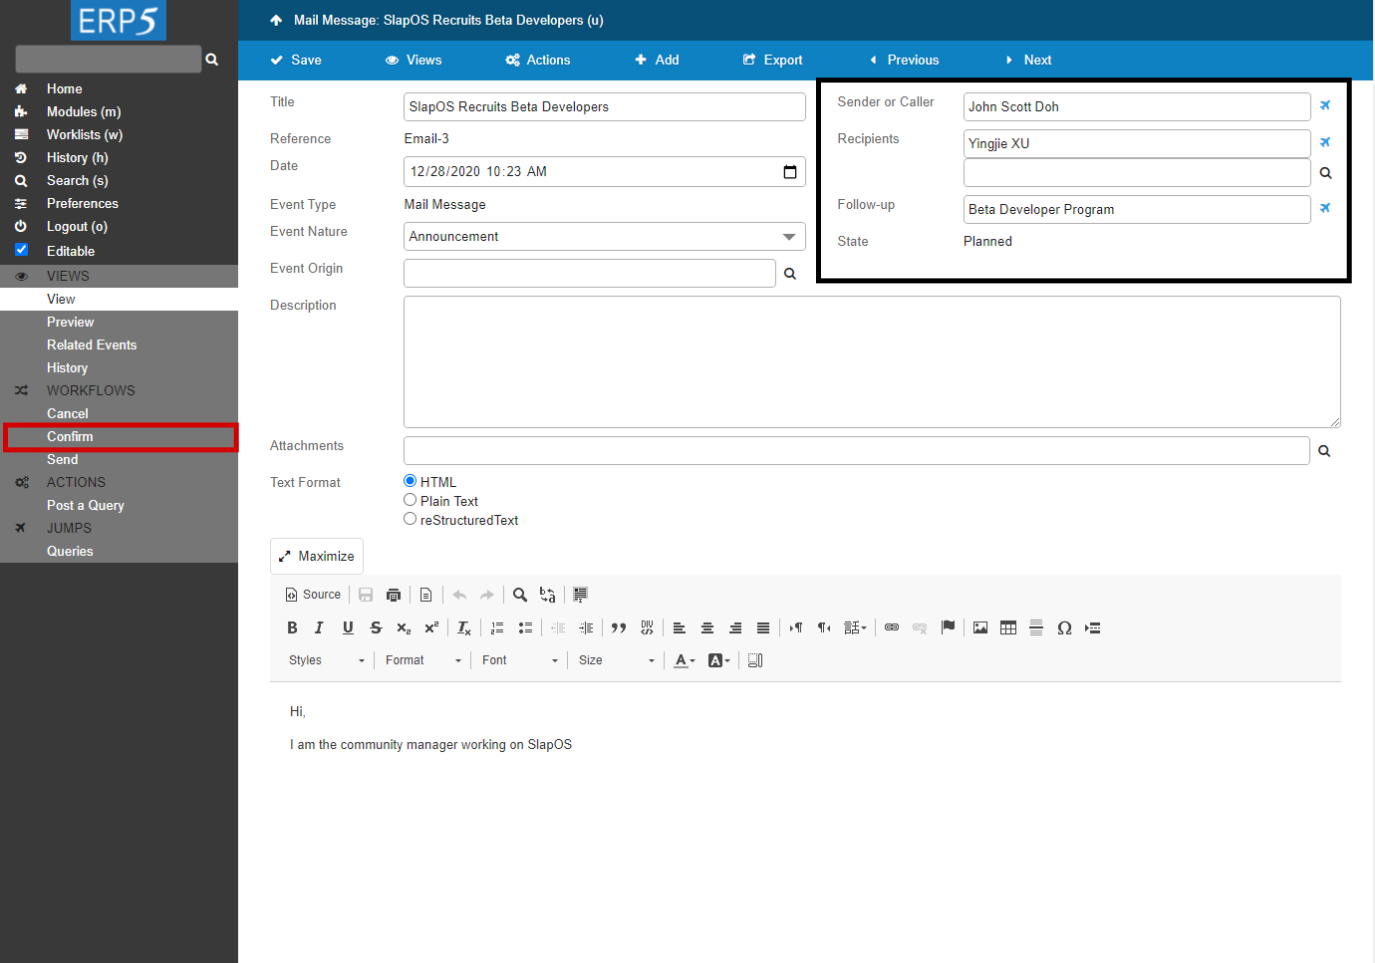
In order to send the Event, first we should verify that everything is correctly set in the Event sheet and then confirm the Planned Event .
Black Zone displays the current state of the Event is “planned”. This means that this Event has been created in the Follow Up Ticket, and waiting to be sent to the person set in the Recipient field of this Event. The person set in the Sender field will be displayed as the Sender when the Recipient receives the Event.
When you are sure everything is fine, you can then confirm the planned Event. Click on the "Confirm" on the sidebar as highlighted in Red on the screenshot.
| <tal:block tal:define="click_configuration python: {'text': 'Confirm'}"> <tal:block metal:use-macro="here/Zuite_CommonTemplateForRenderjsUi/macros/click_on_panel_link"> </tal:block> </tal:block> | ||
| <tal:block metal:use-macro="here/Zuite_CommonTemplateForRenderjsUi/macros/wait_for_content_loaded"> </tal:block> |
Confirm the Event (2): Comment and confirm
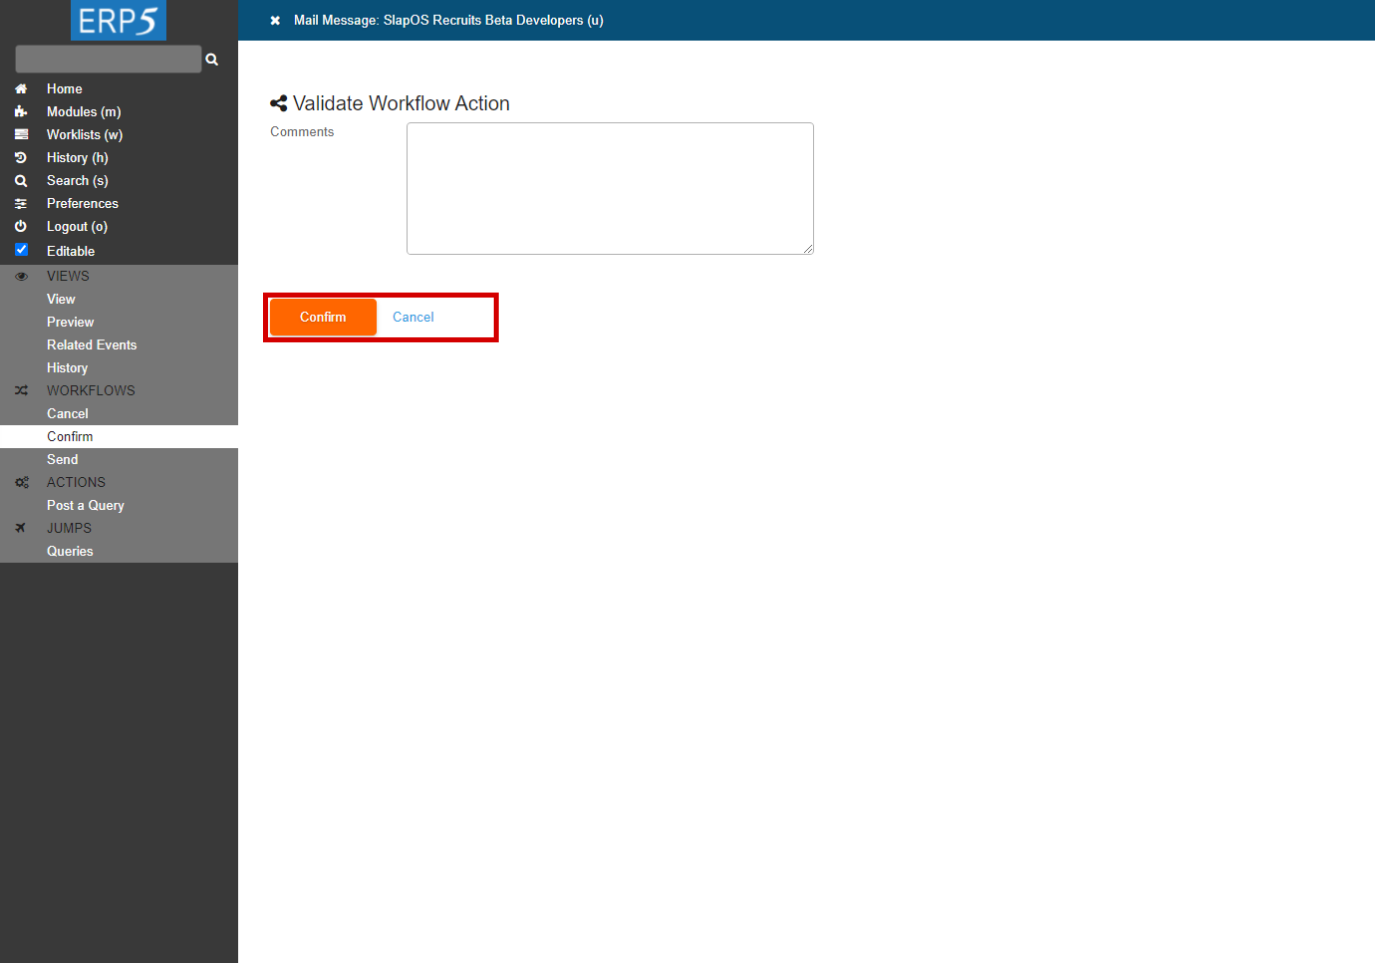
In this page you can add comments (only visible for your team) to this Event that is going to be confirmed, and then click on Confirm once again.
| <tal:block tal:define="click_configuration python: {'text': 'Confirm'}"> <tal:block metal:use-macro="here/Zuite_CommonTemplateForRenderjsUi/macros/click_on_panel_link"> </tal:block> </tal:block> | ||
| <tal:block metal:use-macro="here/Zuite_CommonTemplateForRenderjsUi/macros/wait_for_content_loaded"> </tal:block> | ||
| <tal:block metal:use-macro="here/Zuite_CommonTemplateForRenderjsUi/macros/submit_dialog"> </tal:block> | ||
| <tal:block metal:use-macro="here/Zuite_CommonTemplateForRenderjsUi/macros/wait_for_content_loaded"> </tal:block> | ||
| waitForElementPresent | //p[text()="Confirmed"] | |
Send the Event (1): Click on 'Send'
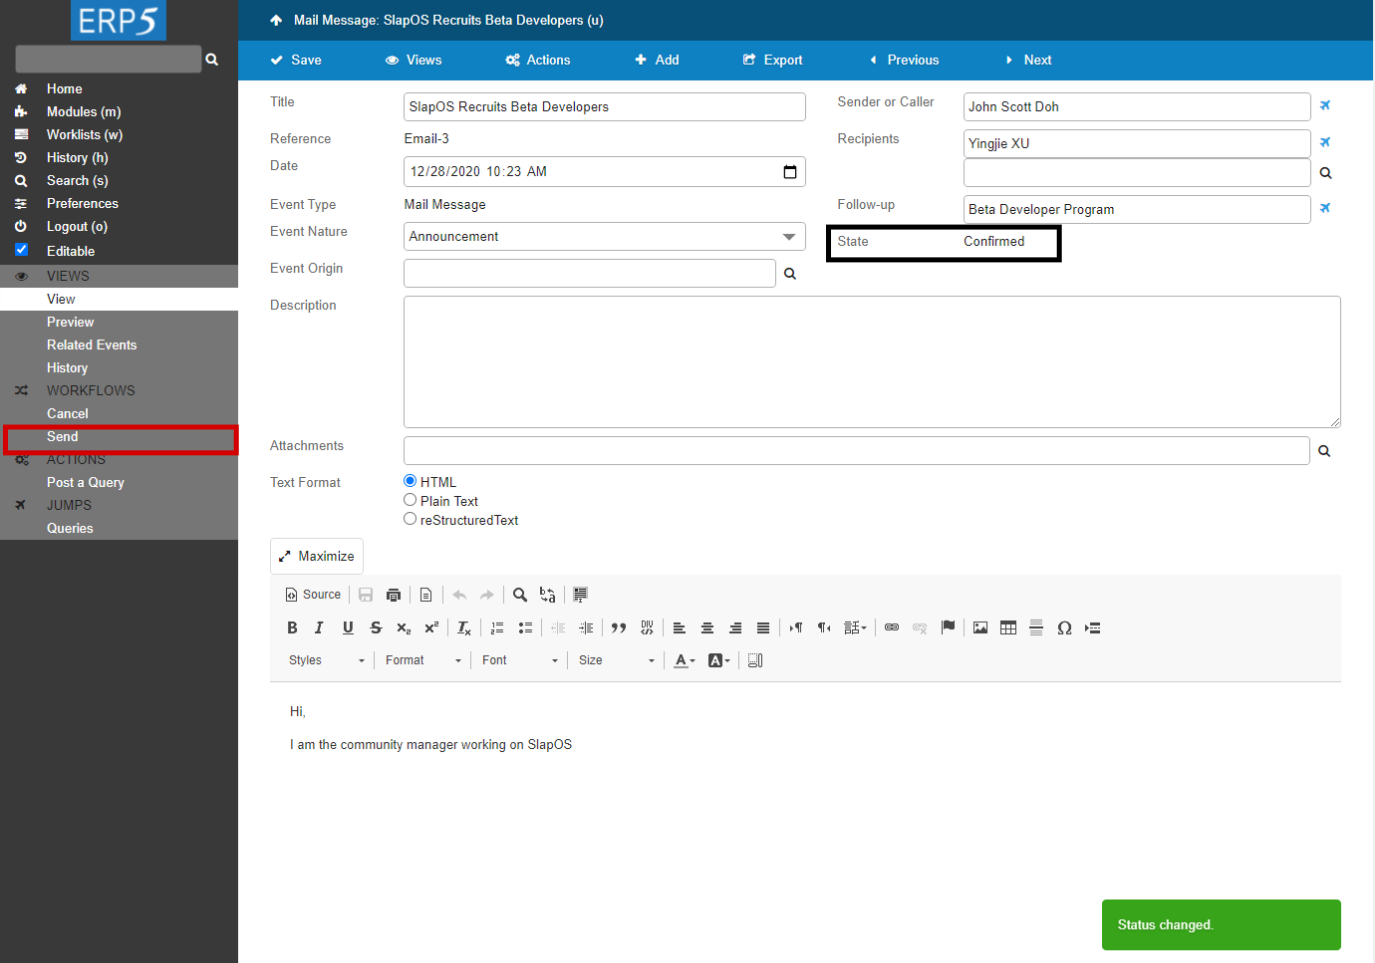
After you Confirm the Event, you will see in the Event sheet the status has changed from Planned to Confirmed .
Then we will Send the confirmed Event. The first step is to click on Send in the sidebar.
| <tal:block tal:define="click_configuration python: {'text': 'Send'}"> <tal:block metal:use-macro="here/Zuite_CommonTemplateForRenderjsUi/macros/click_on_panel_link"> </tal:block> </tal:block> | ||
| <tal:block metal:use-macro="here/Zuite_CommonTemplateForRenderjsUi/macros/wait_for_content_loaded"> </tal:block> |
Send the Event (2): Comment and send the Event
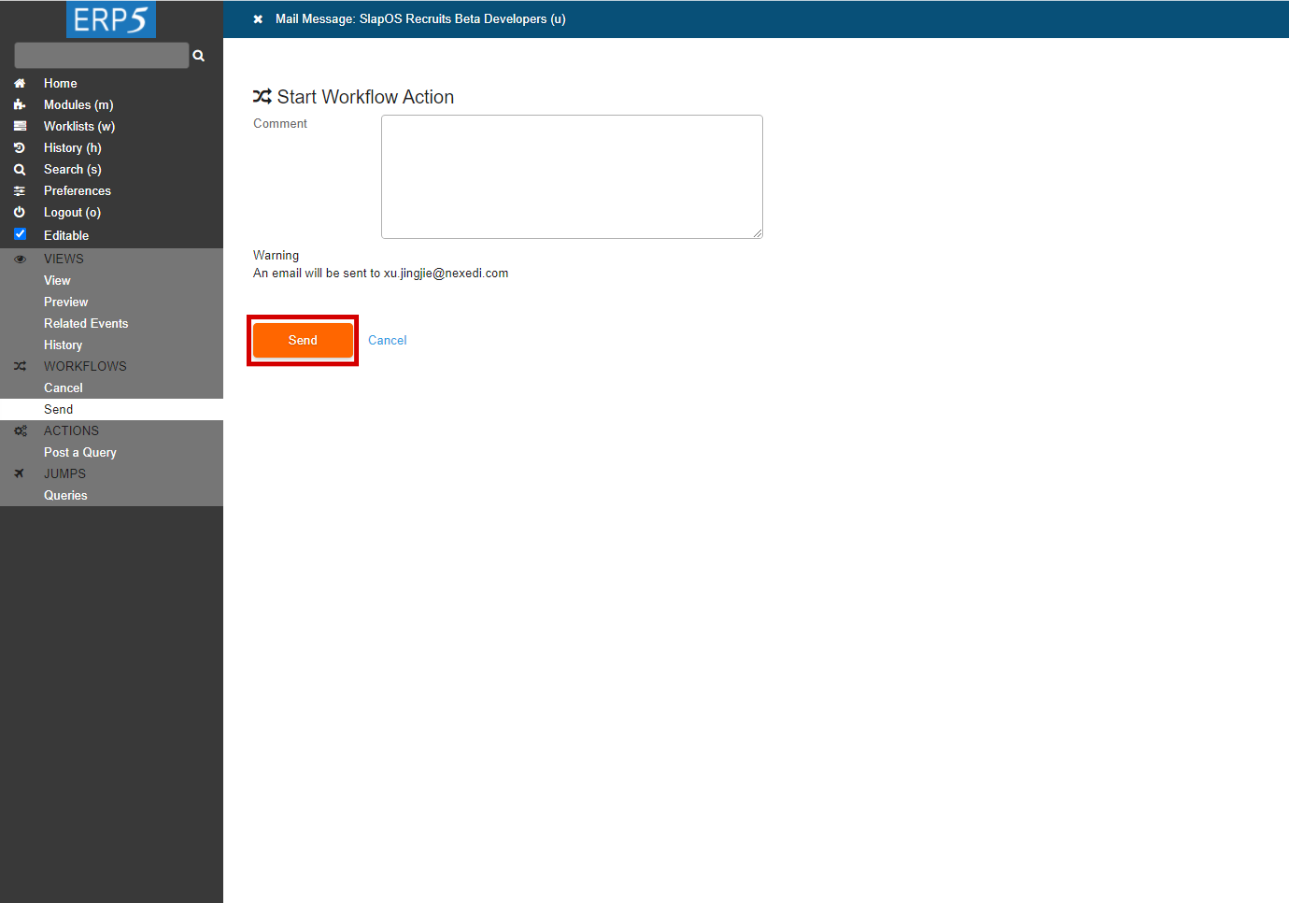
This is the page that asks for confirmation that you really want to send the Event. When an Event is sent, it cannot be modified or retreated anymore, so be careful.
You can first add some comments if needed, which will be only seen by you team. When you are ready to send the Event, click on Send .
| <tal:block metal:use-macro="here/Zuite_CommonTemplateForRenderjsUi/macros/submit_dialog"> </tal:block> | ||
| <tal:block metal:use-macro="here/Zuite_CommonTemplateForRenderjsUi/macros/wait_for_content_loaded"> </tal:block> |
Check the Event status (1): In the Event sheet
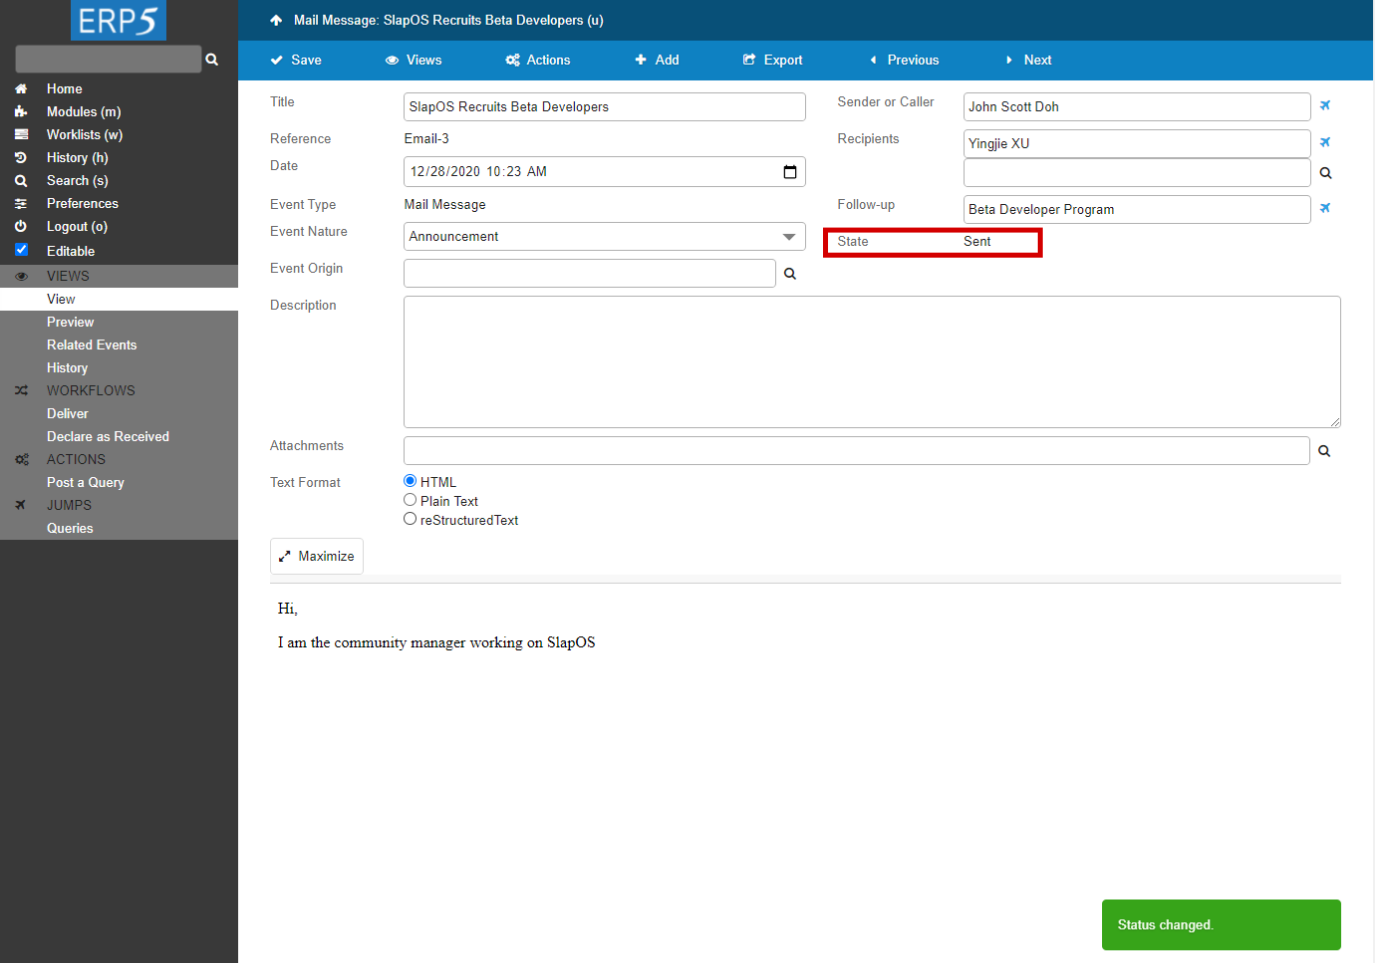
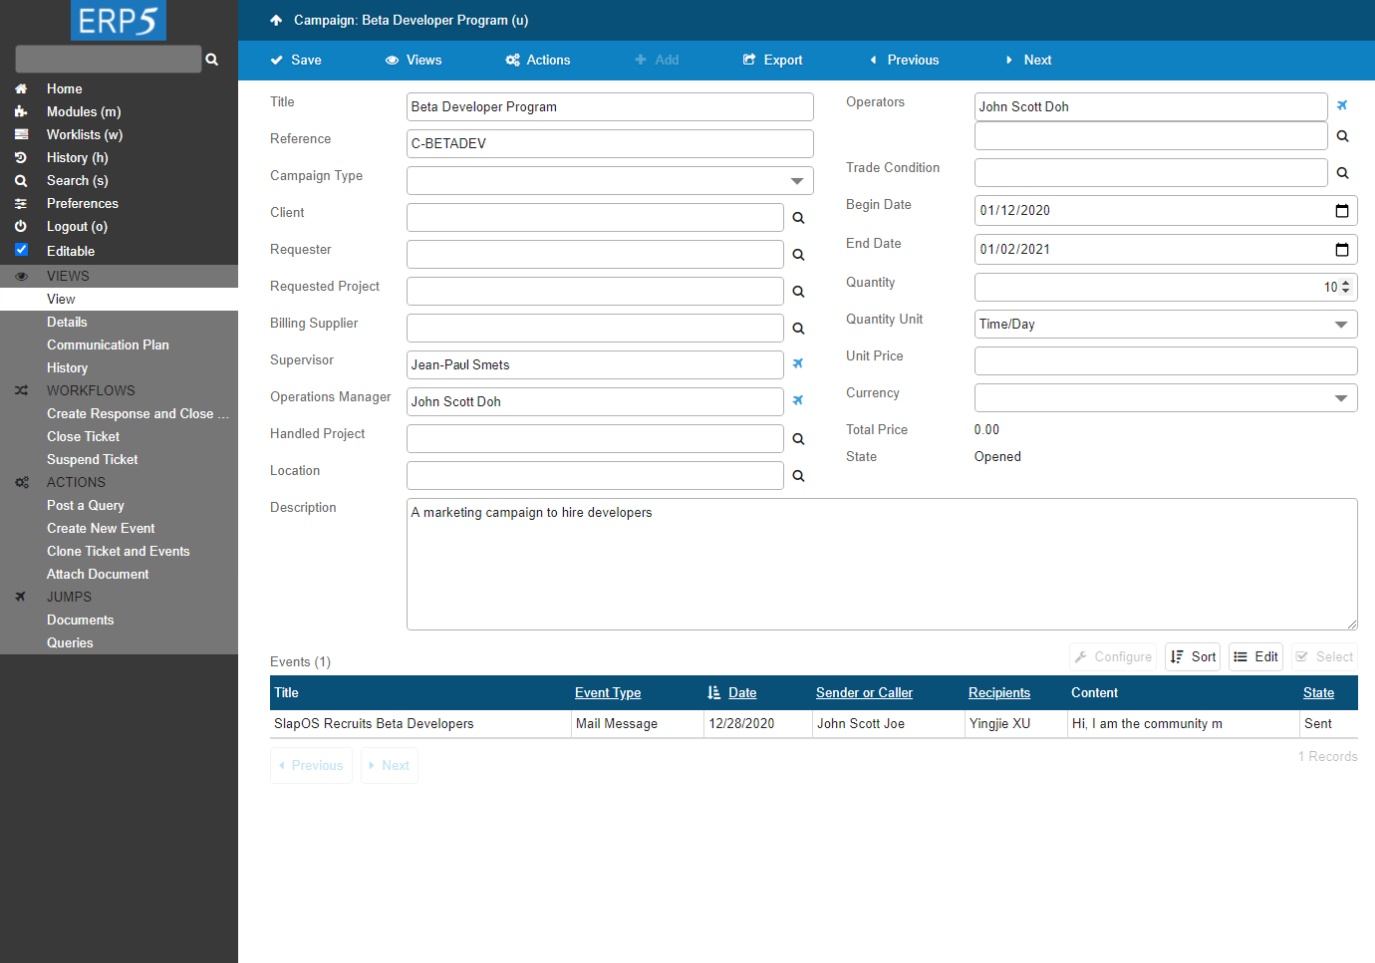
After the Event is sent, you will have to check the Event status to make sure the Event you created for the campaign Ticket has been sent to the recipient you set. There are three documents you need to check in order to make sure that your Event has been sent, and that the Recipient has successfully received the Event: the Event sheet, the Ticket sheet, and the Recipient's document .
Now we will first look at the Event sheet . After you click on Send in last step, you will be lead back on your Event sheet. As shown in the screenshot, first, you can see in the red circled area that the status of your Event has changed from "Confirmed" to "Sent", which means your Event has been "Sent" .
Then we will have to check the Ticket sheet . Click on the Plane Icon next to the Follow Up field of your Event. This action will lead you back to the related Ticket, in our example, which is still the same campaign "Beta Developer Program" as in the previous tutorial “How to Send Outgoing Events”.
| waitForElementPresent | //p[text()="Sent"] |
Check the Event status (2): In the Ticket sheet
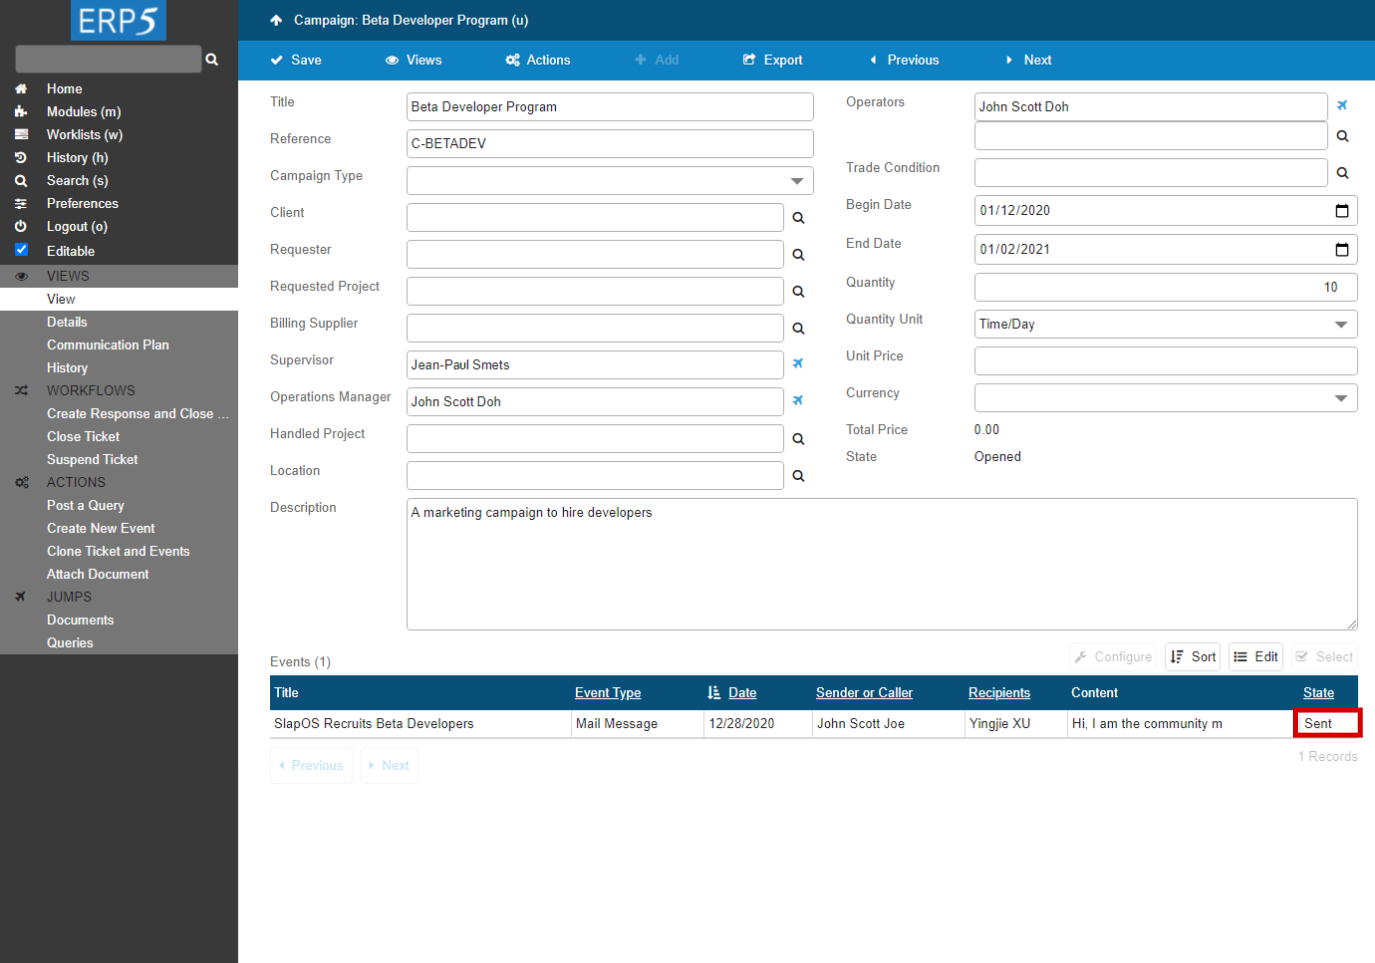
From the previous step we see that the Event sheet shows the Event is sent. After we clicked on the plane icon, we have been lead to the sheet of the message Event's Follow Up Ticket - in our example the Beta Developer Program. So as you can see circled in red on the screenshot of the Campaign Ticket, in the Events list , the Event is now displayed in a sent state. Again, this means that your Event has been sent .
However, are you sure that your Event has been sent to the right person-the Recipient that you set in the Event? And do you want to know how does this message Event behaves on the person document of the Recipient? In order to have a clear look, we will need to access to the Person Document of the Recipient .
| click | //input[@name="field_my_default_follow_up_title"]/../../a | |
| <tal:block metal:use-macro="here/Zuite_CommonTemplateForRenderjsUi/macros/wait_for_content_loaded"> </tal:block> | ||
| waitForElementPresent | //input[@value="ZUITE-TEST-POST-EVENT-CAMPAIGN-001"] | |
| <tal:block metal:use-macro="here/Zuite_CommonTemplateForRenderjsUi/macros/wait_for_listbox_loaded" /> | ||
| waitForElementPresent | //a[contains(text(), "ZUITE-TEST-POST-EVENT-EVENT-001")] | |
| waitForElementPresent | //a[contains(text(), "Sent")] | |
Check the Event status (3): Reach ERP5 Persons database
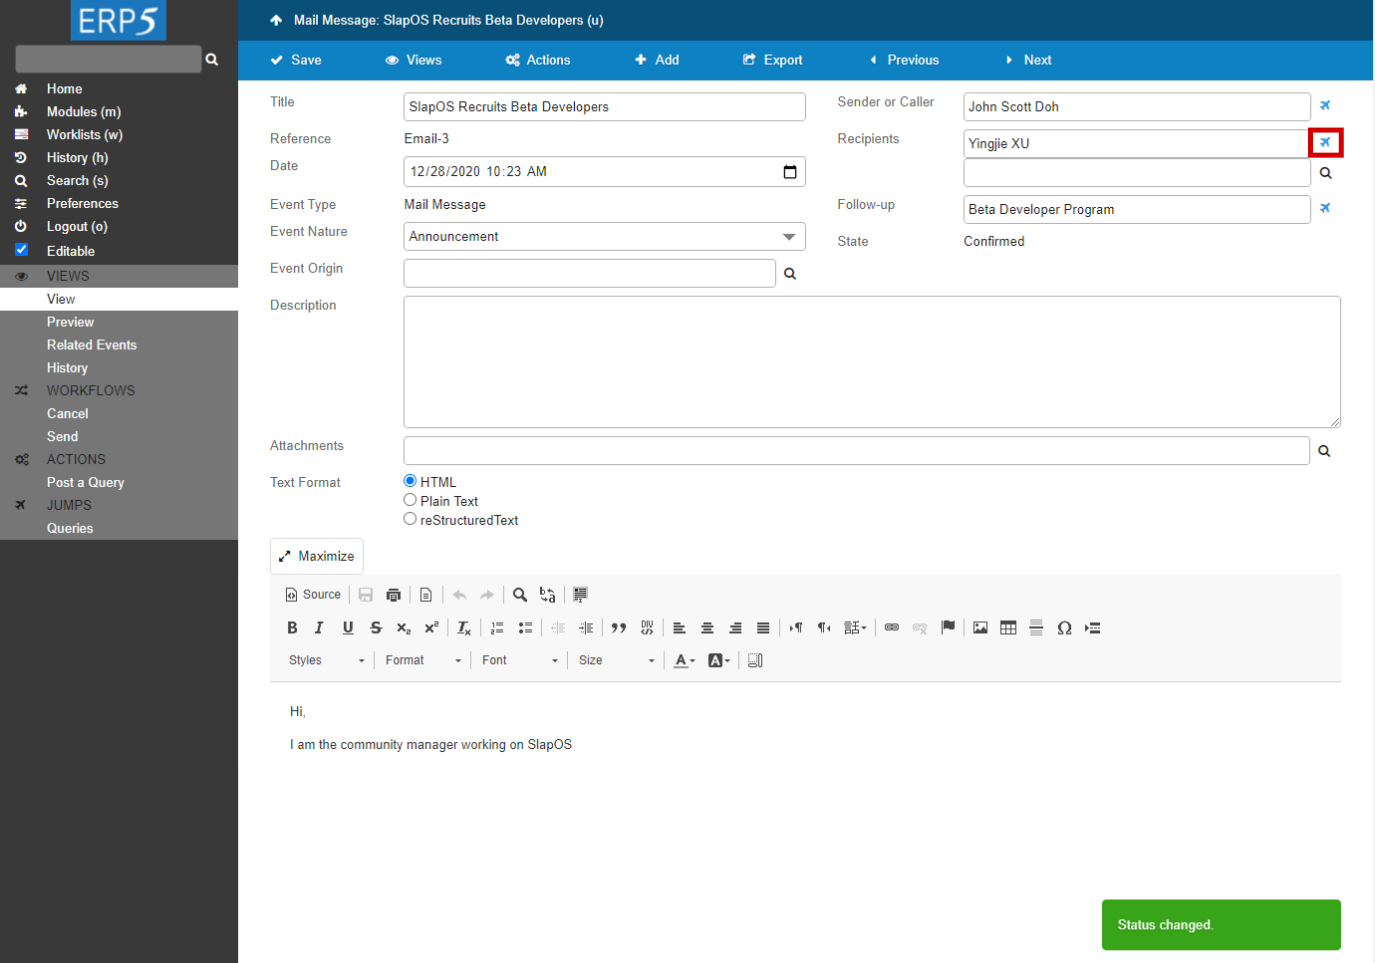
Click on the "plane" icon next to the Recipient "person" file you want to access, it will lead you to the database of this person. In this screenshot, we will access the Person document of Yingjie Xu.
| <tal:block tal:define="click_configuration python: {'text': 'Modules'}"> <tal:block metal:use-macro="here/Zuite_CommonTemplateForRenderjsUi/macros/click_on_panel_link" /> </tal:block> | ||
| <tal:block metal:use-macro="here/Zuite_CommonTemplateForRenderjsUi/macros/wait_for_content_loaded"> </tal:block> | ||
| <tal:block tal:define="click_configuration python: {'text': 'Persons'}"> <tal:block metal:use-macro="here/Zuite_CommonTemplateForRenderjsUi/macros/click_on_page_link"> </tal:block> </tal:block> | ||
| <tal:block metal:use-macro="here/Zuite_CommonTemplateForRenderjsUi/macros/wait_for_content_loaded"></tal:block> |
Check the Event status (4): In the Recipient's document
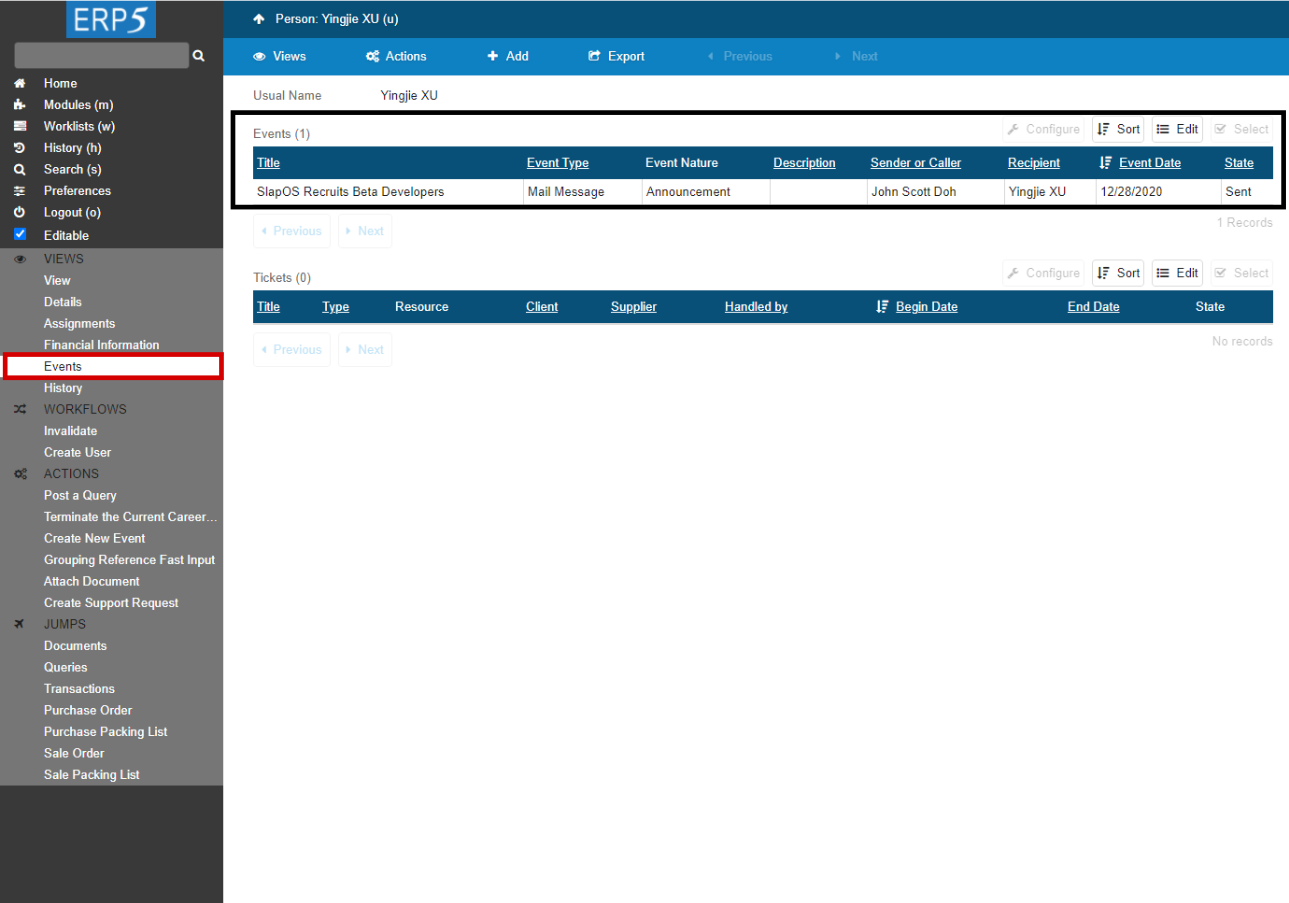
Now we have been redirected to Yingjie Xu's Person Document, to check how does the Event behaves in this document, we will click on the “Event” tab , as circled on sidebar of the screenshot.
In ERP5 the Event tab of the person document displays all the Events that have been sent or received by a person. As you can see on the screenshot, the Event we have sent in this tutorial is displayed here. This method helps you follow the relations you have with your clients, suppliers and prospects. If you click on the Event, you will be redirected to the sheet of this Event.
| <tal:block metal:use-macro="here/Zuite_CommonTemplateForRenderjsUi/macros/wait_for_listbox_loaded" /> | ||
| waitForElementPresent | //a[contains(text(), "ZUITE-TEST-POST-EVENT-PERSON-SUPERVISOR")] | |
| click | //a[contains(text(), "ZUITE-TEST-POST-EVENT-PERSON-SUPERVISOR")] | |
| <tal:block metal:use-macro="here/Zuite_CommonTemplateForRenderjsUi/macros/wait_for_content_loaded"> </tal:block> | ||
| <tal:block tal:define="click_configuration python: {'text': 'Events'}"> <tal:block metal:use-macro="here/Zuite_CommonTemplateForRenderjsUi/macros/click_on_panel_link" /> </tal:block> | ||
| <tal:block metal:use-macro="here/Zuite_CommonTemplateForRenderjsUi/macros/wait_for_content_loaded"></tal:block> | ||
| waitForElementPresent | //a[contains(text(), "ZUITE-TEST-POST-EVENT-EVENT-001")] | |
Your Event has been sent

Here we are back on the Event sheet of the Event that we have sent to Yingjie Xu in this tutorial.
| click | //a[contains(text(), "ZUITE-TEST-POST-EVENT-EVENT-001")] | |
| <tal:block metal:use-macro="here/Zuite_CommonTemplateForRenderjsUi/macros/wait_for_content_loaded"></tal:block> | ||
| waitForElementPresent | //p[text()="Sent"] | |
| <span metal:use-macro="container/Zuite_viewTestMacroLibrary/macros/login_as_manager">Login As Manager</span> | ||
| <span metal:use-macro="container/Zuite_viewTestMacroLibrary/macros/wait_for_activities"> Wait for activities </span> | ||
| openAndWait | ${base_url}/Zuite_tearDownPostEventTest | |
| verifyTextPresent | Clean Ok | |
| <span metal:use-macro="container/Zuite_viewTestMacroLibrary/macros/wait_for_activities"> Wait for activities </span> | ||
Thank You

- Nexedi SA
- 147 Rue du Ballon
- 59110 La Madeleine
- France
- +33629024425
For more information, please contact Jean-Paul, CEO of Nexedi (+33 629 02 44 25).