Installing AOS on a switch
This tutorial will guide you through the process of installing AOS (AOS = ACCTON Operating System) on the Edgecore AS5812 switch. ACCTON is the company owning Edgecore.
AOS is an OS for switches developped by Edgecore. AOS should be soon open sourced by Edgecore. In order to configure a switch to make computers communicate, we need an installed OS on a switch.
If you are doing this installation in the hosting data enter, the switch should have been connected to the internet in the datacenter. (For more information, read Install ESA Kit and OCP Servers)
If you are doing this installation from your office (before inserting the switch to the rack), the switch should be connected to the internet in your office. (Suggested)
Table Of Content
- Check recognizion of the serial port
- tftp server Installation
- AOS Installation
Check recognizion of Serial Port
root@DellE5530:~# ls /dev/ttyUSB*
To see if your serial port is recognized, simply look if you have the following files:
root@DellE5530:~# ls /dev/ttyUSB*
/dev/ttyUSB0
If you serial port is not recognized it means that you may need to install a driver. If so, you can follow the little tutorial in the next slides.
Display information about USB buses

On your terminal, enter
lsusb
to display information about USB buses in your system and the devices connected to them.
You will have something like
ID XXXX:YYYY ... Serial port [name of your serial port]
Note down the XXXX and YYYY.
Add loadable kernel

Enter
modprobe usbserial vendor=0xXXXX product=0xYYYY
Modprobe is used to add a loadable kernel to your Linux kernel.
Look for tty

Enter
chmod 777 devttyXXXX
You need to give all rights to your ttyXXXX in order to see if your serial port is recognized by your computer.
Here, mine is ttyUSB0.
Install dnsmasq-base
Enter
sudo apt install dnsmasq-base
in order to install dnsmasq which will be used as a standalone TFTP server.
Enter
mkdir -p /tftpboot
to create a /tftpboot repository. This is the directory in which you will put the files you want to send to your switch.
Give rights
Enter
sudo chmod -R 777 /tftpboot
to give full rights to the tftpboot repository.
Download image
Download the official AOS Debian 10 image for AS5812 switch and put it inside the /tftpboot directory.
Enter
cd /tftpboot
wget https://handbook.rapid.space/rapidspace-AOS.AS5812.Debian10.Official.Image/Base_download -O aos_5812_debian10.swi # if you are outside China
wget https://handbook.xunkongjian.cn/rapidspace-AOS.AS5812.Debian10.Official.Image/Base_download -O aos_5812_debian10.swi # if you are inside China
You now have your upgraded file on your switch.
Start tftpd server to server the image
Start the tftpd server on your computer to serve the image to the switch.
Enter
cd /tftpboot
dnsmasq -d --port=0 --log-dhcp --enable-tftp --tftp-root=/tftpboot
You are now ready to install the image on your switch. You should keep this terminal open to see the logs of dnsmasq. Once installation will be done, you can stop this dnsmasq process by pressing "Ctrl-C".
Install minicom
Enter
sudo apt-get install minicom
which installs minicom to communicate with your switch.
Connect the switch with Raspberry Pi
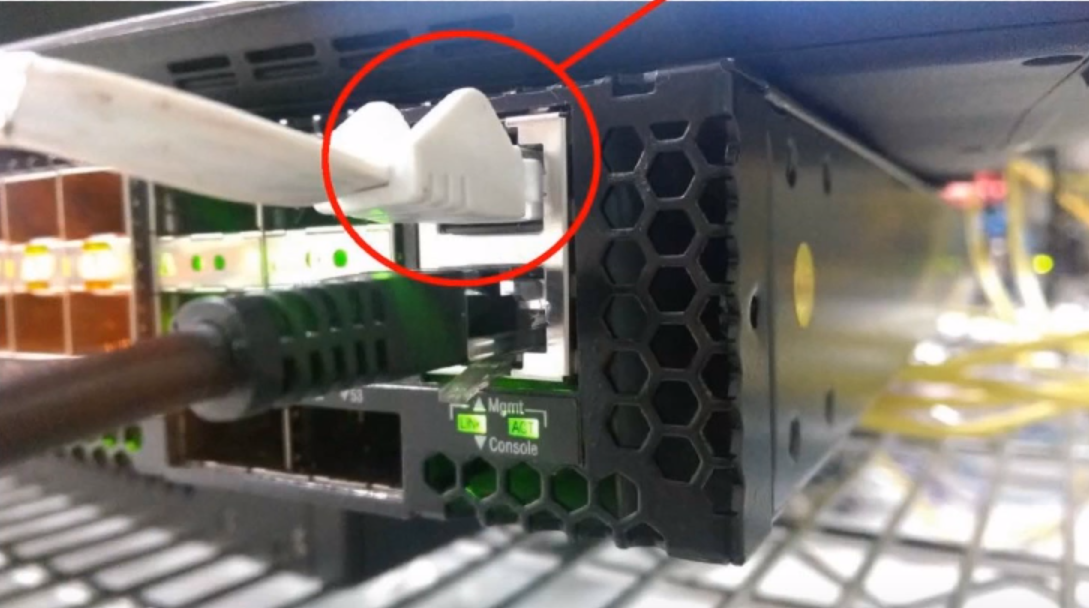
Two cables are used here to connect the switch with the Raspberry Pi: an ethernet cable (The white cable in the red circle in this image) and a serial cable (The black cable in this image).
The ethernet cable is plugged between the so-called Management port on the switch side and the ethernet port on the Raspberry Pi side.
The serial cable has one side on RJ45 and the other side on USB. The RJ45 side is connected to the console port of the switch, and the USB is connected to the USB port of Raspberry Pi.
These two cables are used to distribute IPs from the RPi via dnsmasq.
Open config
Enter
sudo minicom -s
to open minicom with option s. It is for configuration.
Choose setup
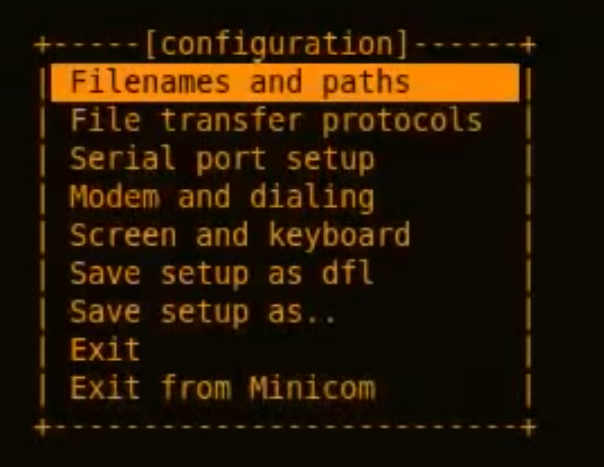
When you are in configuration choose Serial port setup.
Modification of setup

Do you remember your ttyXXXX from the part 1. ? It is the same which is used here. So press A and enter your ttyXXXX. Then enter to exit the A line ; Press E to choose 115200 8N1. Then enter again to exit the E line. Finally set F and G to no and go back to configuration.
Save modifications
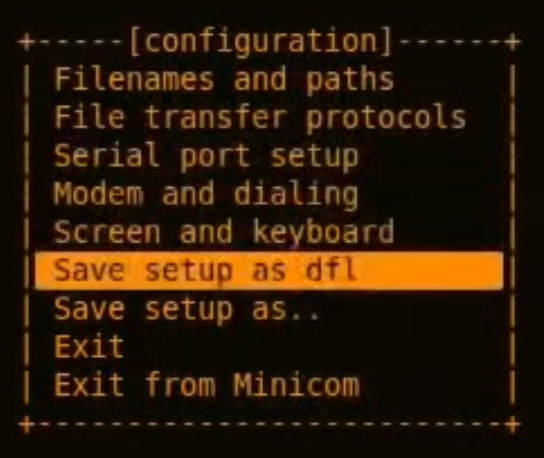
Save your setup as dfl. The difference between Save setup as dfl and Save setup as .. is : for the first one, when you will launch minicom you can type sudo minicom and it will open minicom with your last config save as default. In the second one, imagine you save as switch, you will have to launch minicom in this way : sudo minicom switch in order to use the switch configs you saved earlier.
You are now in the switch. In my case, there was scrolling text and I need to type this command to stop it : onie-discovery-stop.
Configure an ip address on your computer
You need to setup an IP address on your ethernet interface of your computer. Depending on your computer, it may be different procedure. Please give your computer a local IP address. e.g. 192.168.1.99
Configure an ip address on the switch
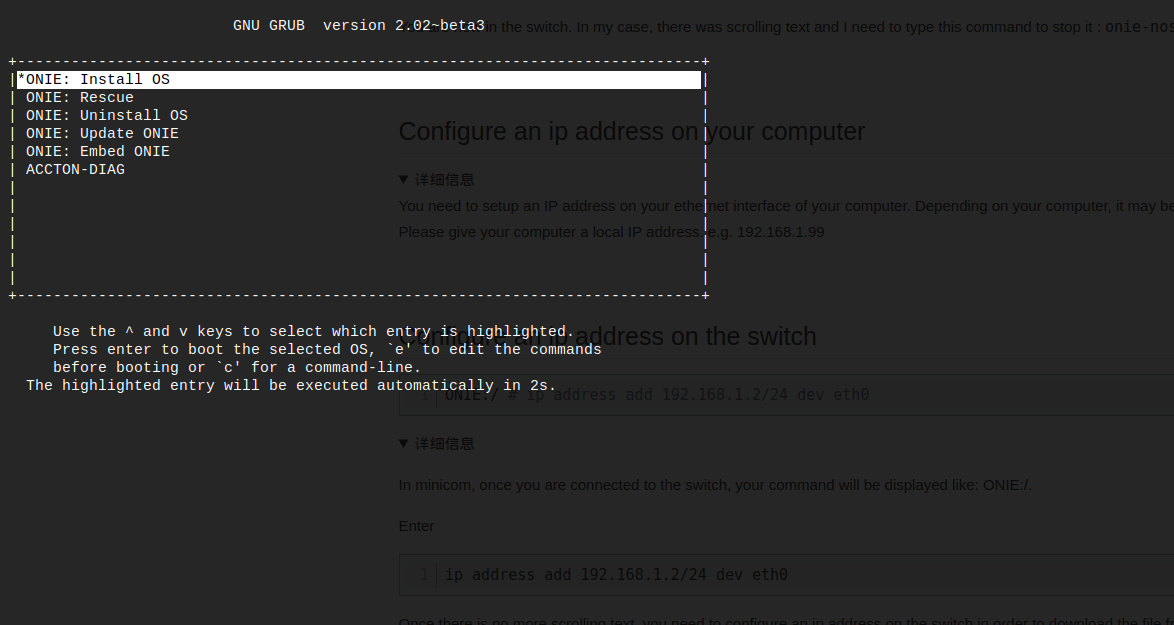
You need reboot the switch and then enter the ONIE command line. If there is no OS installed yet, you will go automatically in ONIE. If there is an OS already installed, you will need to select "ONIE" entry in the GRUB menu:
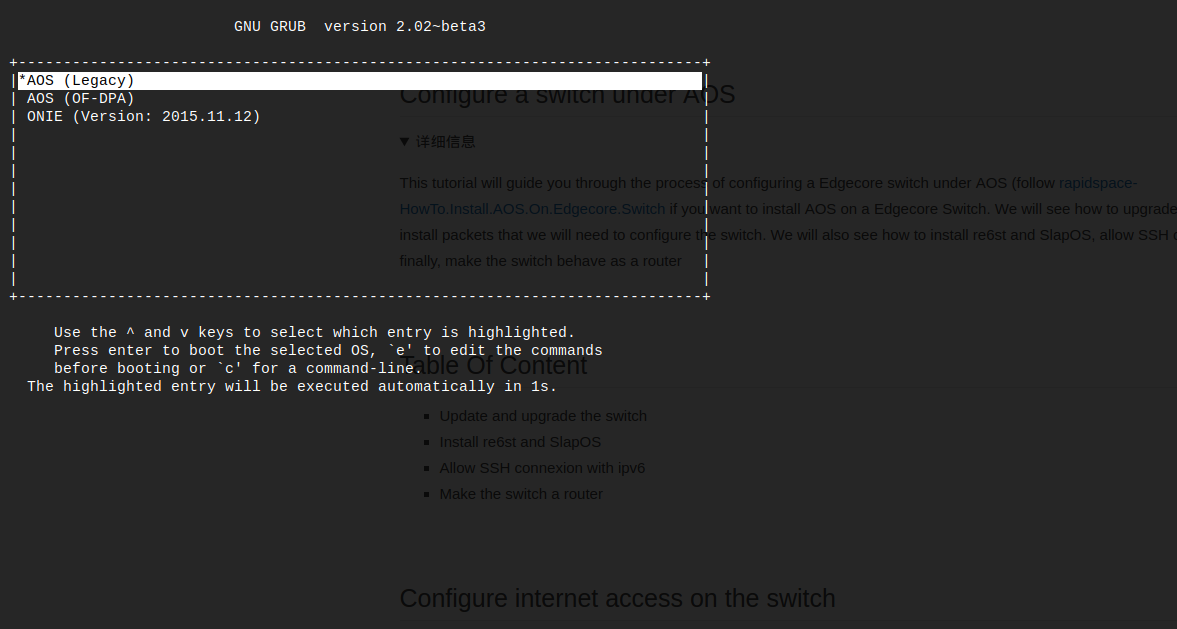
Then choose "Install OS":
ONIE:/ # ip address add 192.168.1.2/24 dev eth0
In minicom, once you are connected to the switch, your command will be displayed like: ONIE:/.
Enter
ip address add 192.168.1.2/24 dev eth0
Once there is no more scrolling text, you need to configure an ip address on the switch in order to download the file from tftpboot. You should use an IP address on the same subnetwork as your computer.
Installing from tftp server
ONIE:/ # install_url tftp://192.168.1.99/aos_5812_debian10.swi
Enter
install_url tftp://[ip of your computer]/[file name]
to install the image you just downloaded earlier. The file is call aos_5812_debian10.swi and you should look the IP address in your computer with the command "ip -4 a".
It will fetch the image and install it. You can look at the log of the installation.
Log to the switch
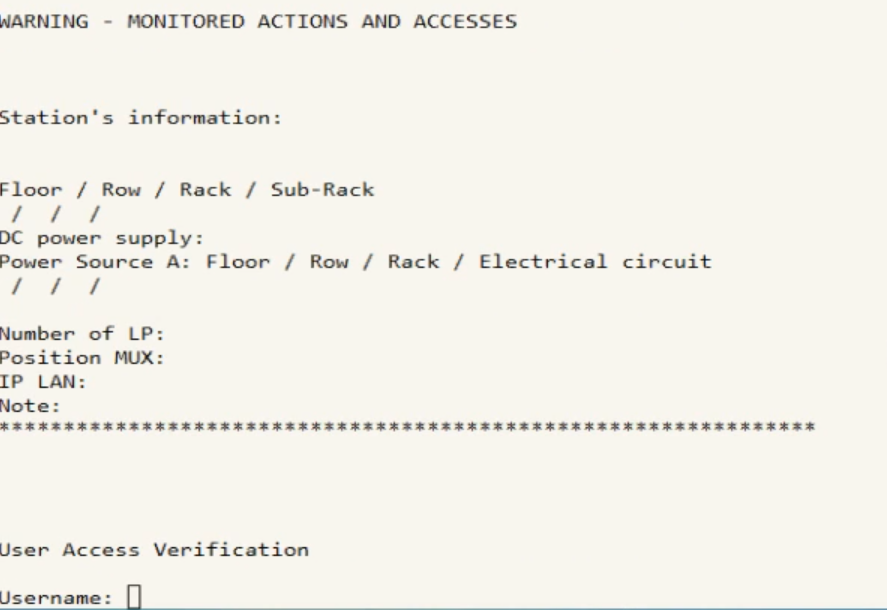
Log to the switch and check if the firmware version is correct. The default user name is : admin and the default password is : admin.
Show license file
You can generate a license file and use it but you don't need to do it with AOS. You can now use your switch with AOS normally.
In case you really want to generate your license file, you can find here a tutorial which explains how to get a license file and then do the commands below to put your license file in AOS.

Type
show license file
Check the license. At first there will be no licence file. You need to provide the mac-address of the switch to get a license file. The license file is needed to get it to work.
Show interfaces brief
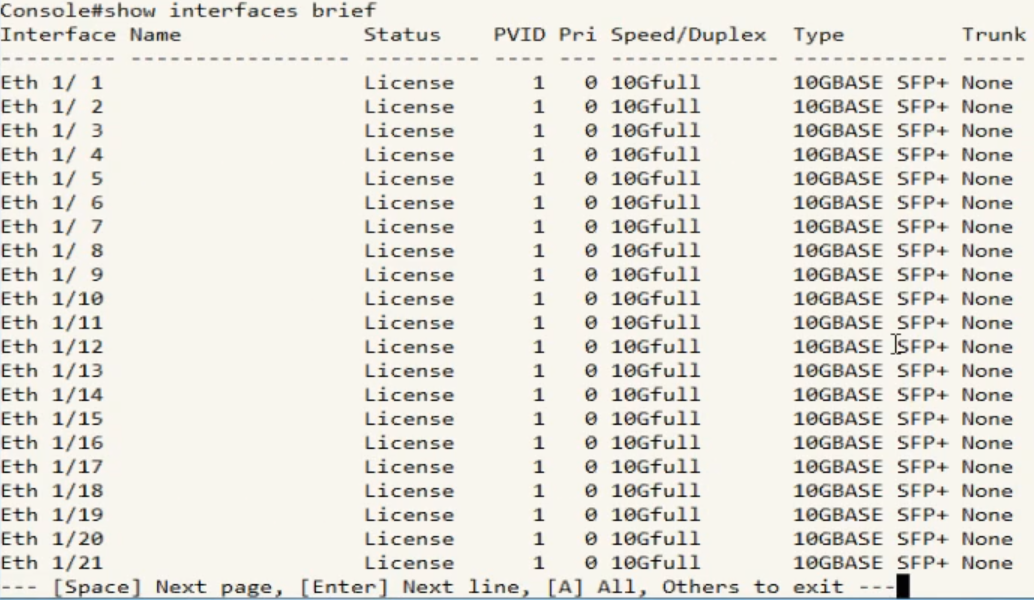
Enter
show interfaces brief
Status columns shows license. The above means that your license file has not been downloaded yet.
configure ip address

Enter
interface craft
Then
ip address 192.168.1.1/24
Then
EX
Then
ex
Put your license file into your tftpboot repository (the one on your computer). Go back to the switch, configure an ip address on management port and upload the file via tftp.
Copy tftp file

Enter
copy tftp file
You can now copy the license file on the switch, then choose the ip you configured earlier.
Choose 3 for license file and finally, give the name of your license file.
Show license file
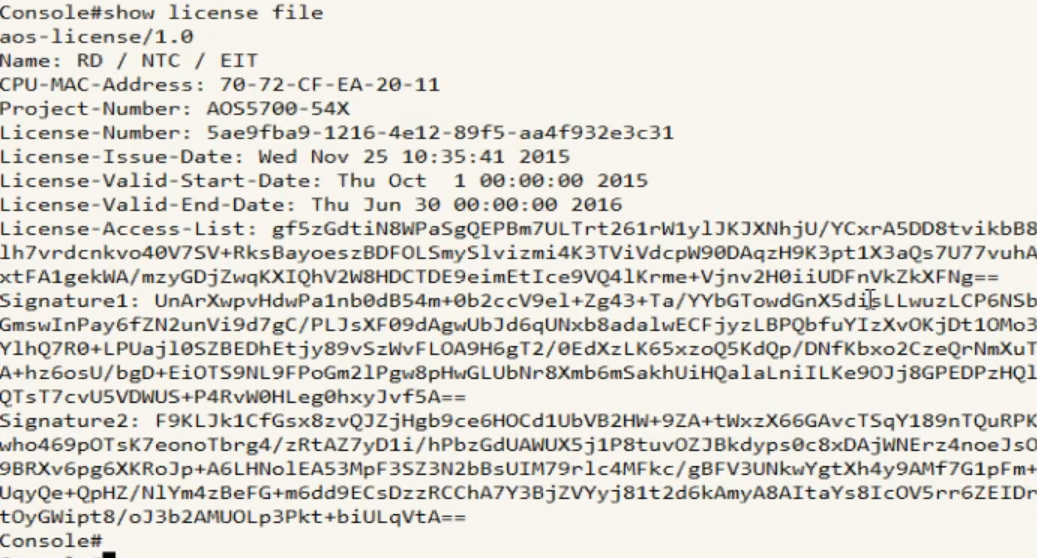
Enter
show license file
If you type show license file now and did everything correct, you should see it. It means that it worked.
Show interfaces brief
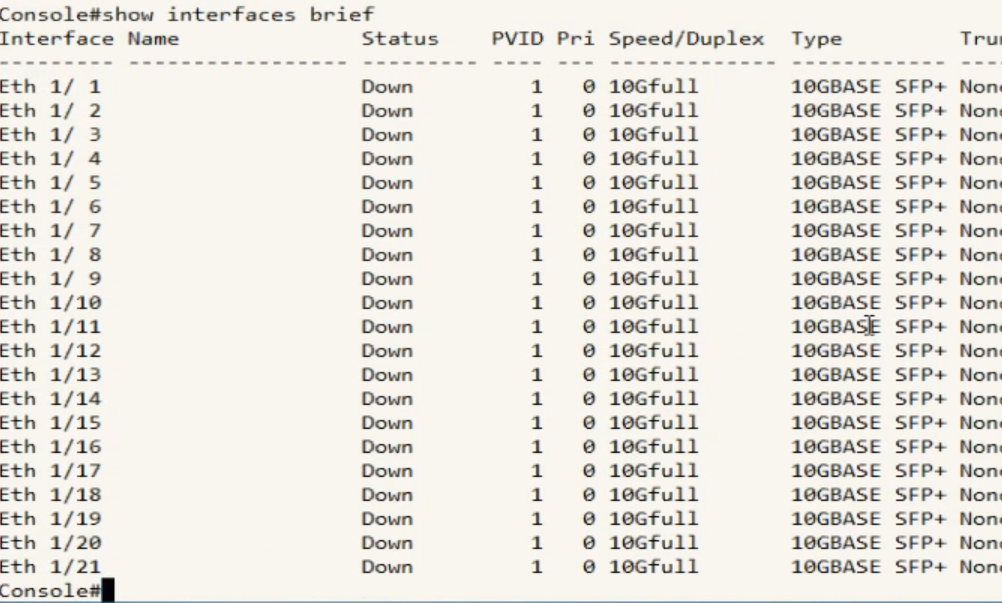
Enter
show interfaces brief
Status column changed to down. That means that your license file was correctly downloaded.
Now that AOS is installed, you can follow the tutorial to configure the switch here. Every times you wan to go back to ONIE shell after rebooting, press the esc button.
We have installed AOS in order to configure the switch. The next step would be to install babel and re6stnet.
Thank You
- Nexedi GmbH
- 147 Rue du Ballon
- 59110 La Madeleine
- France