Introduction
In ERP5, stock quantities are calculated in real time by summing all incoming movements, for example purchase packing lists and by subtracting all outgoing movements, for example sales packing list, consumptions from production or disposal.
Table of Contents
Stock Management in ERP5
It is a common business practice in stock management to periodically perform an inventory. The purpose is to count all items in the stock at each warehouse and to check that this physical inventory matches with the theoretical inventory as it is registered in the system. There can be differences, for example due to human errors or stolen items, in this case we need to update the stock level so that they reflect reality.
In ERP5, this is done by entering the actual quantities for each product in an inventory document. Once the inventory documented is validated, the system will automatically adjust the stock quantities to the quantities defined in the inventory document.
Note: From the inventory module you can print a stock report. This report can help to perform the inventory, because it gives you a list of all products which are registered to be in stock.
Steps
The procedure to create an inventory goes as follows:

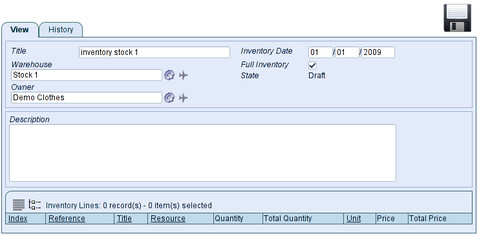
- Inventory name: Choose a name for the inventory
- Warehouse: Choose the warehouse related with this inventory
- Owner: Choose who is the owner of the goods in this inventory
- Inventory Date: Choose the date of the inventory
- Full Inventory: Choose if it is a full inventory or partial inventory. If Full Inventory is checked, this means that all products, which are not listed in this inventory have zero stock for this warehouse and this owner.
- Save the informations thanks to the floppy disk icon
- Add inventory line: 'Action' >> 'Add Inventory Line'
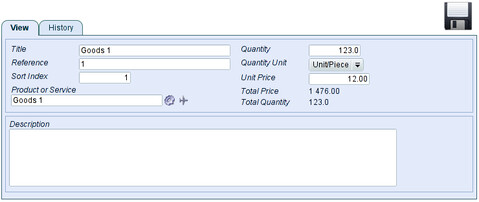
- Fill in the information:

- Title: Choose a title for the Inventory Line
- Reference: Choose a reference for the Inventory Line
- Sort Index: Choose an index if you want to sort inventory lines in a particular order
- Product or Service: Choose the Product concerned about this inventory line
- Quantity: Enter the quantity of product
- Quantity Unit: Enter the quantity unit (can be automatically filled in if you chose the product and saved)
- Unit Price: Enter the unit price
- Add as many Inventory lines as you want
- Validate the inventory: 'Action' >> 'Validate Inventory'
- Option step: Add multiple inventory lines with Fast Input
- Click fast input icon in tool bar
- In the fast input view, type in references of product and quantities, you can input 10 products at once.
- Click Update, you will see product names and prices and total prices calculated.
- Click Add lines to add all these inventory lines to this inventory document.
Related Articles